Quoting Basics
Learn how to create, edit and send quotes to customers using Cooledge
Quoting Basics
Learn how to create professional air conditioning quotes, manage customer information and send quotes that convert leads into sales.
You can quote from either surface. The mobile app is built for the van and the customer's driveway: three steps, big controls, PDFs generated on the phone. The web portal is built for the desk: the same quote types, more of the form on screen at once and a live pricing panel beside it. A quote started on one shows up immediately on the other, so a site visit on the phone can be finished in the portal.
Download the App
- iOS: Search "Cooledge" in the Apple App Store or Download Here
- Android: Get it on Google Play
1. Quote Creation Overview
Available System Types
Cooledge supports multiple air conditioning system types:
- Split System: Individual indoor/outdoor units
- Ducted System: Central air with ductwork
- Multi System: Multiple indoor units, one outdoor unit
- VRV System: Variable refrigerant volume systems
- Install Only: Installation of customer-supplied equipment
- Repair Parts: Parts replacement quotes
- Repair Leak: Leak detection and repair quotes
- Kits & Items Quote: Free-form line items, kits and options, for anything the system types don't cover
Every one of these can be created and edited on both surfaces. Repair Parts and Repair Leak were portal-only gaps for a while and no longer are.
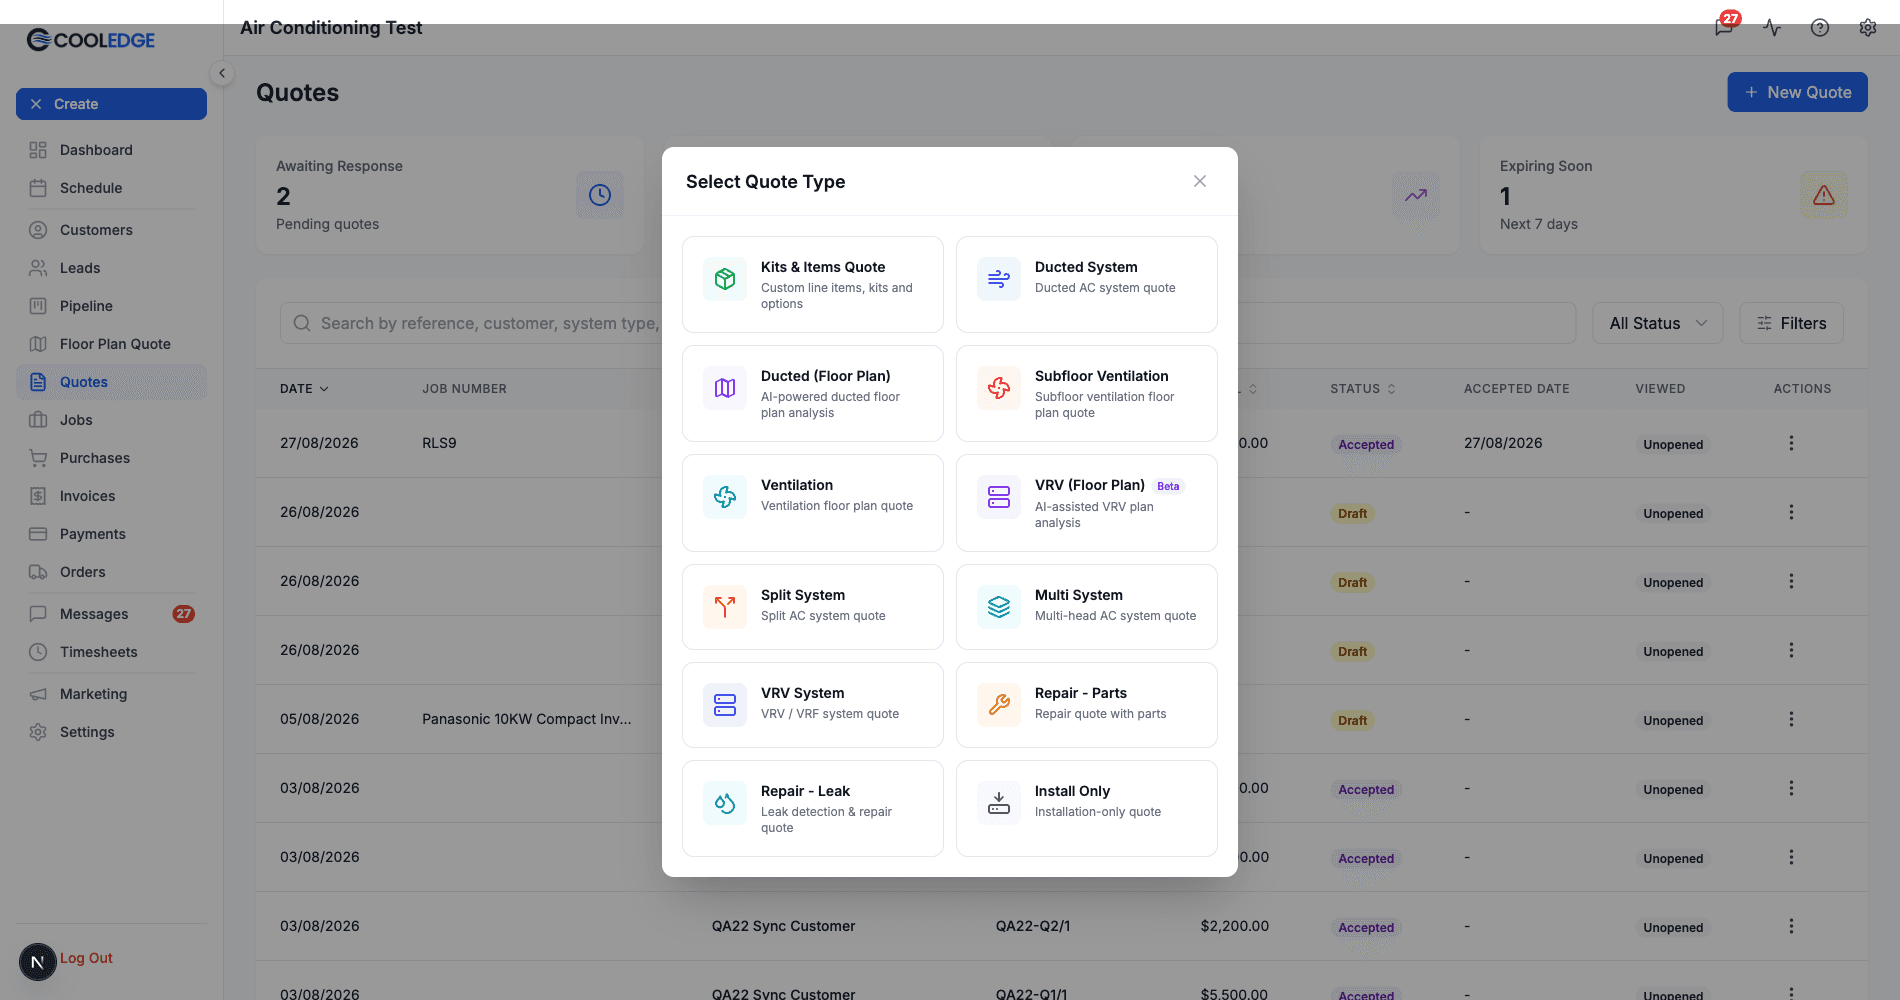
The portal adds a few types the app doesn't have, because they need a floor plan and a big screen: Ducted (Floor Plan), VRV (Floor Plan), Ventilation and Subfloor Ventilation. Which tiles you see depends on your industries. See Floor Plan Scanning →.
Starting a Quote
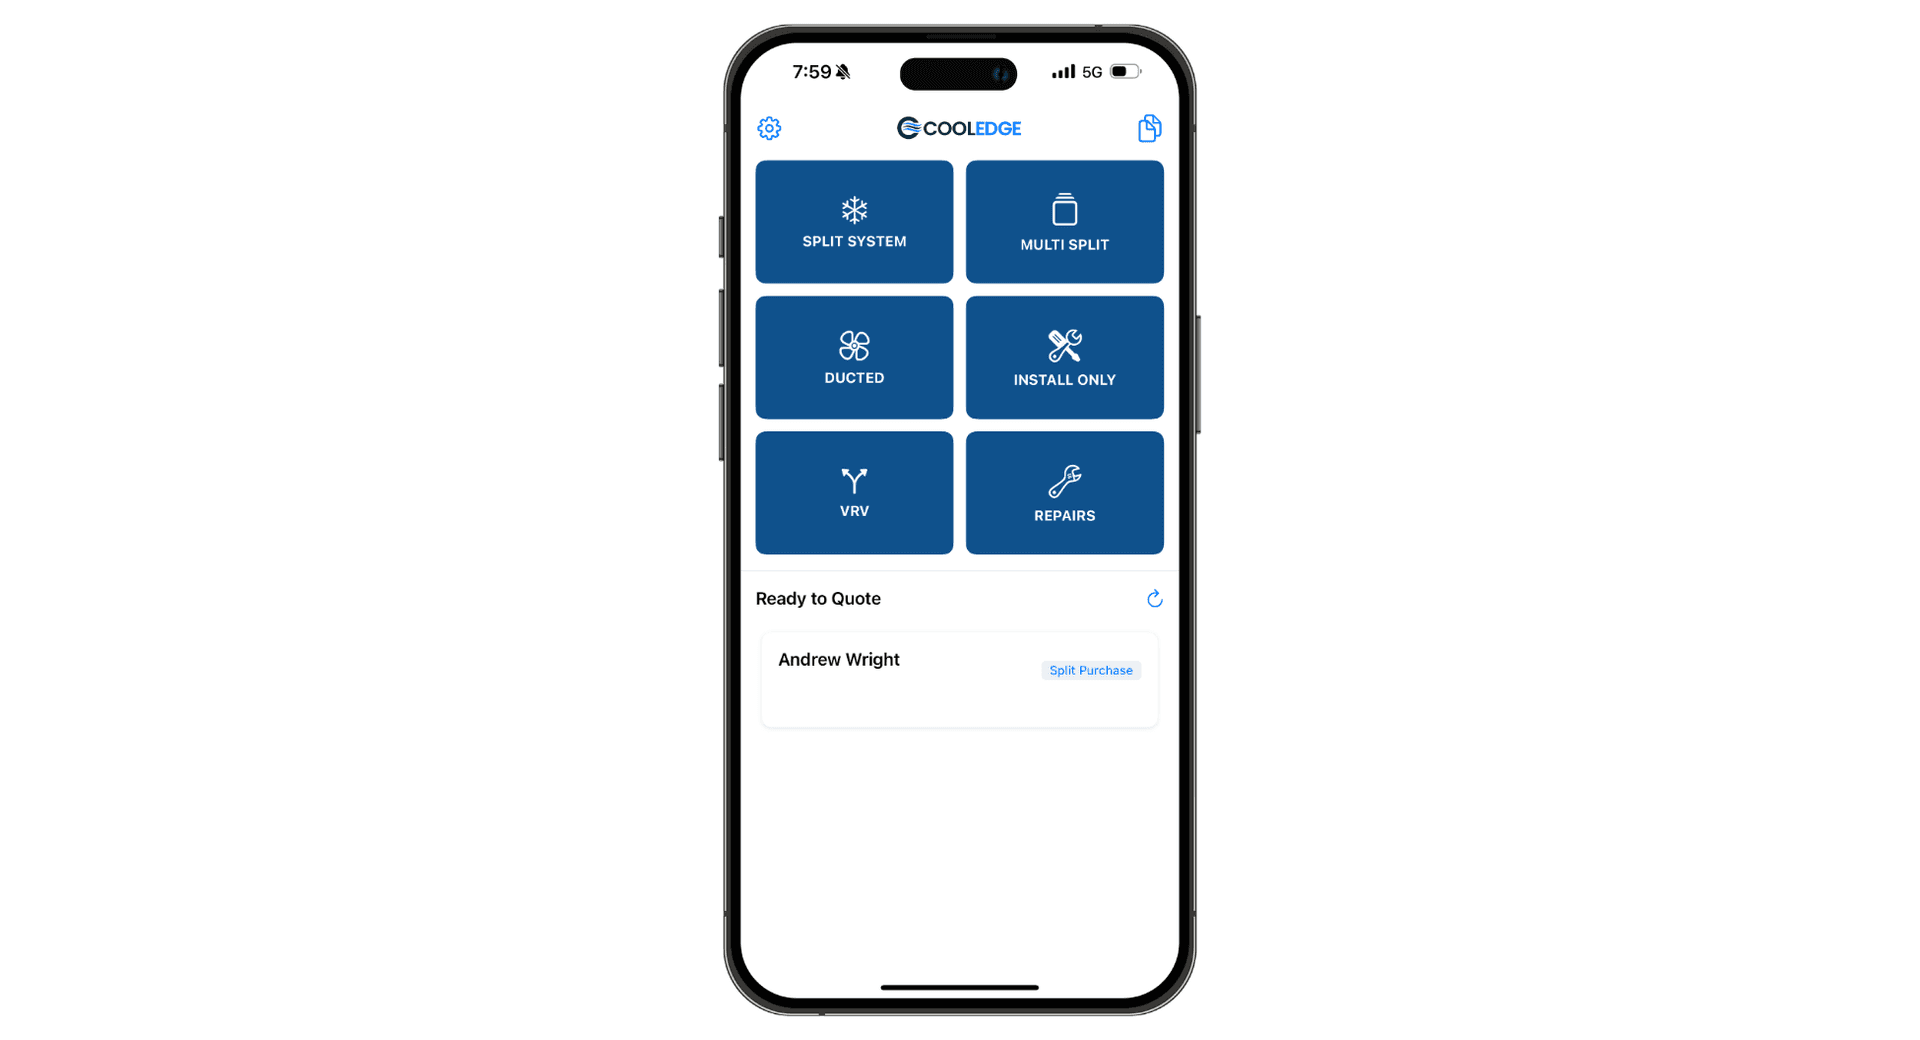
In the mobile app, tap the + button on the Home screen, choose New Quote, then pick the system type.
In the portal, go to Quotes and click New Quote (top right), then pick a tile.
2. Creating Your First Quote
Step 1: System Selection and Configuration
In the mobile app this is step 1 of 3, headed Installation Details: pictures, then unit selection, then the install fields, then Power Supply and Labour. Required fields are outlined in red until you set them and Next won't move on until they're done.
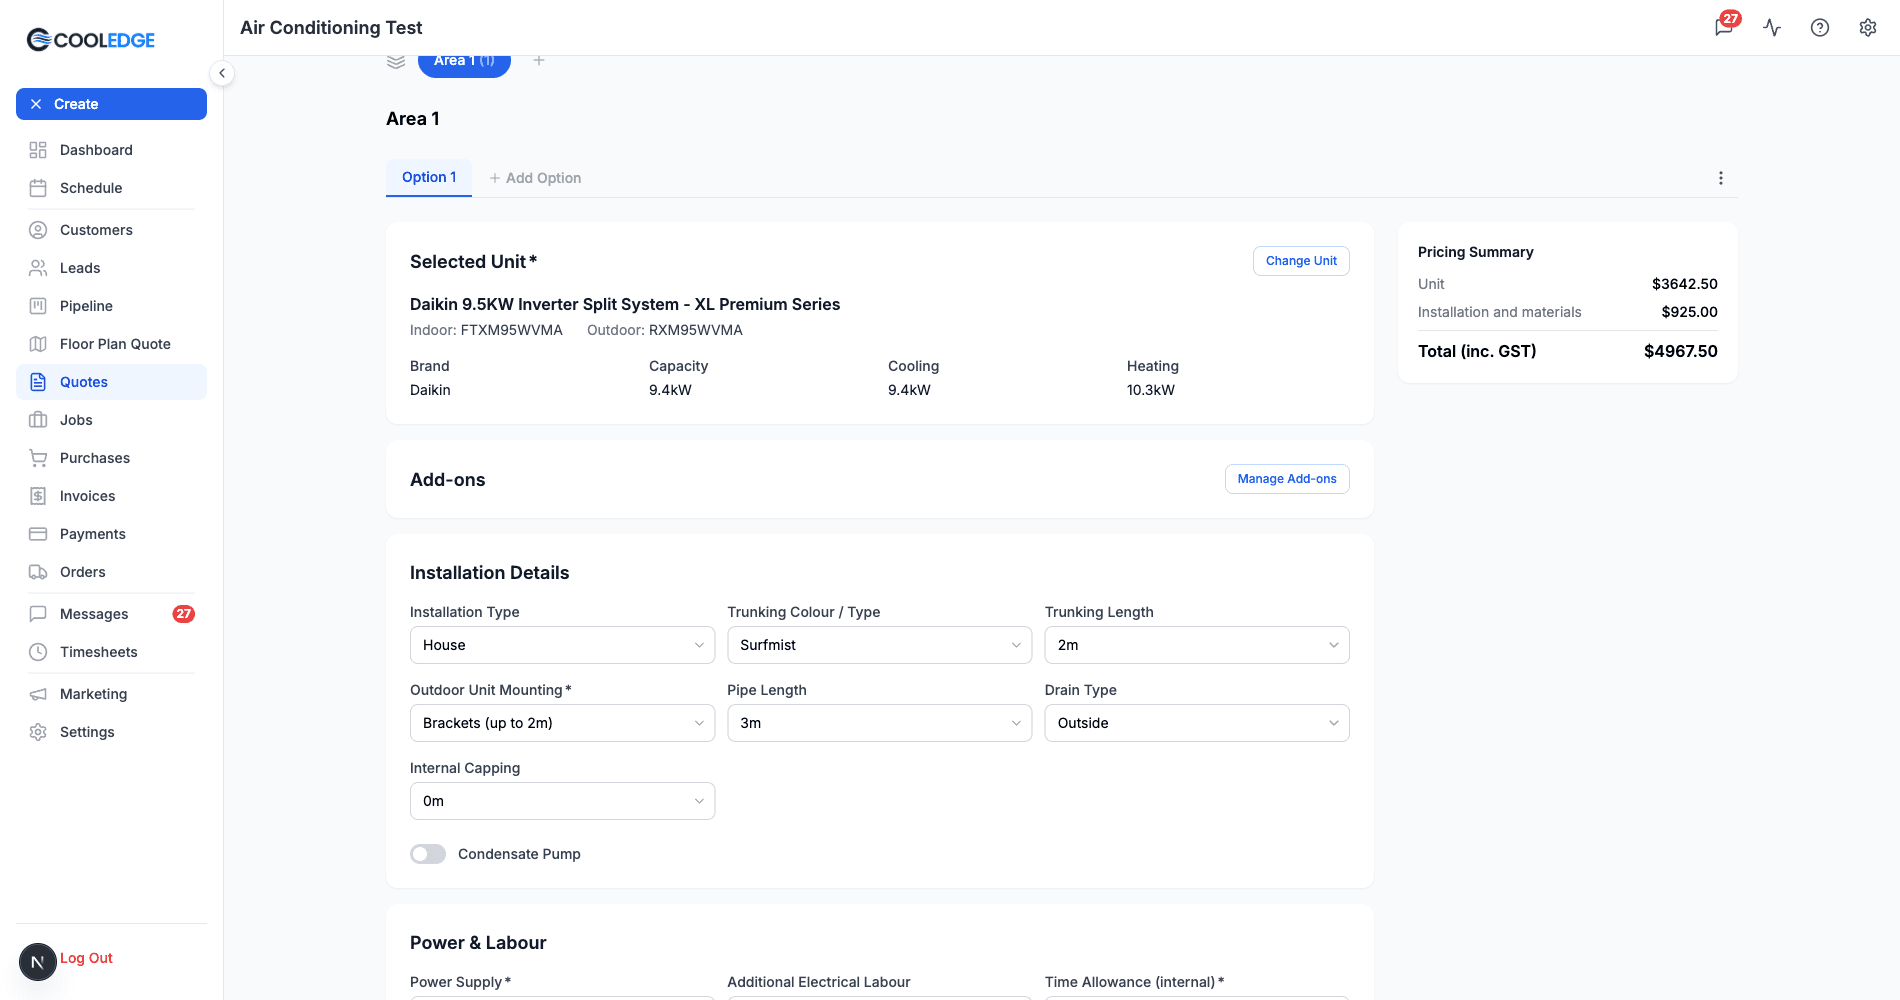
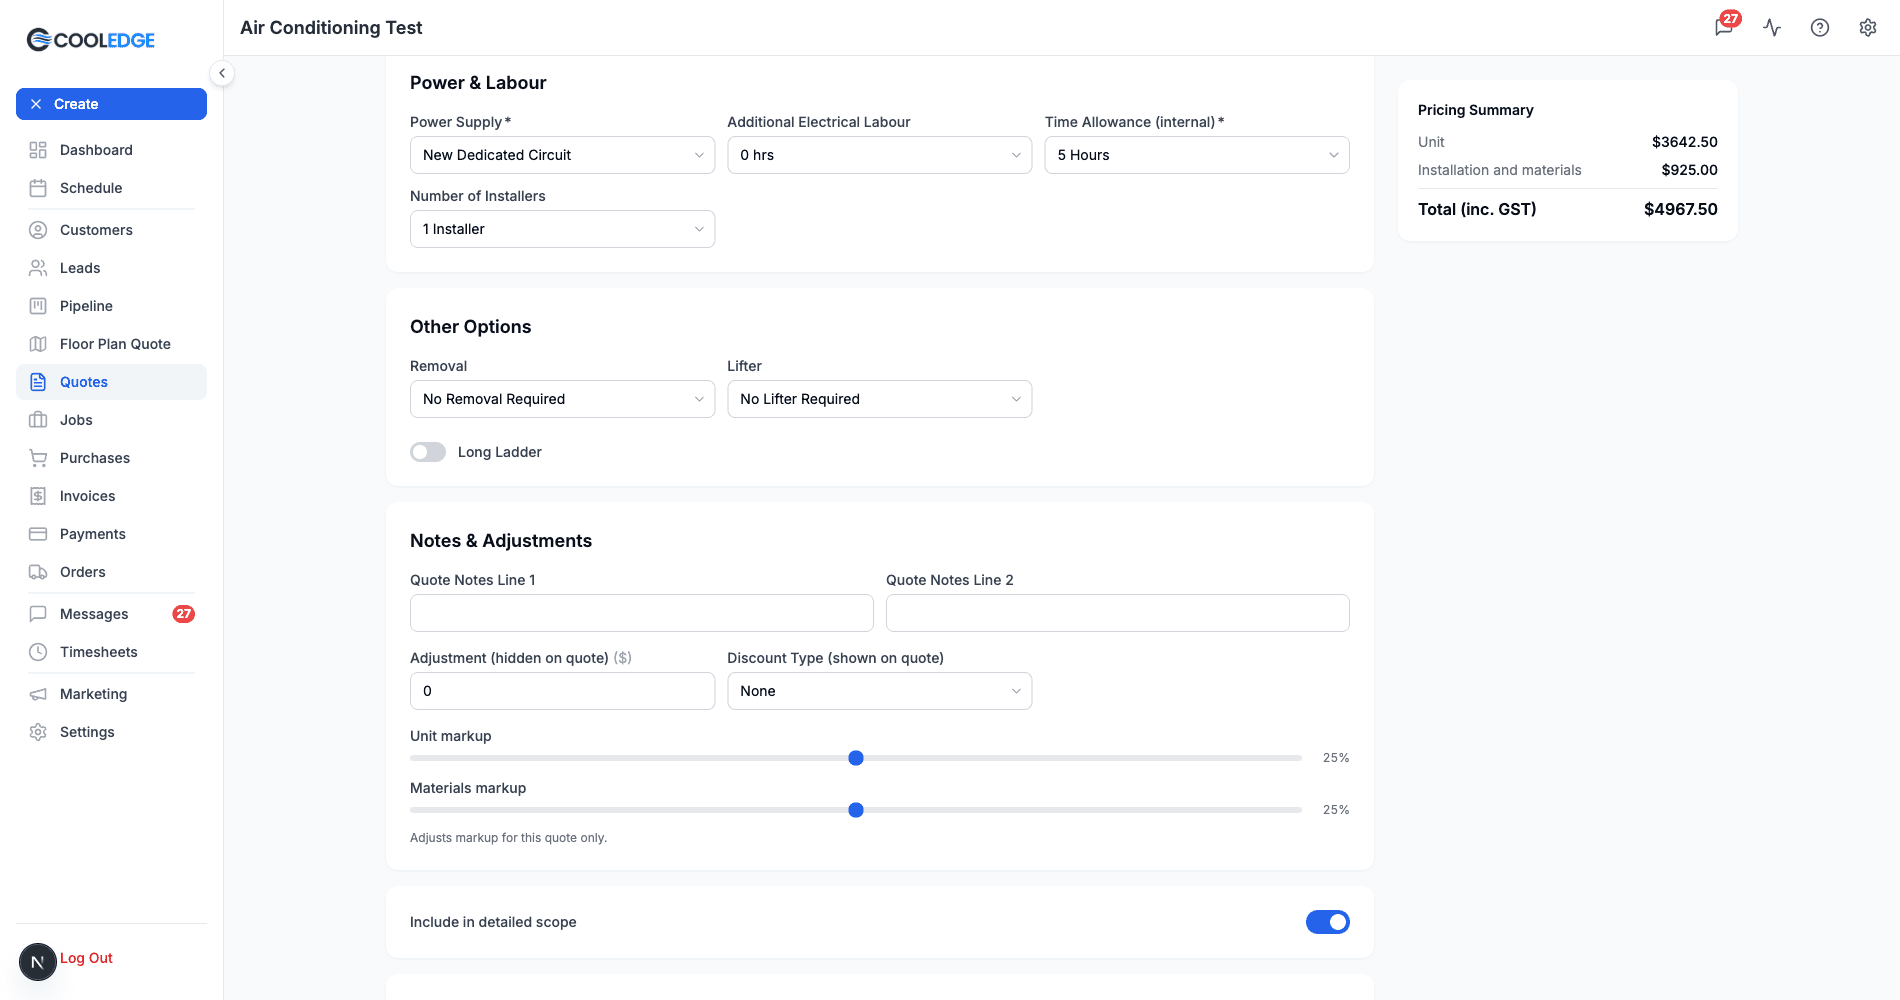
In the portal the same fields sit on one scrolling page, split into cards (Selected Unit, Add-ons, Installation Details, Power & Labour, Other Options), with a Pricing Summary panel that updates as you go.
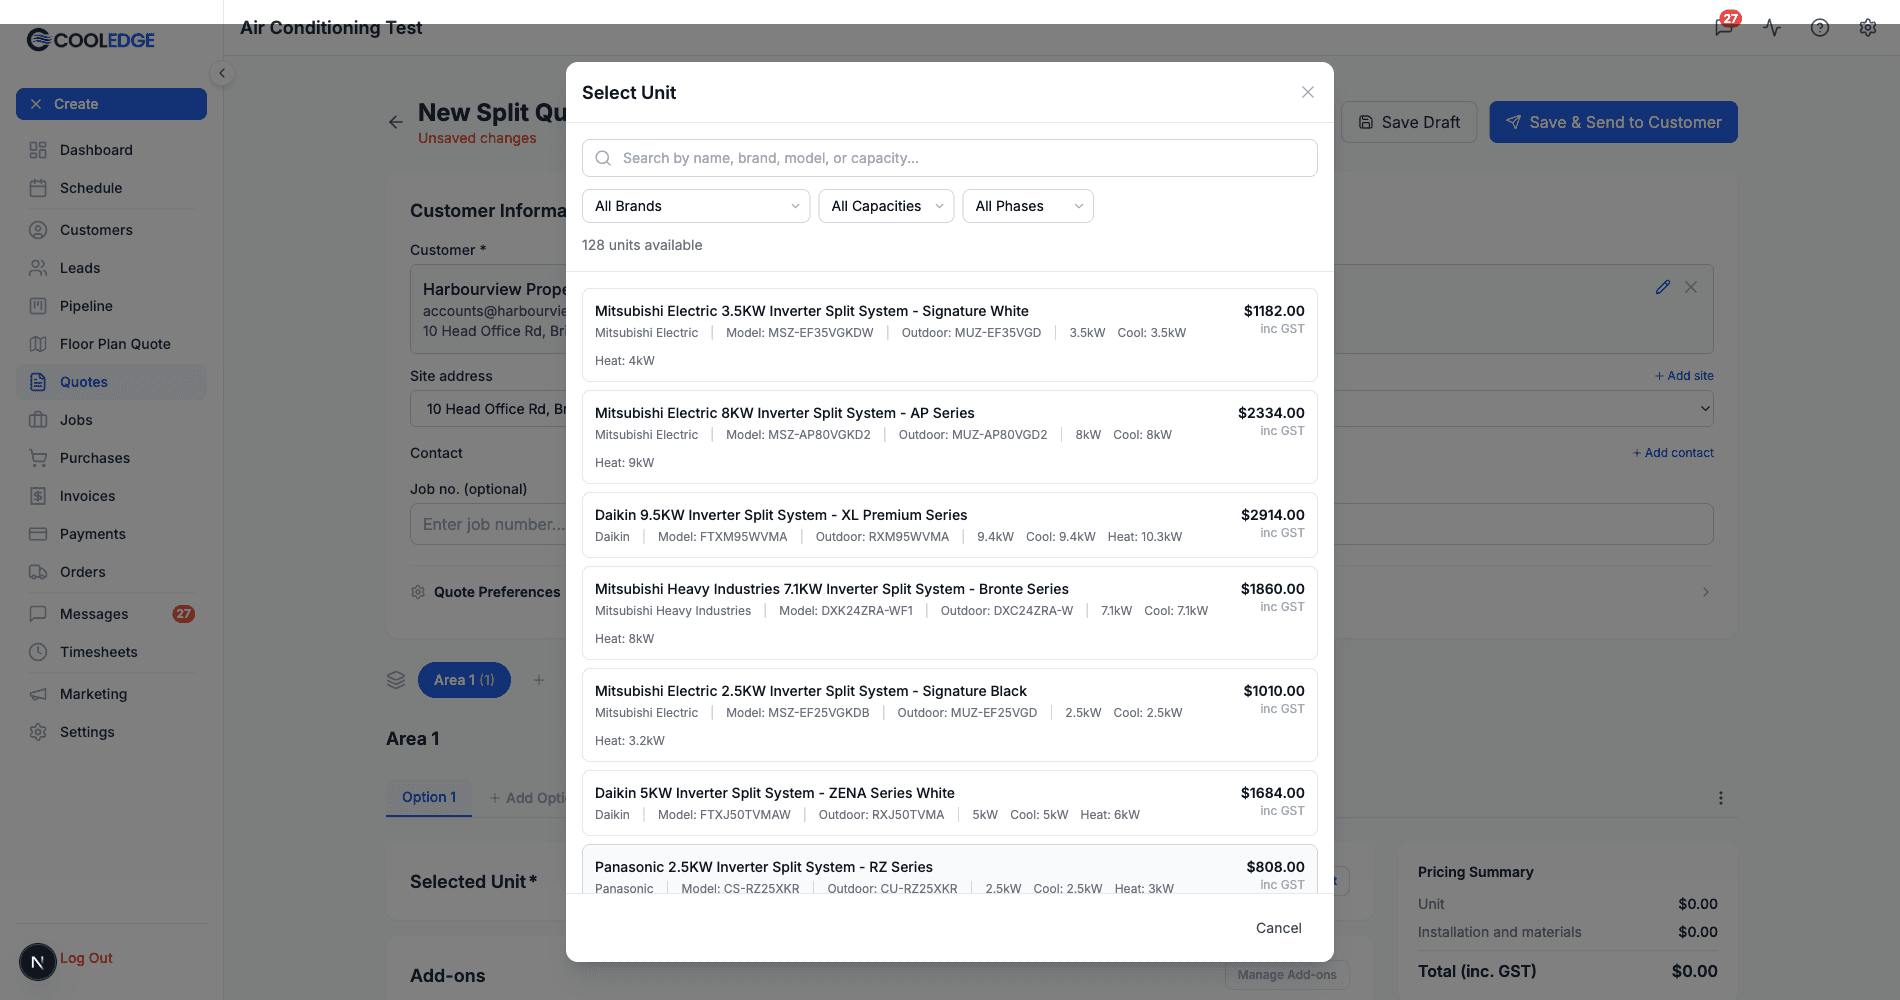
Either way you pick the unit from your own product catalogue, filtered by brand, capacity and phase.
For Split Systems:
- Select Unit: Choose from your product catalog
- Installation Type: House or apartment
- Pipe Length: Distance from indoor to outdoor unit (starts at 3m)
- Trunking: Decorative covering for pipes
- Power Supply: Electrical requirements
- Mounting Options: Indoor and outdoor unit mounting
For Ducted Systems:
- Select Unit: Choose ducted system from catalog
- Installation Type: New installation, replacement or upgrade
- Return Air Configuration: Fresh air, existing or new return
- Ductwork Type: Flexible or rigid ductwork
- Controller Options: Wall controller type and location
- Outlet Configuration: Number and type of outlets
System-Specific Tutorials:
- Split System Tutorial →
- Ducted System Tutorial →
- Multi System Tutorial →
- VRV System Tutorial →
- Install Only Tutorial →
- Repair Parts Tutorial →
- Repair Leak Tutorial →
Advanced Quote Configuration:
- Add-ons: Additional equipment (smart controllers, WiFi etc.)
- Custom Pricing: Price "Adjustments" for special circumstances
3. Pricing and Options
Understanding Quote Pricing
Base Components:
- Unit Cost: Air conditioning equipment price
- Installation Labor: Standard installation time and complexity
- Materials: Pipes, fittings, electrical components
- Add-ons: Optional equipment and services
Pricing Adjustments:
- Labor Adjustments: Account for difficult installations
- Material Variations: Adjust for site-specific requirements
- Adjustment (hidden on quote): A dollar amount added to the total that is never shown on the customer's quote. Negative adjustments are only available when the owner enables "Allow negative adjustments on quotes" in Settings > Quote Preferences > Quote Options
- Markup sliders (per quote): Adjust unit and materials markup on a single quote without changing your catalogue defaults, available once the owner enables "Allow markup adjustment on quotes" in Settings > Quote Preferences > Quote Options. See Quote Preferences →
- Discounts: Apply customer-specific pricing. Unlike the adjustment, discounts and rebates do show on the customer's quote
In the portal these live in the Notes & Adjustments card at the bottom of the option, with the markup sliders underneath. On mobile they're in the Notes & Adjustments section of the same step.
Managing Multiple Options
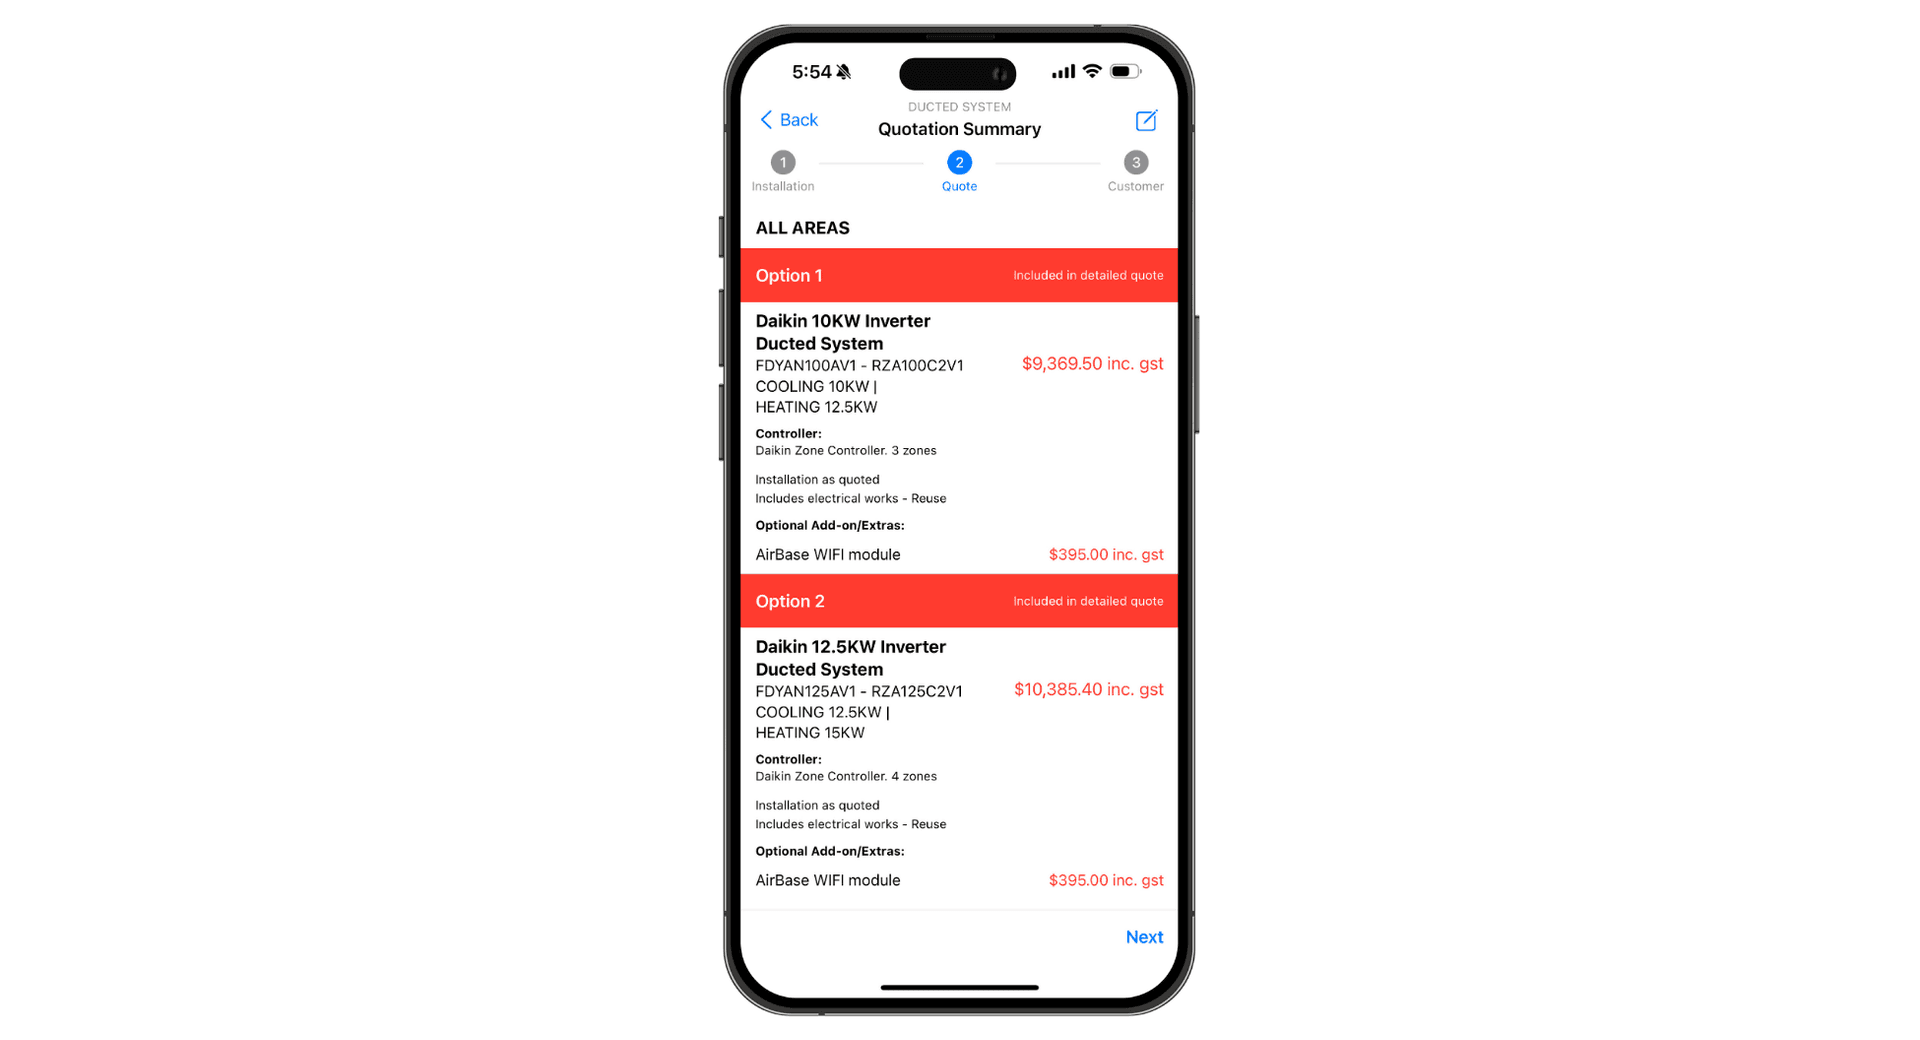
- Option Comparison: Present 2-3 options per area
- Good/Better/Best: Different service levels and equipment
- Include/Exclude Options: Control which options appear in detailed quotes
Add an option in the portal with + Add Option next to the Option 1 tab. On mobile, tap the ... on the option header and choose Duplicate, then swap the unit on the copy. Duplicating is usually quicker than building the second option from scratch, because the install details rarely change between them.
Step 2: Customer Information
When creating a new quote, you'll need:
Required Details:
- Customer Name: Full name of the customer
- Job Number: Optional reference that prints on the quote PDF as "Job No.". If your business is connected to ServiceM8, enter a ServiceM8 job number and press Load to fill in the customer details automatically. See ServiceM8 Integration
- Customer Address: Installation address
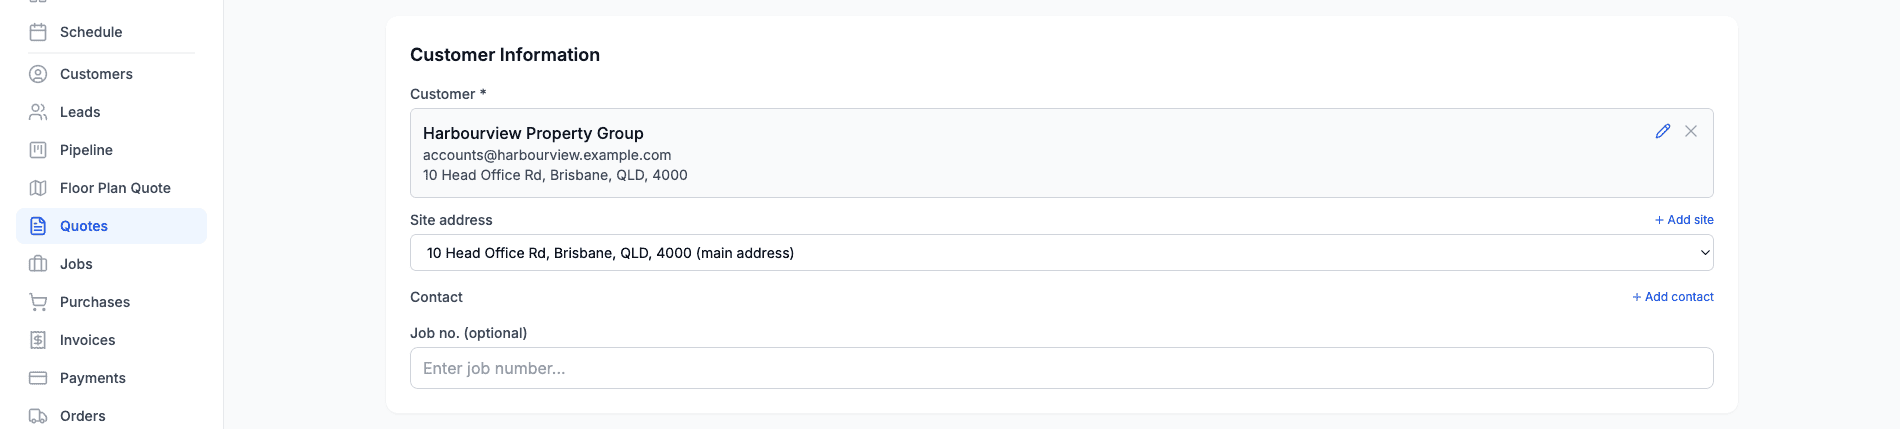
- Site address: If the customer has more than one address saved, a picker appears here, preset to their main address. Choose the one the work is for and the quote PDF, the quote email and any job or invoice made from the quote all use it. Every customer also gets an Add site link, so a new address can go on without leaving the quote. See Managing Customer Sites and Contacts
- Email Address: For sending the quote link
- Contact: If the customer has contact people saved, a contact picker appears here. It starts on the primary contact and you can switch to another person or choose no specific contact. The quote email then goes to whoever is selected.
- From a lead: A quote created from a lead auto-populates the customer details and stays linked to that lead
In the portal this is the Customer Information card at the top of the editor, pictured above. Search for the customer, or use Create new customer in the results to add them without leaving the quote.
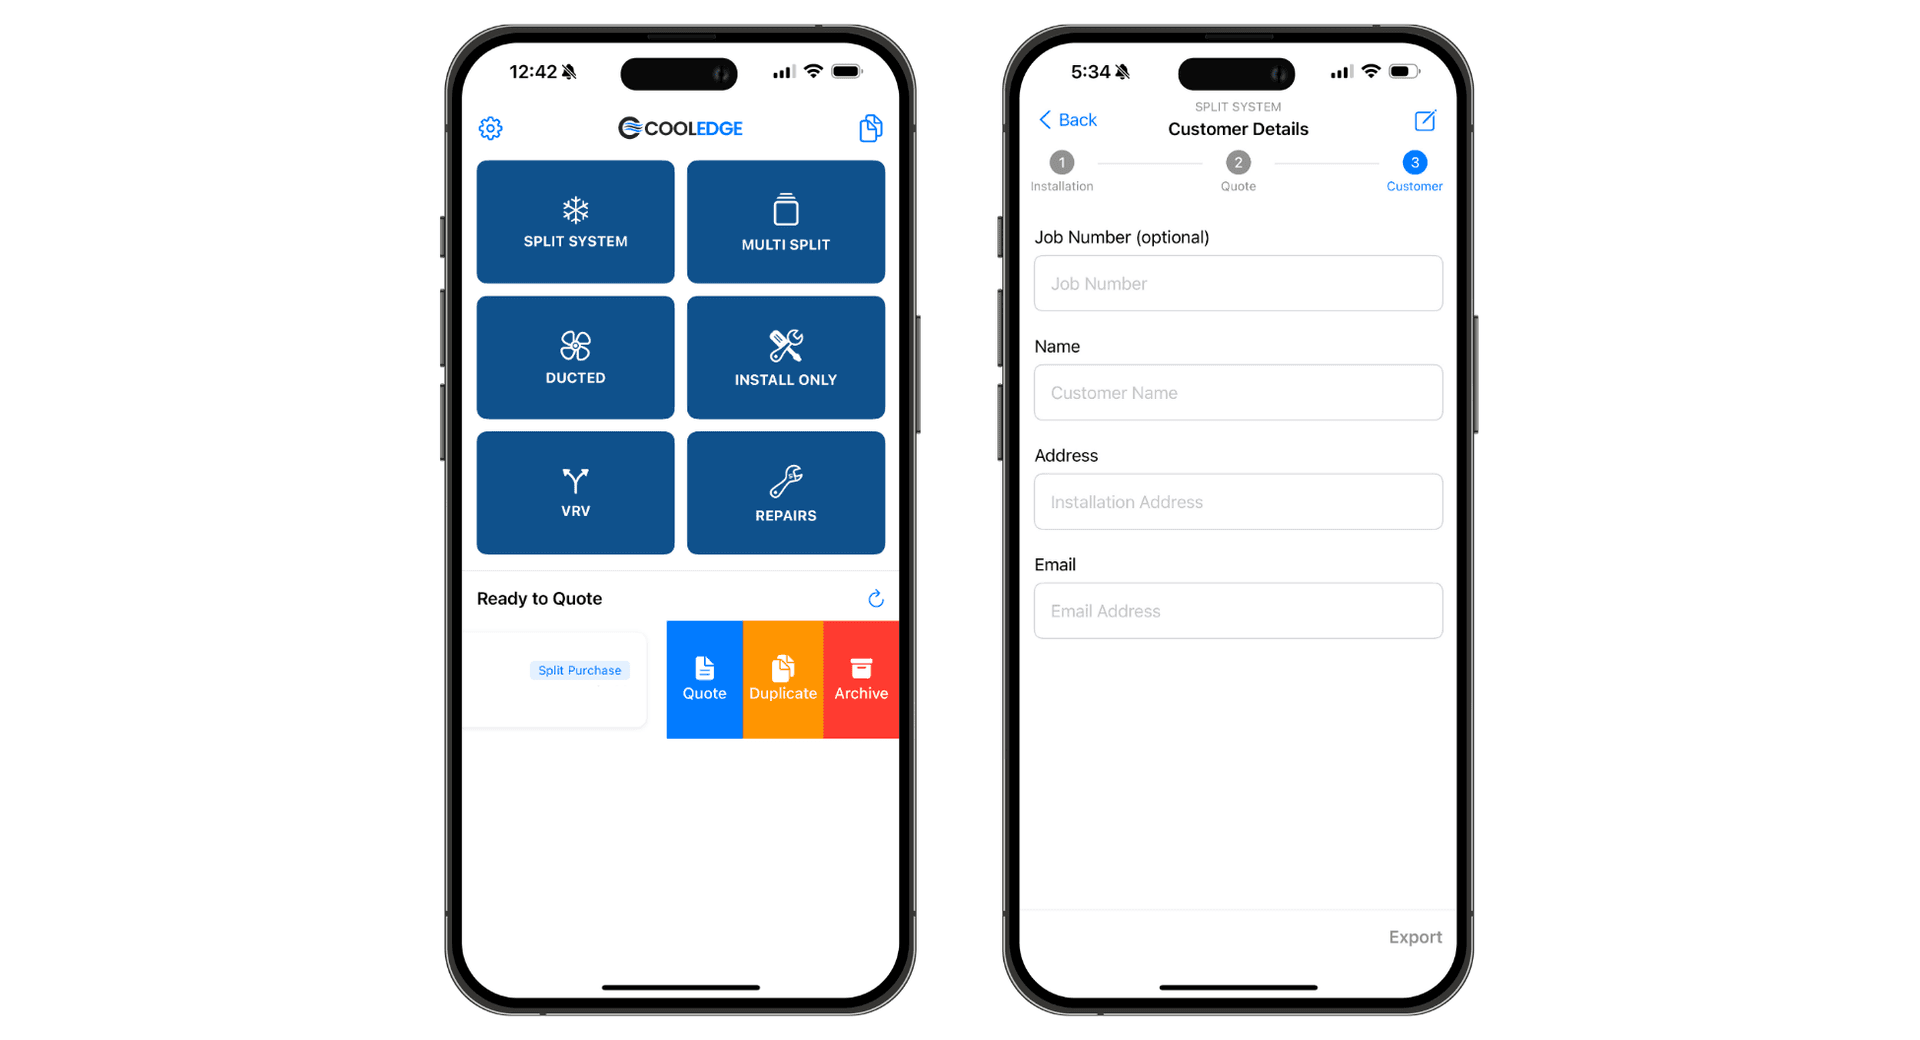
In the mobile app it's step 3, Customer Details. Tap Select Customer, search, and pick. The site address then appears as a row of pills rather than a dropdown, with a star on the main address.
4. Quote Generation and Delivery
Quote Output Formats
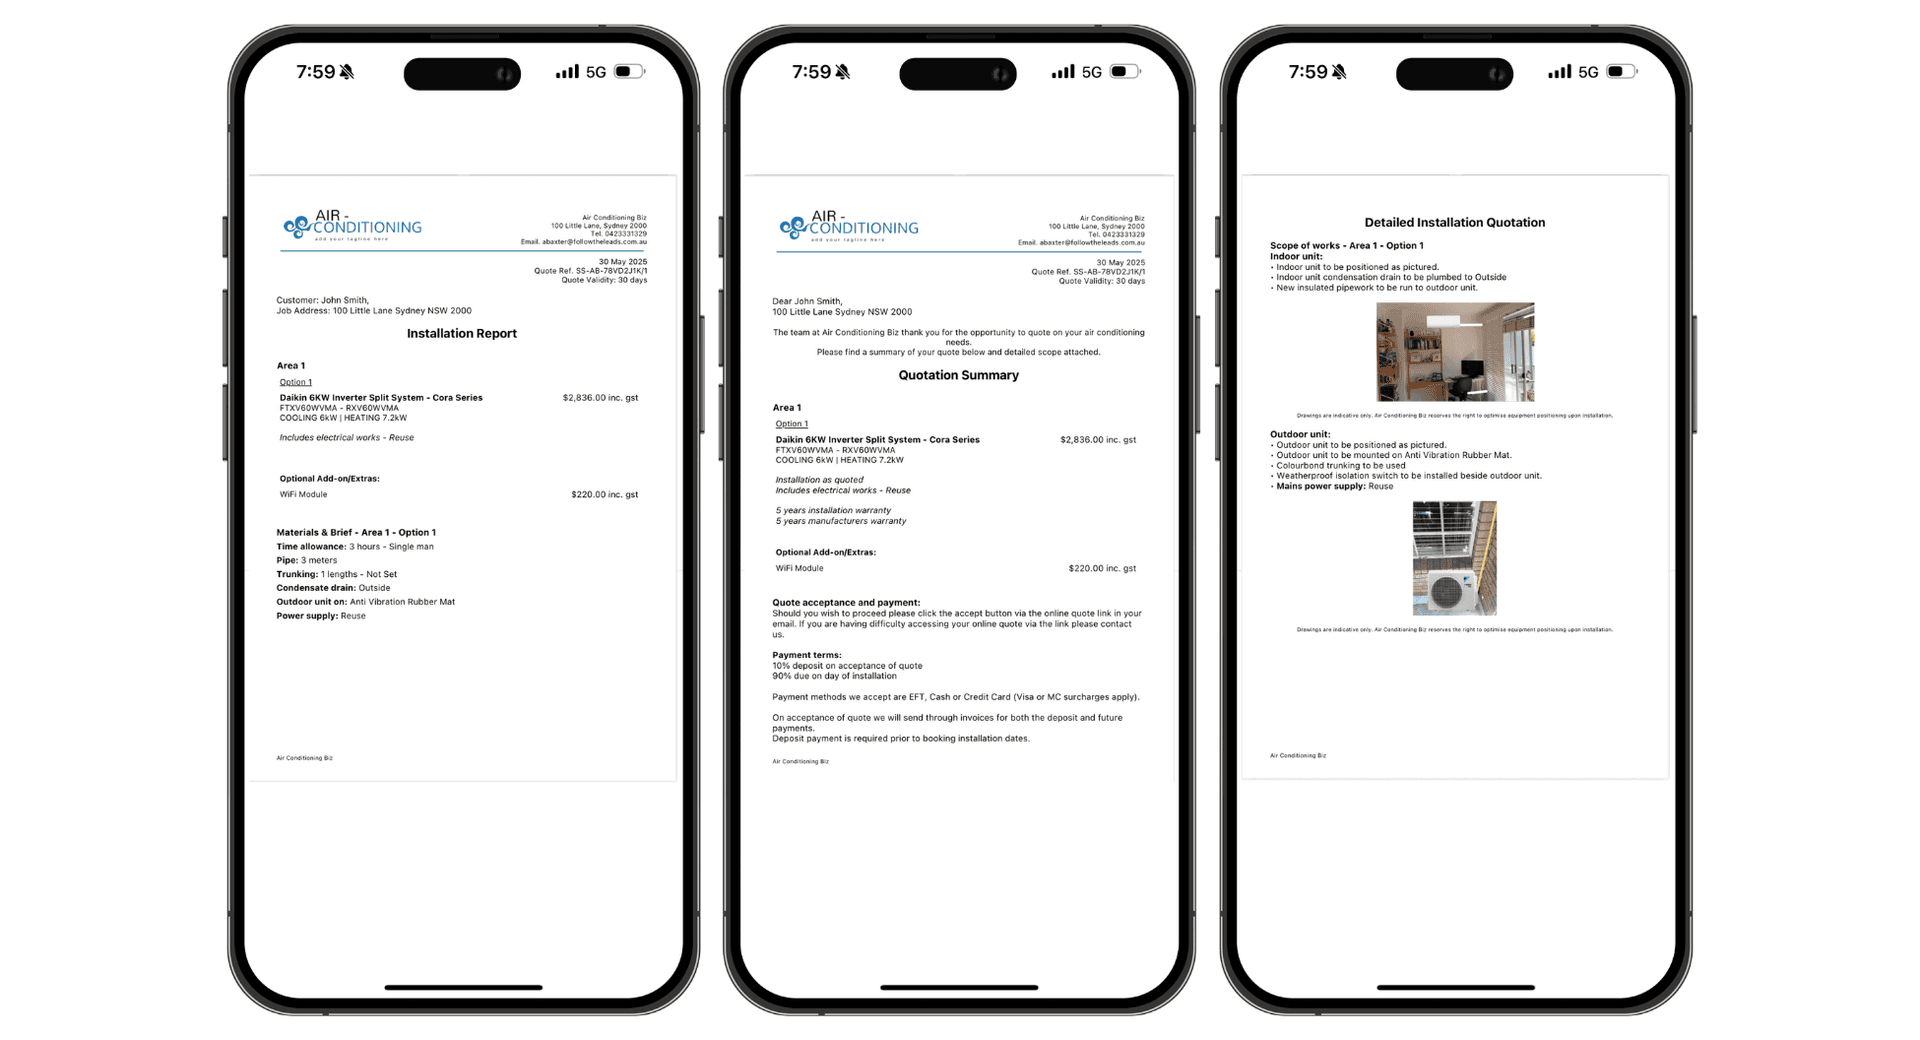
PDF Quote Document:
- Professional layout: Branded with your company name, details and logo
- Detailed specifications: Equipment details and installation scope
- Terms and conditions: Payment terms and warranty information
- Licenses and Insurances: Business related licenses and insurances
PDF Report Document:
- Installation Report/Work Order: For detailed breakdown of labour, parts or equipment required for each job. For your technicians or installers
Online Quote Link:
- Mobile-friendly: Optimized for customer mobile viewing
- Interactive: Customers can view pdfs and accept quotes online
- Payment integration: Optional deposit collection
- Tracking: See when customers view quotes
In the mobile app, Generate on the last step builds both documents on the phone. Tap either card to read it before it goes anywhere.
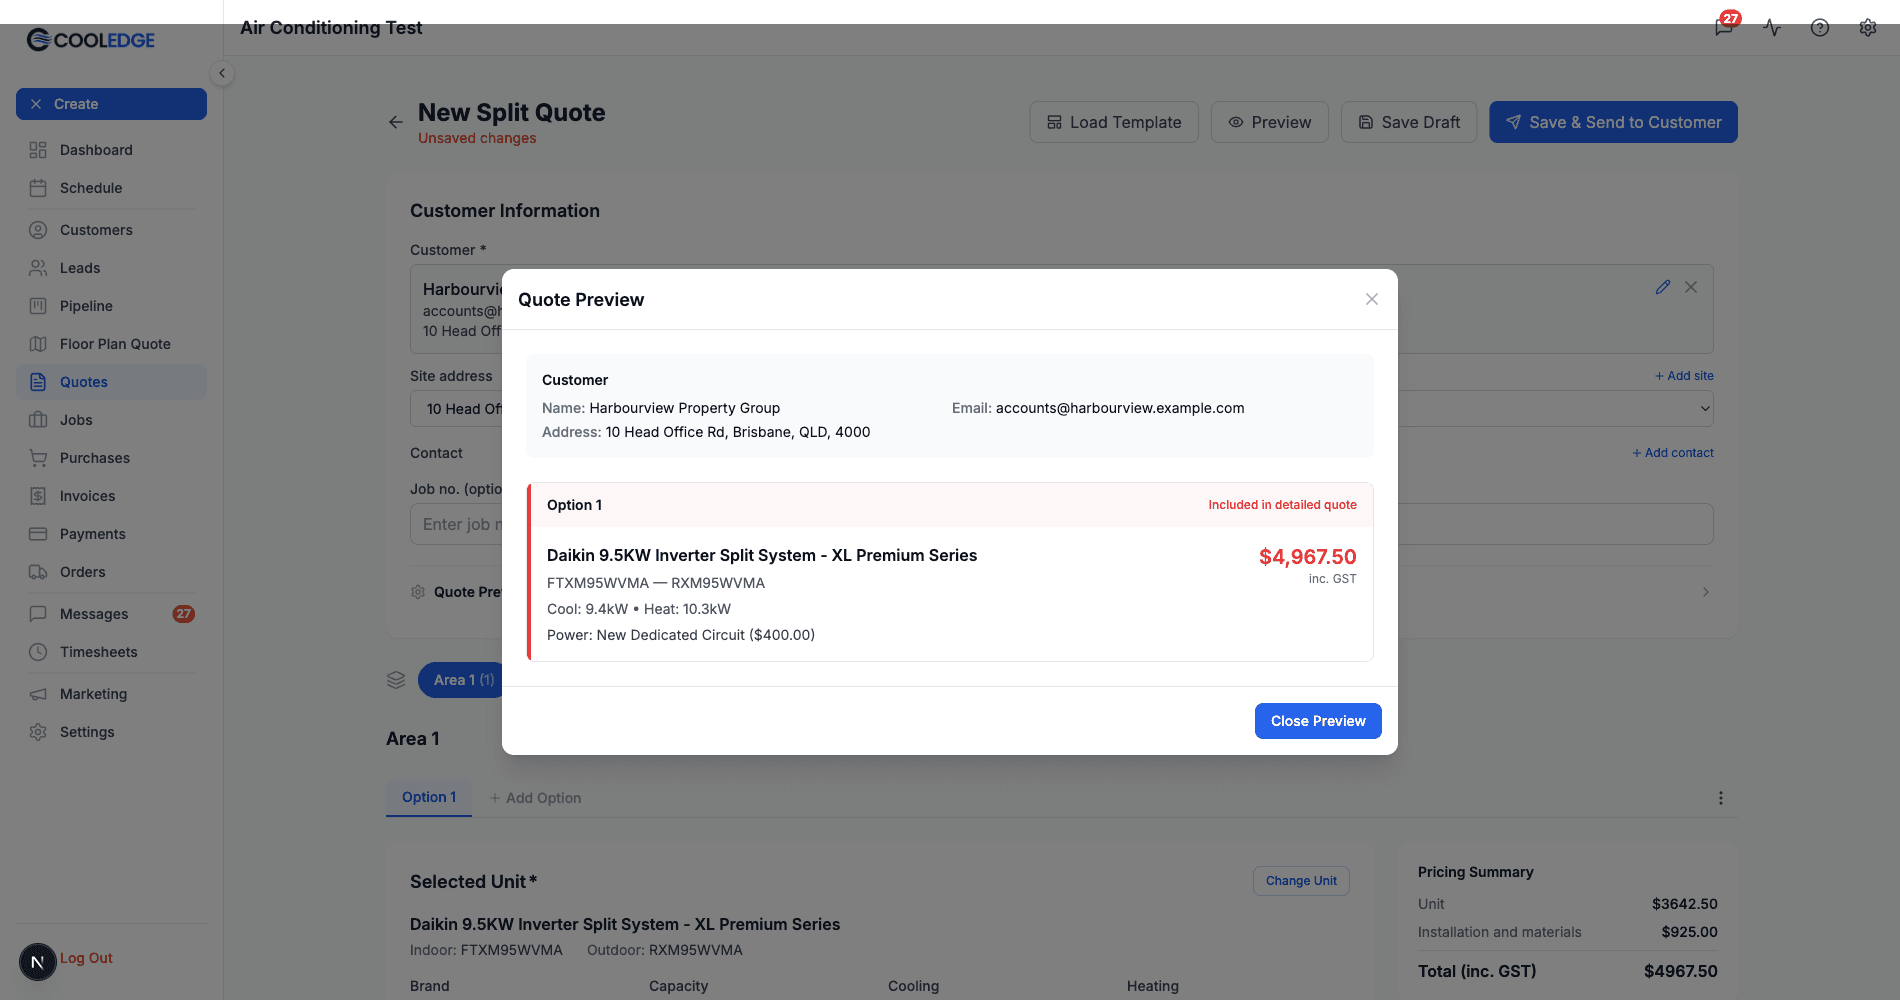
In the portal, Preview gives you a quick on-screen summary of what the customer will see, without generating the PDF.
Sending Quotes to Customers
Email Delivery:
- Review quote details: Verify all information is correct
- Send quote: Email includes online link
- Track delivery: See when quotes are viewed
Both surfaces open the same composer rather than sending blind. Save & Send to Customer in the portal, or Send to Customer on the phone, saves the quote, generates the PDF and opens the message with the PDF preview beside it. You can edit the subject and body, add a Cc or Bcc, switch to SMS, attach the quote PDF or extra files and send yourself a copy. Nothing goes out until you click Send email.
There's also Mark as sent without sending on mobile, for when you handed the quote over in person and just need the status to match.
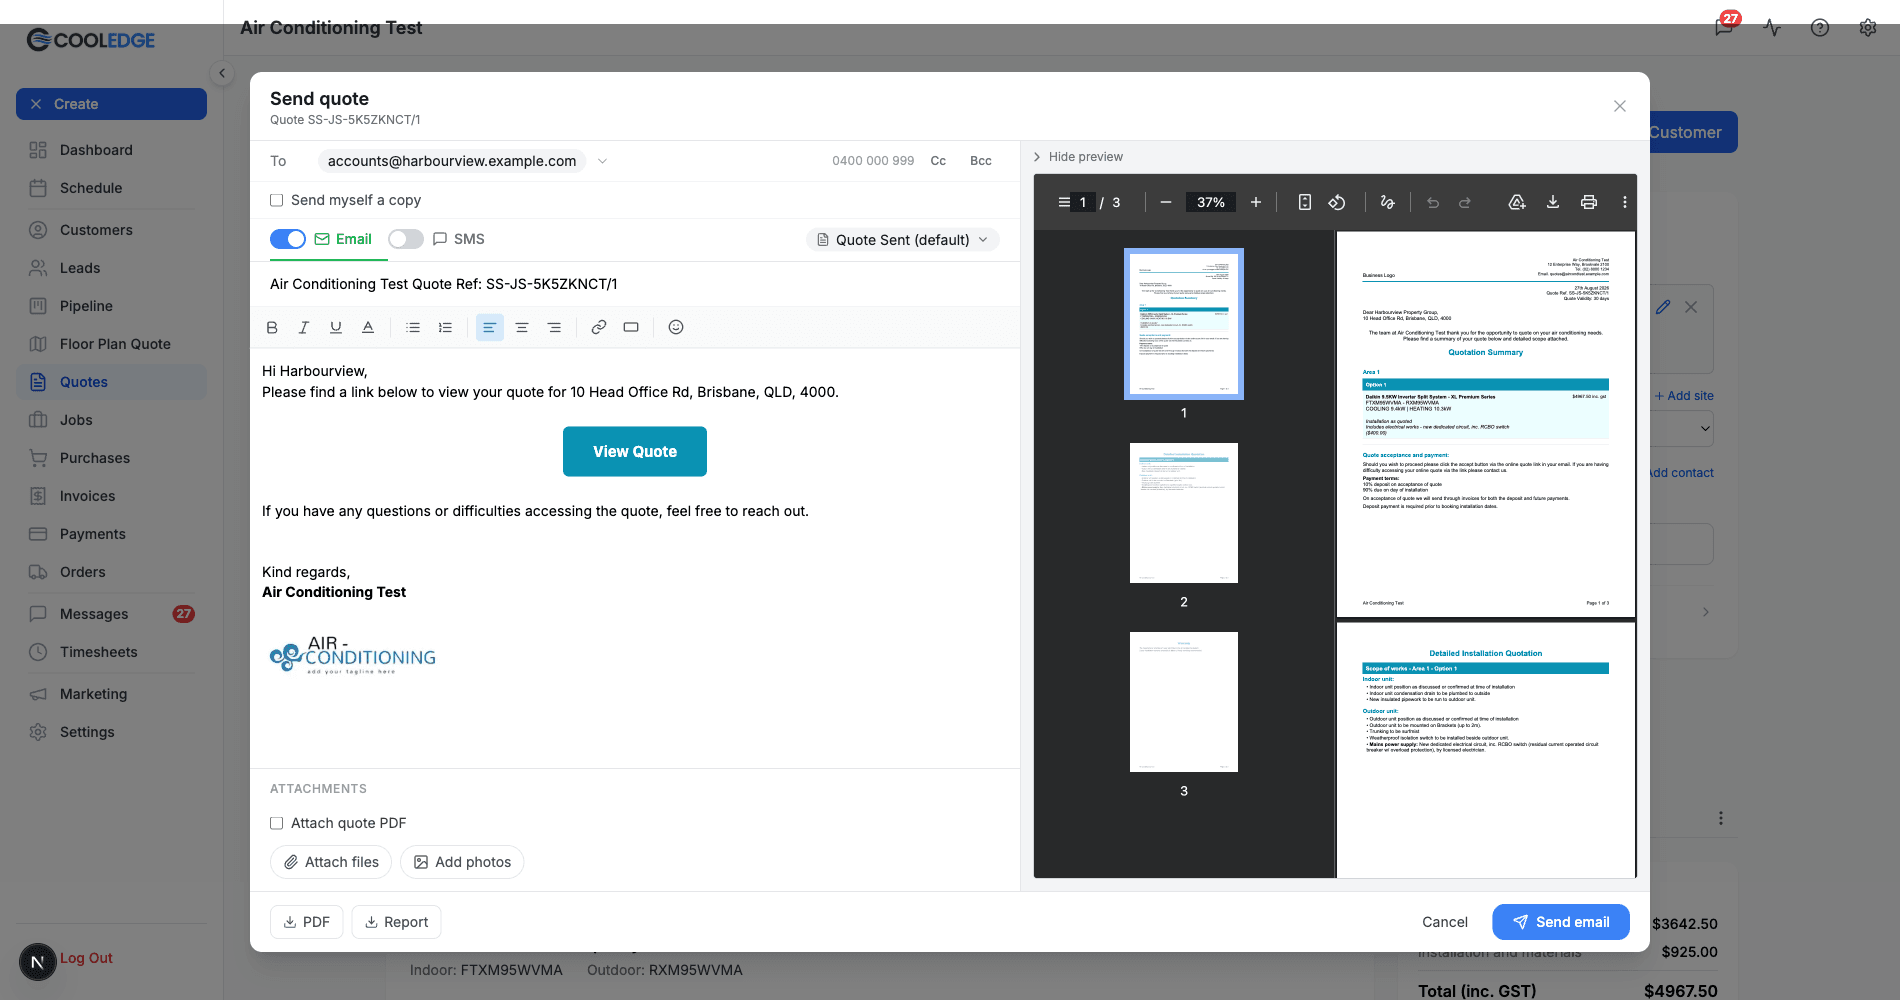
When a quote is linked to a contact person, the email goes to that contact's email address and greets them by first name. If there's no linked contact, or the contact has no email, Cooledge falls back to the customer's default email.
Quote Management:
- Quote Status Tracking: Pending, Viewed, Accepted, Expired
- Automated Follow-ups: Quote Follow-Ups email and SMS pending quotes for you on a schedule
- Version Control: Manage quote revisions and updates
5. Quote Statuses and Management
Quote Lifecycle
Status Progression:
- Pending: Quote sent, awaiting customer response
- Viewed: Customer has accessed the quote
- Accepted: Customer has accepted the quote
- Expired: Quote has passed its validity date (default 30 days). If the quote was created from a job and linked via a "Pending Quote" hold, the hold is automatically released, the job returns to its previous status and an action item appears on your dashboard prompting follow-up.
- Archived: Quote manually archived or cancelled
Quotes Created from Jobs
When you create a quote directly from a job (e.g., after a quote visit), the quote is automatically tracked on the job detail page with an "Unsent" badge while still in draft. Once sent, the job is placed on a "Pending Quote" hold until the customer responds. See Quote Visits for the full workflow.
Managing Quote Status:
- Automatic Updates: Status updates when customers interact with quotes
- Manual Updates: Update status based on phone conversations
- Expiry Management: Extend expiry dates as needed. Refreshing an expired quote re-sends it and reapplies the Pending Quote hold if applicable.
- Archive Management: Keep records organized
Editing a Sent Quote (Unlock and Versioning)
Once a quote has been sent it is locked, because the customer already holds a live link to it. Editing a Pending or Expired quote first asks you to unlock it:
- Unlocking creates a new version of the quote reference (e.g. Q-AB-123/1 becomes Q-AB-123/2)
- The quote returns to Draft and the customer cannot view it until you re-send it
- The PDF is regenerated with the new version when you re-send
This applies to every quote type. Form-based quotes (split, ducted, multi, VRV, repairs) unlock from the quote's Edit button. Floor-plan based quotes (ventilation and subfloor ventilation) unlock when you update the quote from the floor plan editor, with the same confirmation step.
If Quote Follow-Ups are enabled, follow-up timers restart when the new version is sent. Reminder steps the customer already received for that quote are not sent again.
Accepted and paid quotes cannot be edited at all, which protects the record of what the customer agreed to.
Quote Analytics Dashboard
- Conversion Tracking: Monitor quote acceptance rates
6. Best Practices for Successful Quotes
Professional Presentation
- Complete Information: Include all relevant system details
- Professional Photos: Include site photos when possible. A picture in a quote's Other / Plan category can be switched to Plan so it prints full width on the PDF, and Draw plan or Blank canvas starts one from scratch. See Quote Photos and Plans
- Timely Delivery: Send quotes on-site or promptly after site visits
Customer Communication
- Follow-up Strategy: Use the built-in Quote Follow-Ups feature (Growth plan and above)
- Provide Options: Give customers choice with multiple options
- Set Expectations: Clear timeline and process information
7. Advanced Quoting Features
Integration Features
- Lead Integration: Quotes link to any lead, inbound as well as marketplace. A new quote also offers to link to the customer's open lead and to a quote visit, and the link can be changed afterwards from the quote's Linked to line. See Linking Leads to Quotes and Jobs
- Customer History: Access previous quotes when needed
Customisation Options via Admin Dashboard
- Terms and Conditions: Update legal terms and payment conditions
- Branding: Add logos and business information
8. Troubleshooting Common Issues
Email Delivery Issues
- Issue: Customer didn't receive quote email
- Solution: Check email address accuracy and check spam folders
- Alternative: Resend quote or provide quote link manually via admin dashboard
Pricing Discrepancies
- Issue: Pricing doesn't match expectations
- Solution: Review catalog pricing, check for override settings
- Note: Contact support if pricing calculations seem incorrect
Mobile App Sync Issues
- Issue: Quotes not syncing between app and dashboard
- Solution: Ensure internet connection
Related Articles
- Quote Photos and Plans - Where photos live per quote type, drawing a plan and how both print
- Quote Follow-Ups - Automated follow-up emails and SMS for pending quotes
- Quote Visits - Creating quotes from jobs and the quote visit workflow
- Linking Quotes to Jobs - Connecting quotes to jobs with the smart modal
- Putting Jobs on Hold - How the "Pending Quote" hold works
- Dashboard Action Items - Follow-up reminders for expired quotes
- Managing Your Product Catalog - Set up products and pricing for quotes
- Subscription Billing - Manage your Cooledge plan
Need help with quoting? Email us at support@cooledge.com.au
Was this article helpful?
Let us know if you found this information useful.
Still need help? Contact support
In this article
Use your browser's search (Ctrl+F) to quickly find specific topics within this article.
Browse all help articles →Related Articles
Auto Duct Layout
Visual duct designer on the ducted floor plan wizard. Auto-route or draw by hand. Includes outdoor unit and refrigerant pipework. Drives the take-off.
Business Callouts (Why Choose Us)
Display trust-building callout points on your public quote pages to increase acceptance rates
Custom PDF Pages
Add professional cover pages, warranty info, maintenance plans and more to your quote and invoice PDFs