Floor Plan Scanning
Upload a floor plan, let AI detect rooms, and generate a fully customisable ducted system quote in under 2 minutes
Floor Plan Scanning
From floor plan to ducted quote in about 2 minutes.
- Upload a builder or architect's PDF, an image, or a hand-drawn sketch — multi-page PDFs and multi-plan images are supported
- True multi-level designs: Ground and Level One get their own tabs, their own zones and their own duct layout
- AI detects rooms, calculates areas, and works out heatload automatically
- Generates Good / Better / Best system recommendations tuned to your catalogue
- Design the ductwork visually with Auto Duct Design → — one-click auto-route or draw by hand
- Outdoor unit and refrigerant pipework included in the quote and take-off
Floor Plan Scanning uses AI to turn any floor plan image into a complete ducted system quote. Upload a builder's plan, a photo, or even a hand-drawn sketch — the system detects rooms, calculates areas, works out heatload, and generates Good / Better / Best ducted system recommendations. The whole process takes about 2 minutes.
This feature is designed for ducted system quotes and works from the Cooledge Portal (desktop).
What You Need
Before using Floor Plan Scanning, make sure you have:
- An active Cooledge subscription (any plan)
- AI credits available — each scan uses 1 AI credit per level (check your balance in Settings → Billing)
- A floor plan file — PDF (multi-page supported), PNG, JPEG, or WebP
- Ducted system catalogue set up — at least some ducted units and materials configured in your catalogue
Getting Started
Where to Find It
- Open the Cooledge Portal (desktop)
- In the sidebar, click Floor Plan under the Quoting section
- Click New Floor Plan to start
Uploading a Floor Plan
You have two options to get started:
Option 1: Upload a File
- Click the upload area or drag-and-drop your floor plan
- Supported formats: PDF (multi-page), PNG, JPEG, or WebP
- The file can be a builder or architect's PDF, a scanned plan, a photo, or a screenshot
Multi-page PDFs and multi-plan images
Drop in the builder or architect's full PDF — or a single image with multiple plans on it — and Cooledge splits it into one page per level. You confirm each page on the Page Picker before extraction runs.
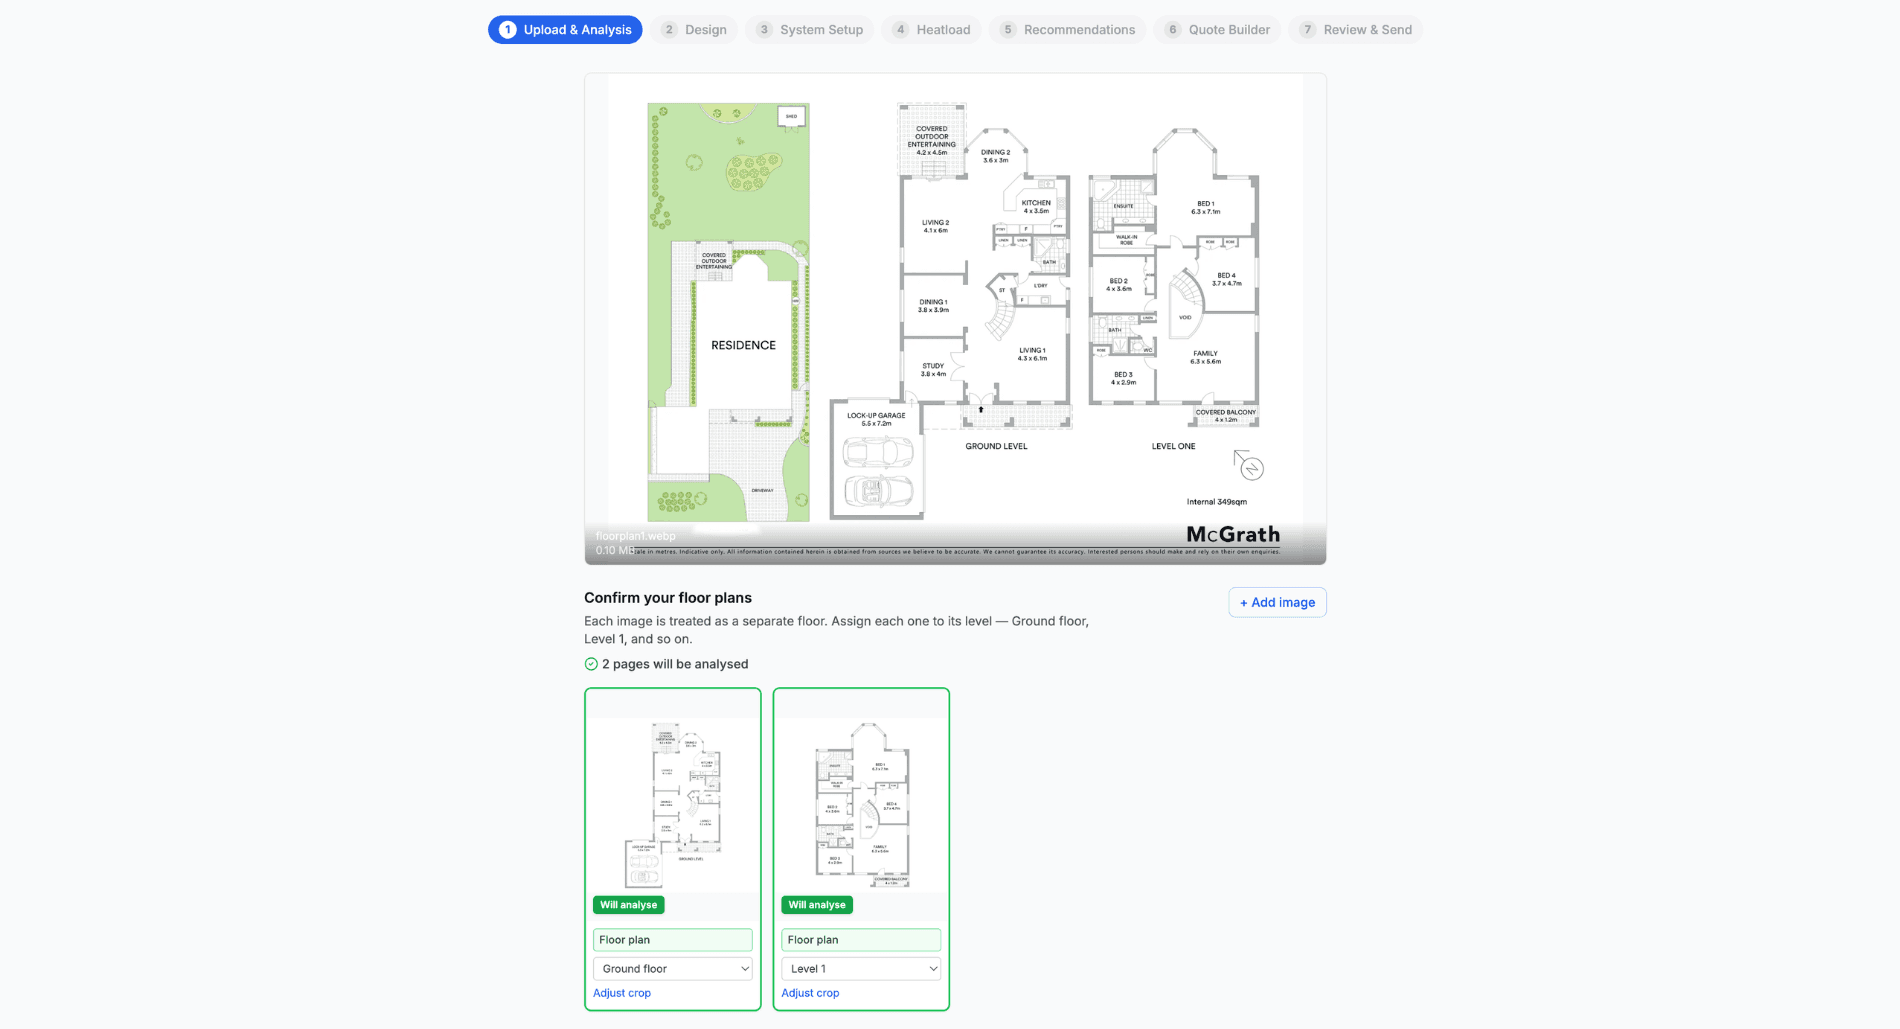
For each page:
- The green tag ("Will analyse") confirms the page is recognised as a floor plan
- The page type (Floor plan, Site plan, Elevation, etc.) is detected for you — change it if anything looks wrong
- Set the level (Ground floor, Level 1, and so on) so the right rooms land in the right tab
- Adjust crop lets you fine-tune which part of the page gets analysed if you want to
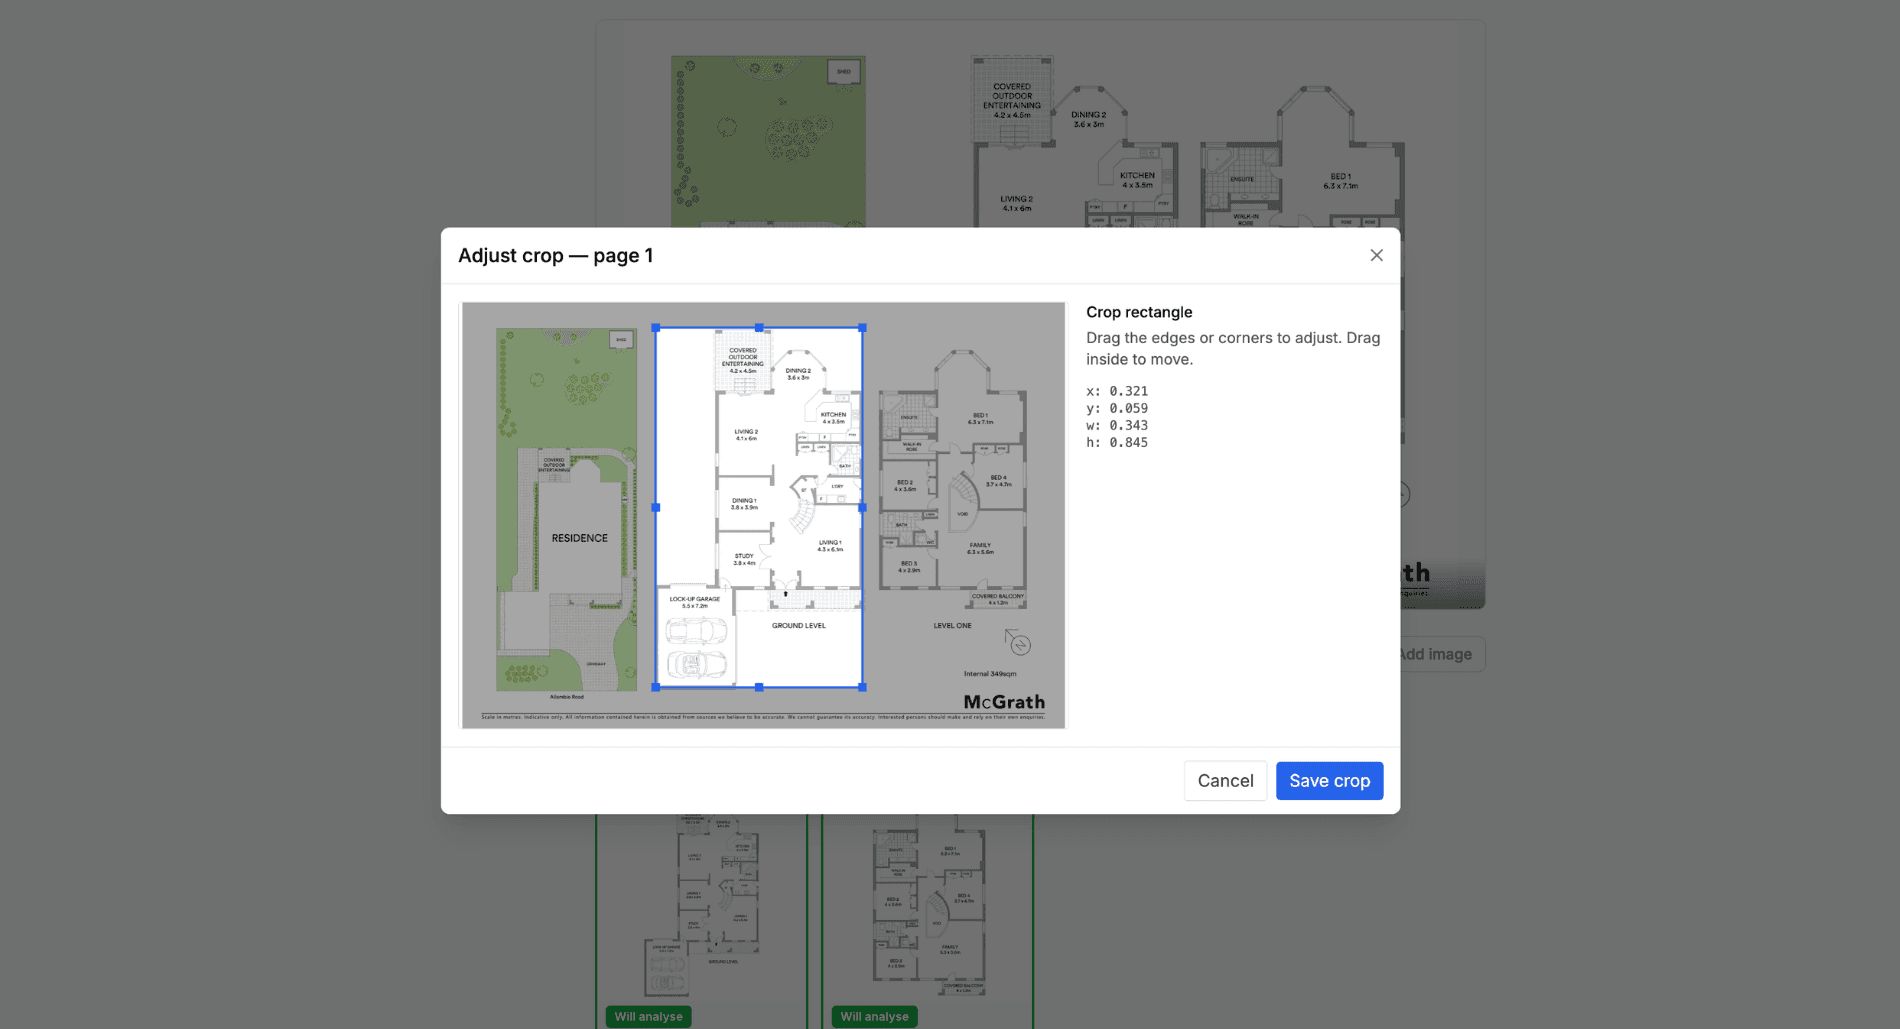
In the Adjust Crop modal, drag the rectangle edges or corners to redefine what gets sent to the AI for that page. Everything outside the rectangle is ignored.
AI credits: 1 credit per page analysed. The confirm button always shows the exact count — for a two-storey home that's "Confirm and analyse 2 pages" (2 credits). Pages set to Site plan, Elevation, or not-a-floor-plan are skipped and don't use a credit.
Option 2: Draw Manually
- Click Skip AI — Draw Manually if you don't have a floor plan file
- You'll draw room boundaries yourself on a blank canvas using the drawing tools
Tip: Builder plans with clear room boundaries and labels work best. But even rough floor plans or photos of printed plans will work — the AI is pretty smart about it.
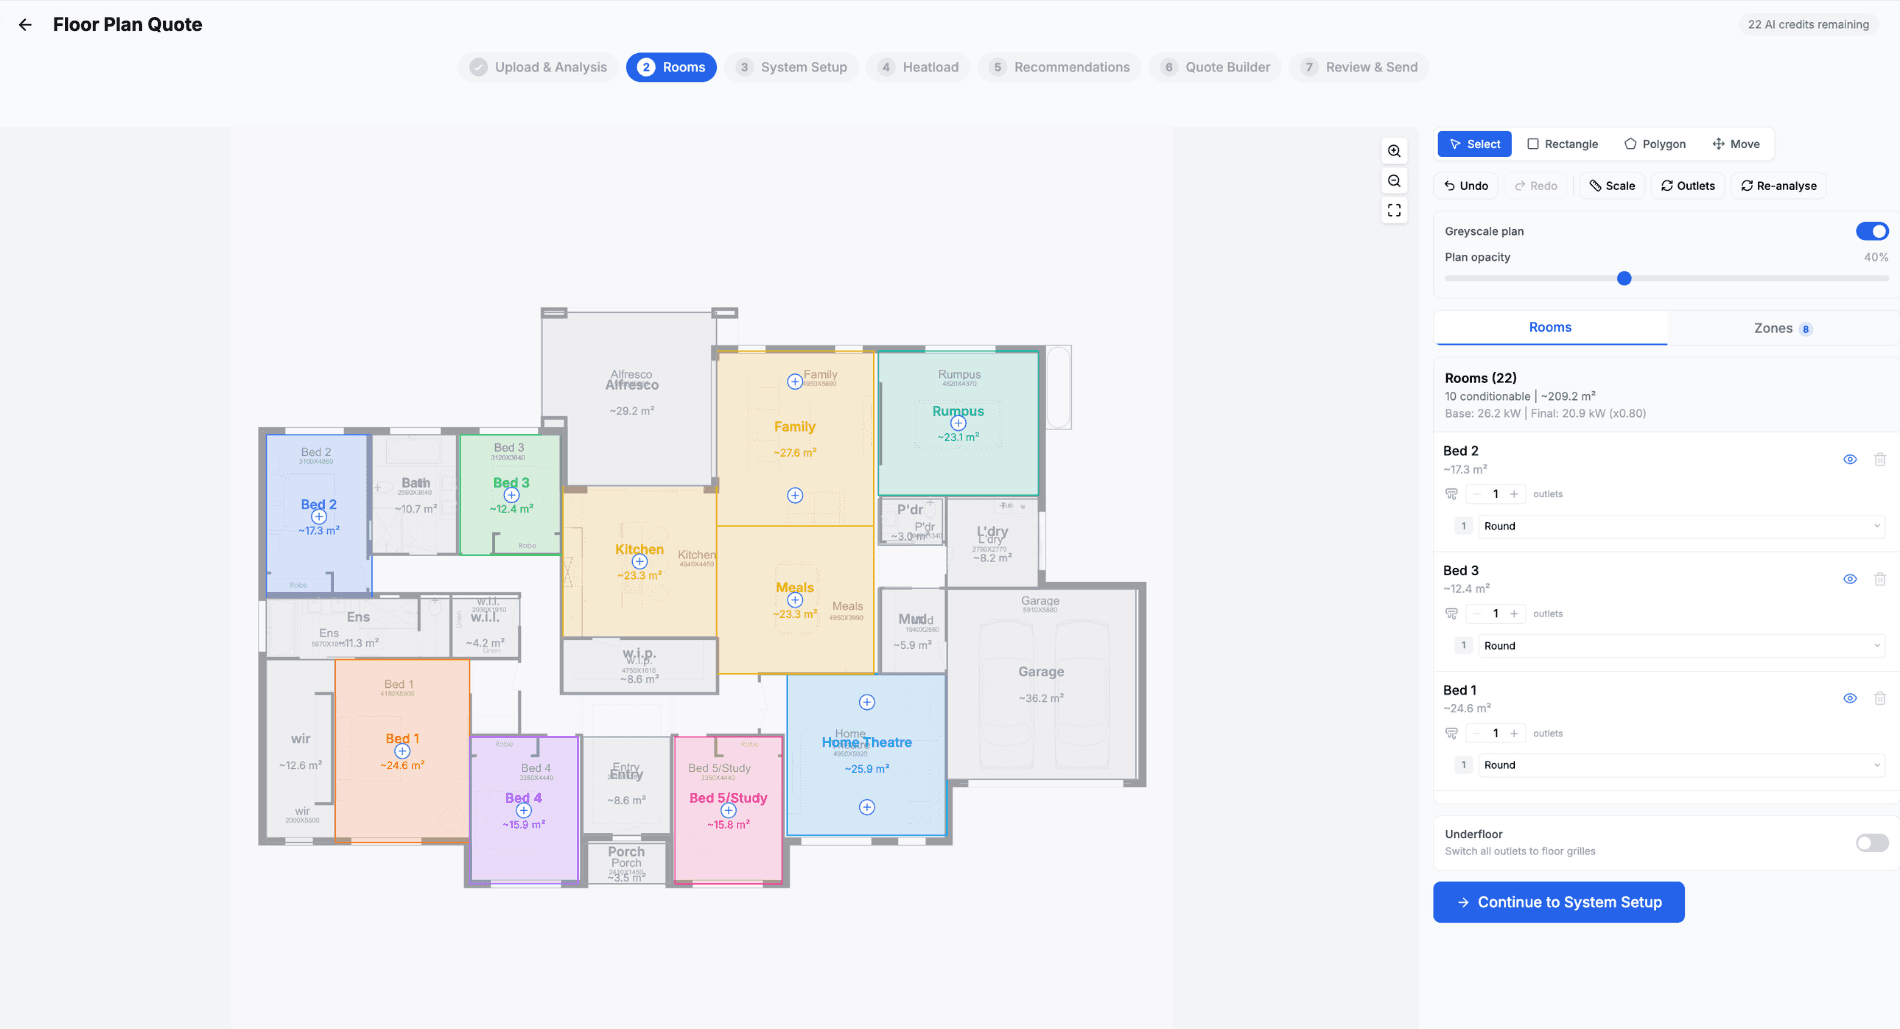
Step 1: Review Detected Rooms
After uploading, the AI analyses your floor plan and detects rooms automatically. This usually takes 30-40 seconds.
What the AI Detects
For each room, the AI identifies:
- Room boundary — a polygon drawn around the room
- Room label — e.g. "Living Room", "Bedroom 1", "Kitchen"
- Room type — categorised for HVAC purposes
- Conditionable flag — whether the room needs air conditioning (bedrooms and living areas = yes, garages and bathrooms = typically no)
Editing Rooms
You have full control over every room the AI detected:
Select & Move Rooms
- Click any room polygon to select it
- Drag to reposition if needed
Edit Room Polygons
- Select a room and drag the corner handles to adjust its shape
- Use rectangle or polygon drawing tools to create new rooms the AI missed
Rename Rooms
- Click the room label to rename it
- Use descriptive names like "Master Bedroom" or "Open Plan Living"
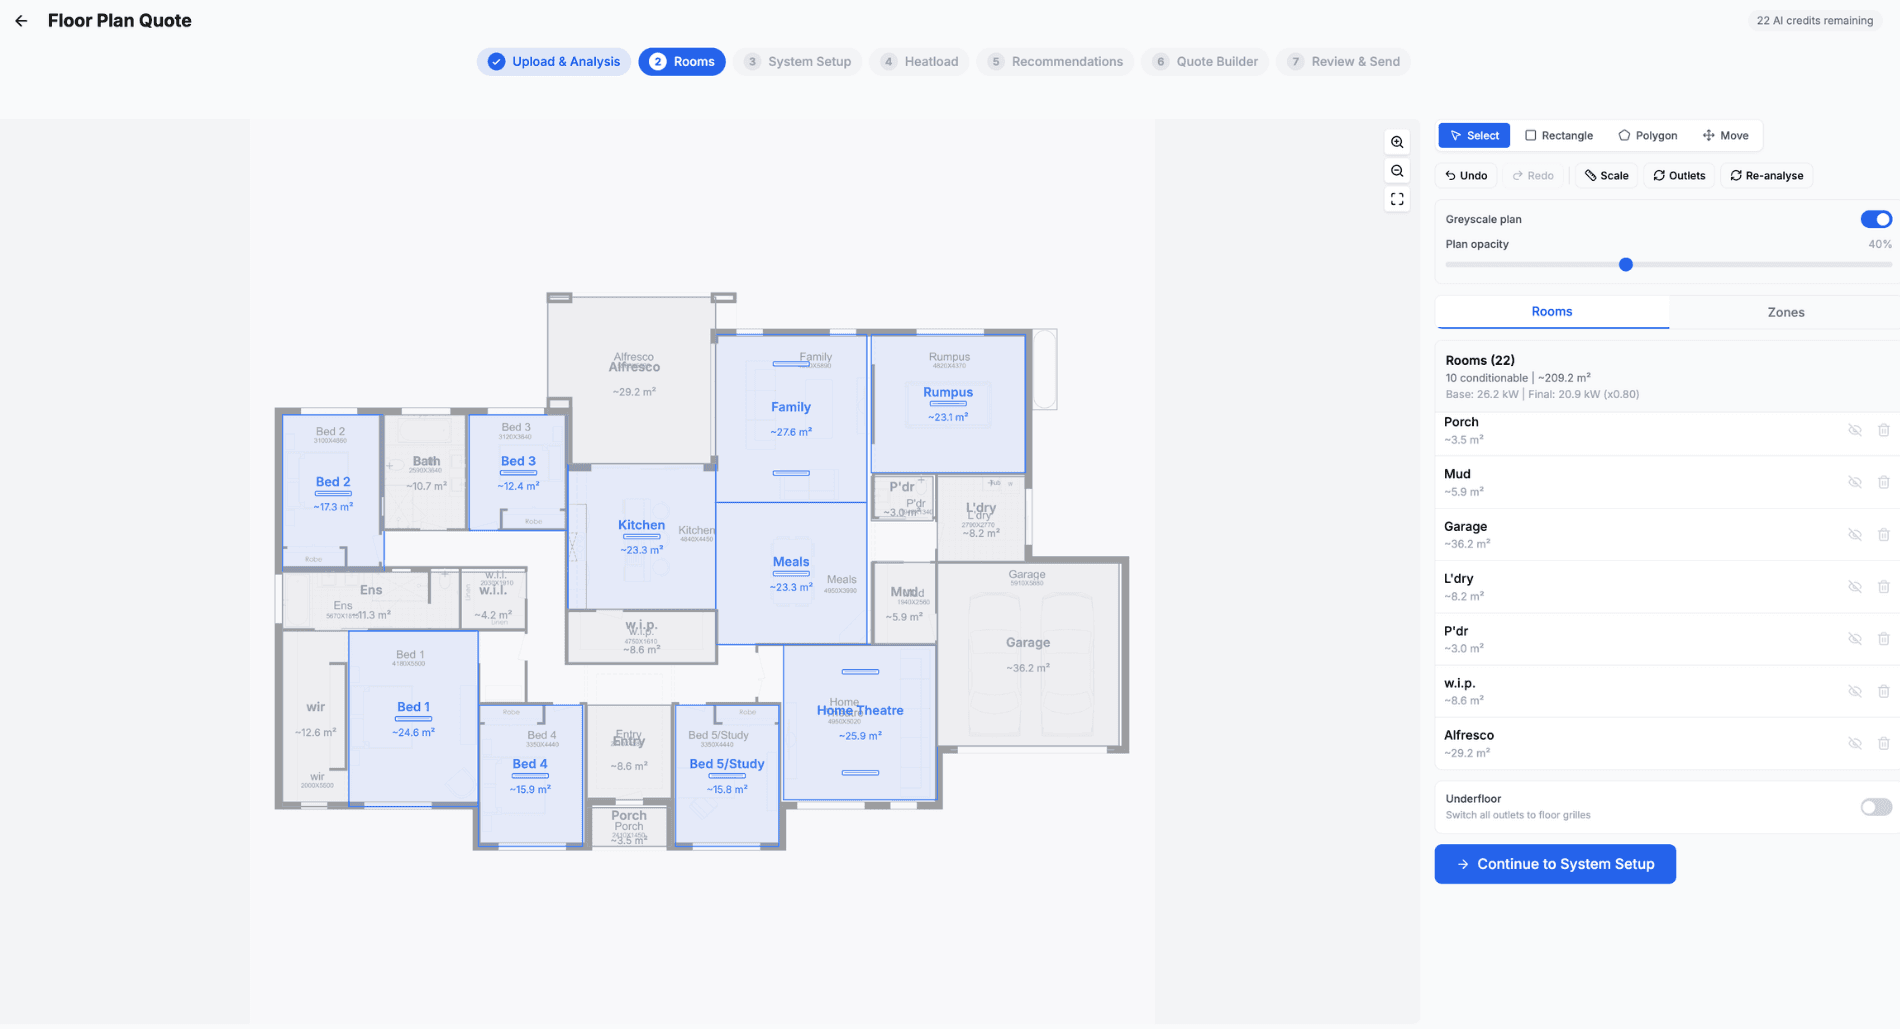
Toggle Conditionable
- Each room has a toggle to mark it as conditionable (needs A/C) or excluded
- Garages, bathrooms, laundries, and hallways are typically excluded
- Only conditionable rooms are included in heatload calculations
Delete Rooms
- Select a room and press delete to remove it
- Useful for removing incorrectly detected rooms
Setting the Scale
The scale tells the system how to convert pixel measurements to real-world metres. This is critical for accurate area calculations.
Auto-detected scale: If the floor plan has a scale bar or dimensions marked, the AI may detect it automatically.
Manual scale: If the AI can't find a scale, you'll need to set it manually:
- Click the Set Scale tool
- Draw a line between two points where you know the real distance
- Enter the distance in metres
- The system calculates metres-per-pixel from this
Important: Accurate scale = accurate areas = accurate heatload. If you know a room dimension (e.g. "the living room is 6m wide"), use that to calibrate.
Zone Assignment
Zones group rooms together for the ducted system zoning. You can:
- Let the system auto-assign zones later based on room types
- Manually assign rooms to zones (e.g. all bedrooms in Zone 1, living areas in Zone 2)
Multi-Level Homes
If you uploaded a multi-page PDF or a multi-plan image, each level shows as its own tab at the top of step 1: Ground, Level One (and beyond, if applicable).
- Switch between tabs to review rooms and assign zones per level
- The scale you set on one level automatically copies across, so you only calibrate once
- Toggle the Overlay view to see Ground and Level One stacked on the same canvas — useful for checking that risers and stacked rooms line up
- Use the alignment handle to nudge a level if the footprints don't match perfectly
- Heatload, take-off and the quote roll all levels into one document
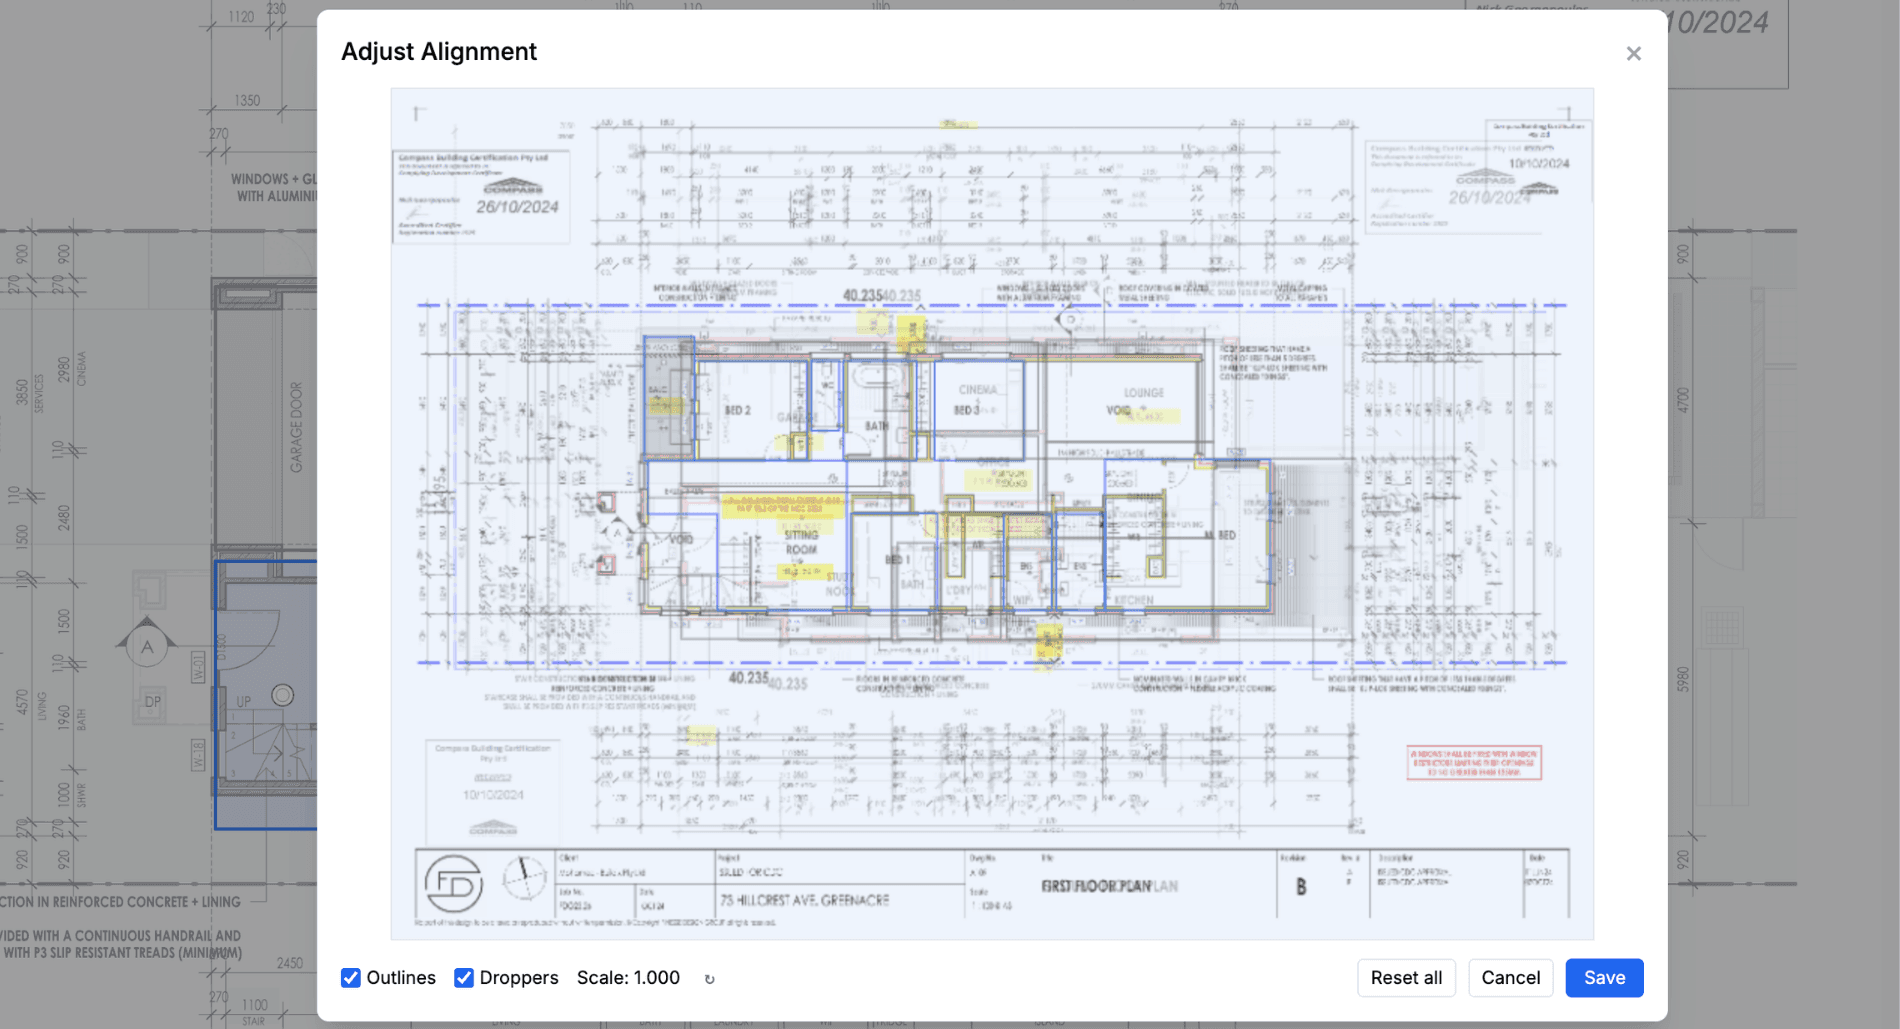
Tip: Use the overlay view to sanity-check stacked rooms (kitchens above kitchens, wet areas above wet areas) before generating the duct layout. Accurate alignment between levels makes droppers and risers land where they should.
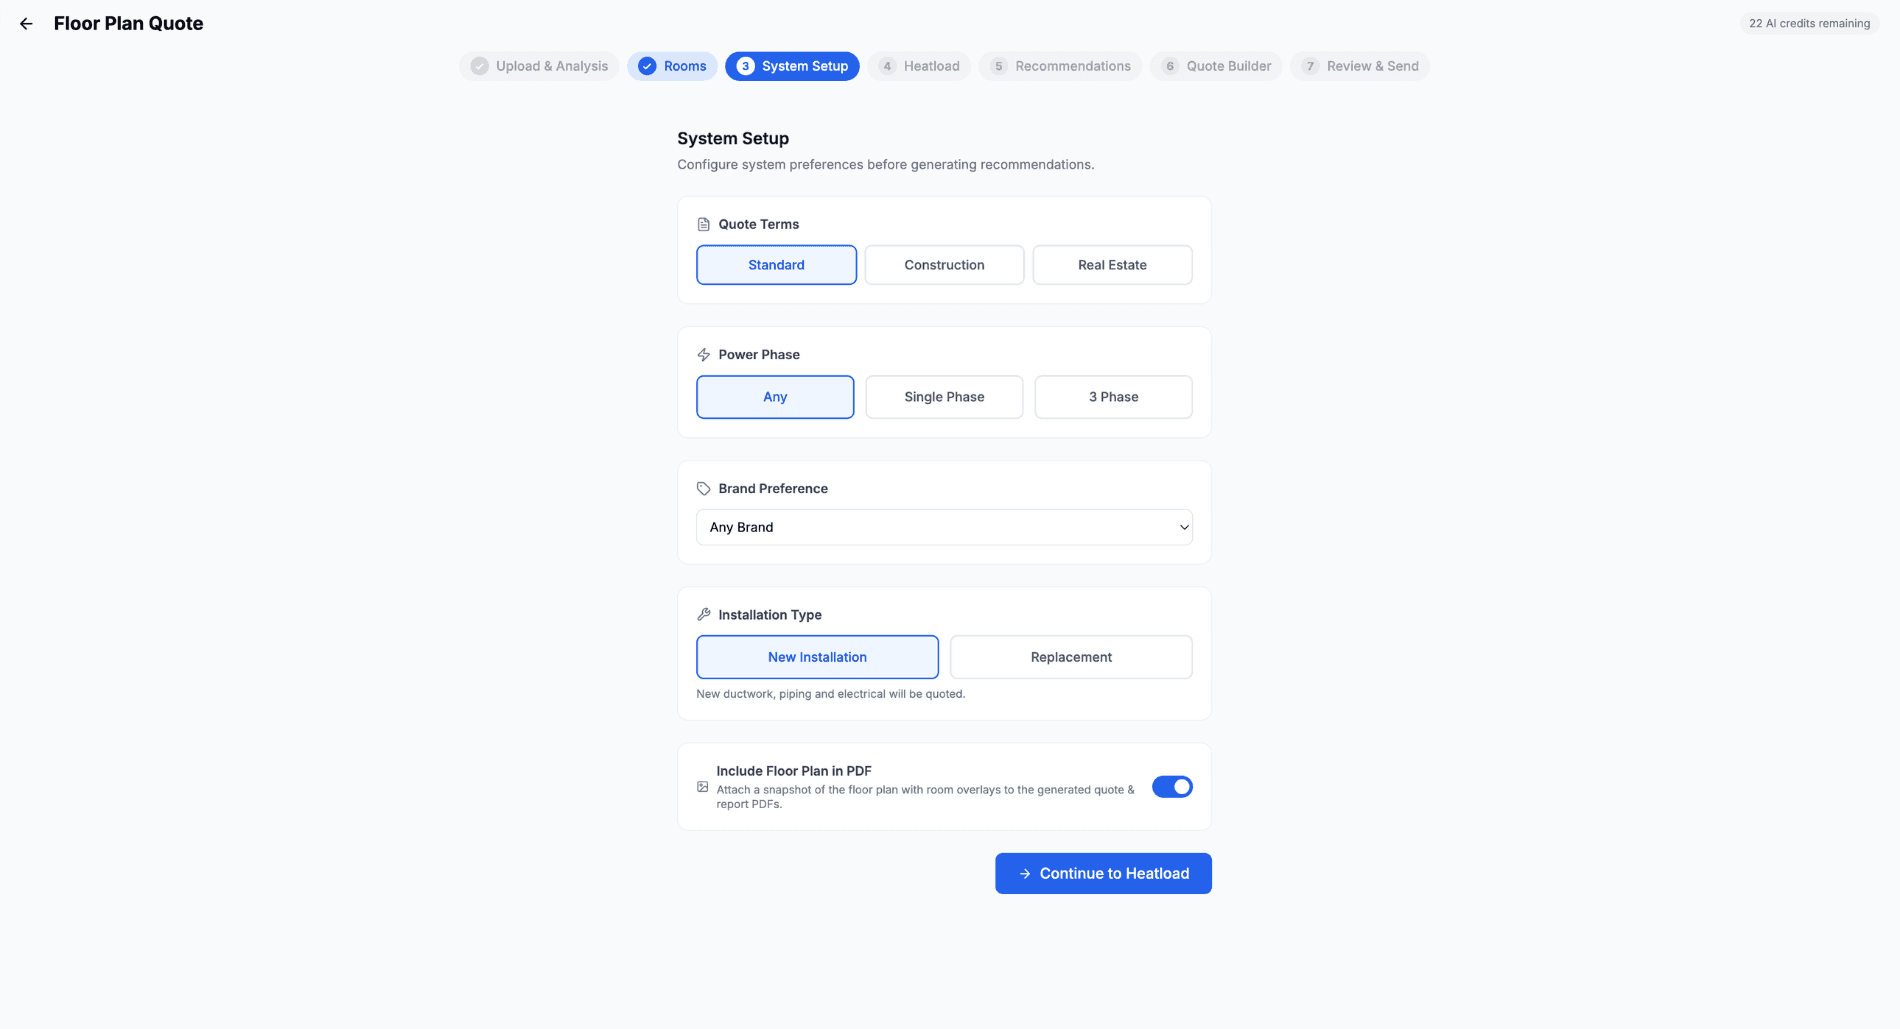
Step 2: System Setup
Once rooms are reviewed, configure the ducted system parameters:
Power Phase
- Single Phase, Three Phase, or Any
- Filters available units to match your site's power supply
Brand Preference
- Select a preferred brand or leave as "Any" to see all options
Installation Type
- New Installation or Replacement
- Affects material lists (new installs include piping, replacements may not)
Quote Terms
- Standard or Construction
- Sets default payment terms on the quote
Include Floor Plan in PDF
- Toggle whether the annotated floor plan image appears in the customer-facing quote PDF
Outdoor Unit & Refrigerant Pipework
- The generated quote now includes the outdoor unit and refrigerant pipework lines automatically
- Review and adjust in the Parts tab or the quote editor after creation
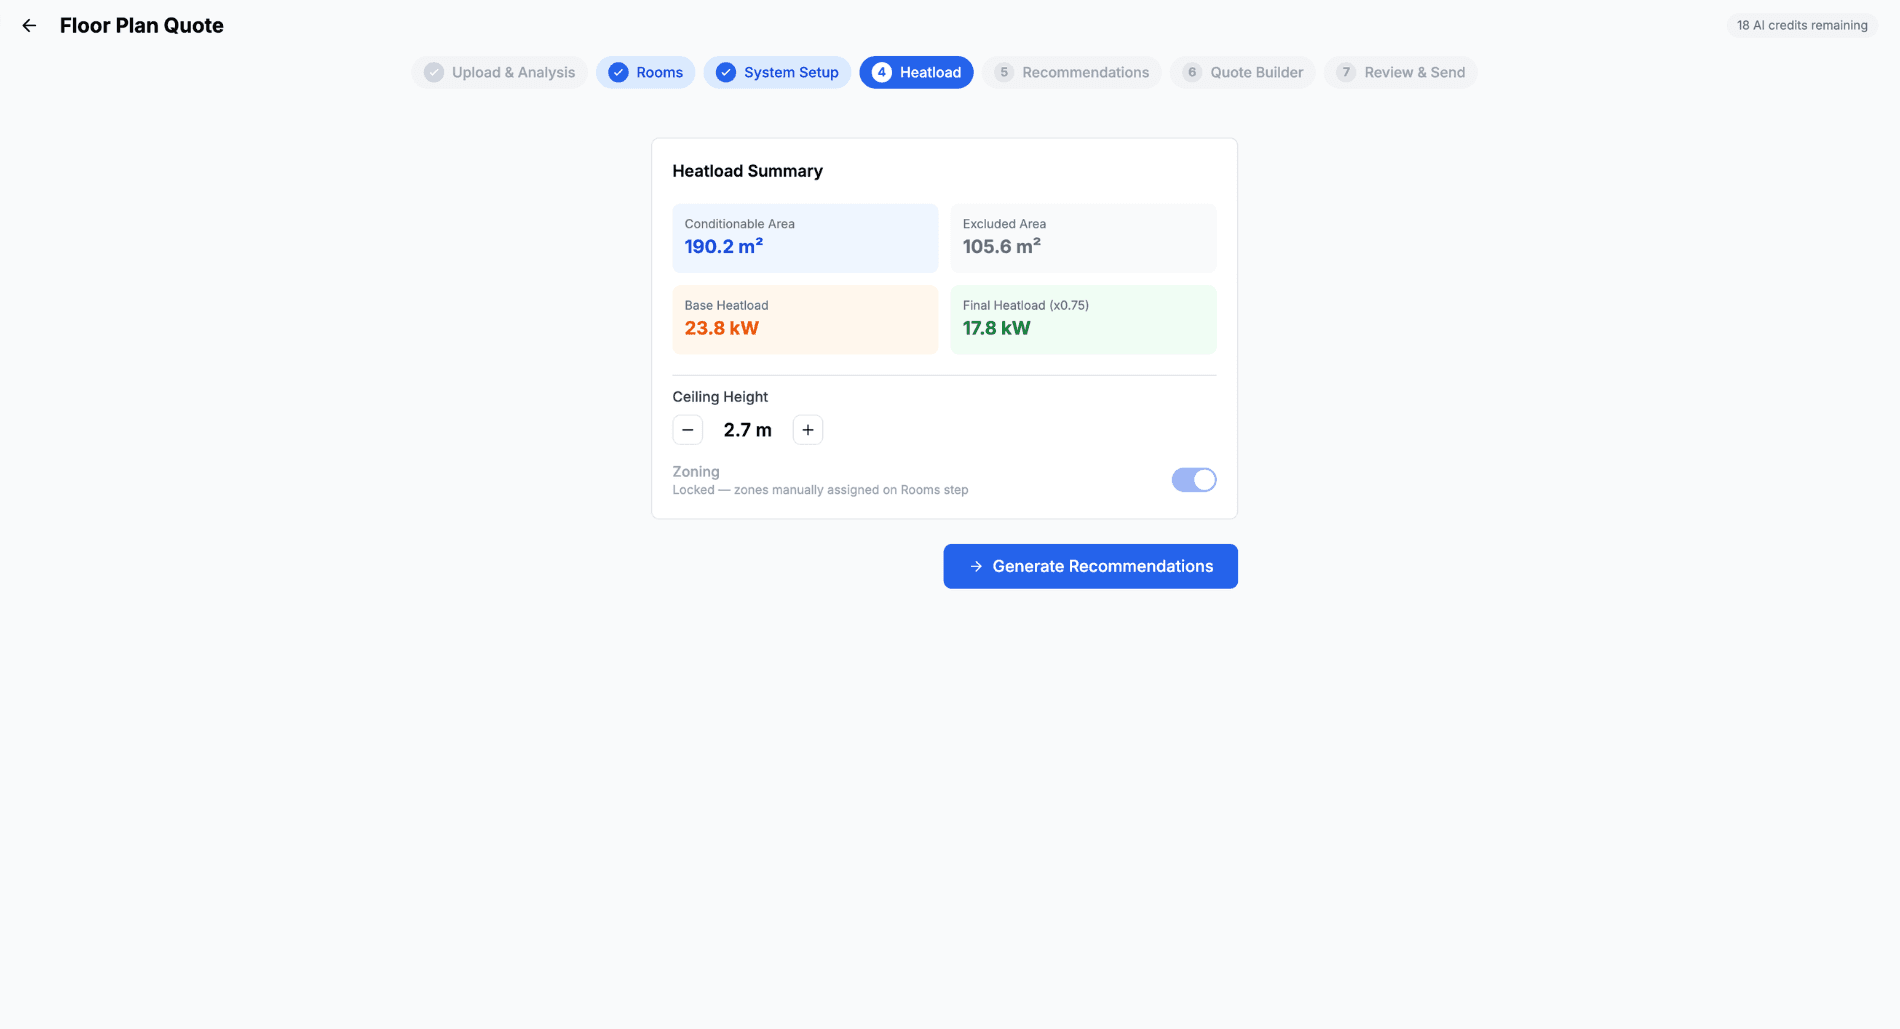
Step 3: Review Heatload
The heatload step shows you the calculated cooling/heating requirement for the property.
How Heatload is Calculated
The formula is straightforward:
Base heatload (kW) = (Total conditionable area in m² × Watts per m²) ÷ 1000
Then adjustments are applied:
- Ceiling height factor — taller ceilings need more capacity
- Zoning factor — if zoning is enabled, a diversity factor (default 0.75) is applied because not all zones run at full capacity simultaneously
What You See
- Conditionable area — total m² of rooms marked as conditionable
- Excluded area — total m² of rooms not being conditioned
- Base heatload — before adjustments
- Final heatload — after ceiling height and zoning adjustments
- Watts per m² — the rate used (default 125 W/m², configurable in settings)
Adjusting Parameters
You can fine-tune:
- Ceiling height — adjust up from the default 2.4m for higher ceilings
- Zoning factor — toggle zoning on/off, or adjust the diversity factor
- Watts per m² — override for specific situations (e.g. west-facing houses may need more) Needs to be done in Floor Plan Setttings page.
Note: These are estimate heatloads for quoting purposes. For compliance heatloads, a formal calculation by a qualified assessor is recommended.
Step 4: Get Recommendations
Based on the heatload and your system configuration, the system generates three tiered options:
Good Option
- Standard-tier ducted unit that meets the heatload requirement
- 2 zones with automatic room assignment
- Standard outlet counts per room
- No add-ons
Better Option
- Mid-range or premium unit with slightly more capacity
- 3 zones for better control
- Standard outlet counts
- WiFi controller included (if available)
Best Option
- Top-tier unit with maximum capacity headroom
- Maximum zones (4+) for the best comfort control
- Standard outlet counts
- Smart controller + per-zone sensors included
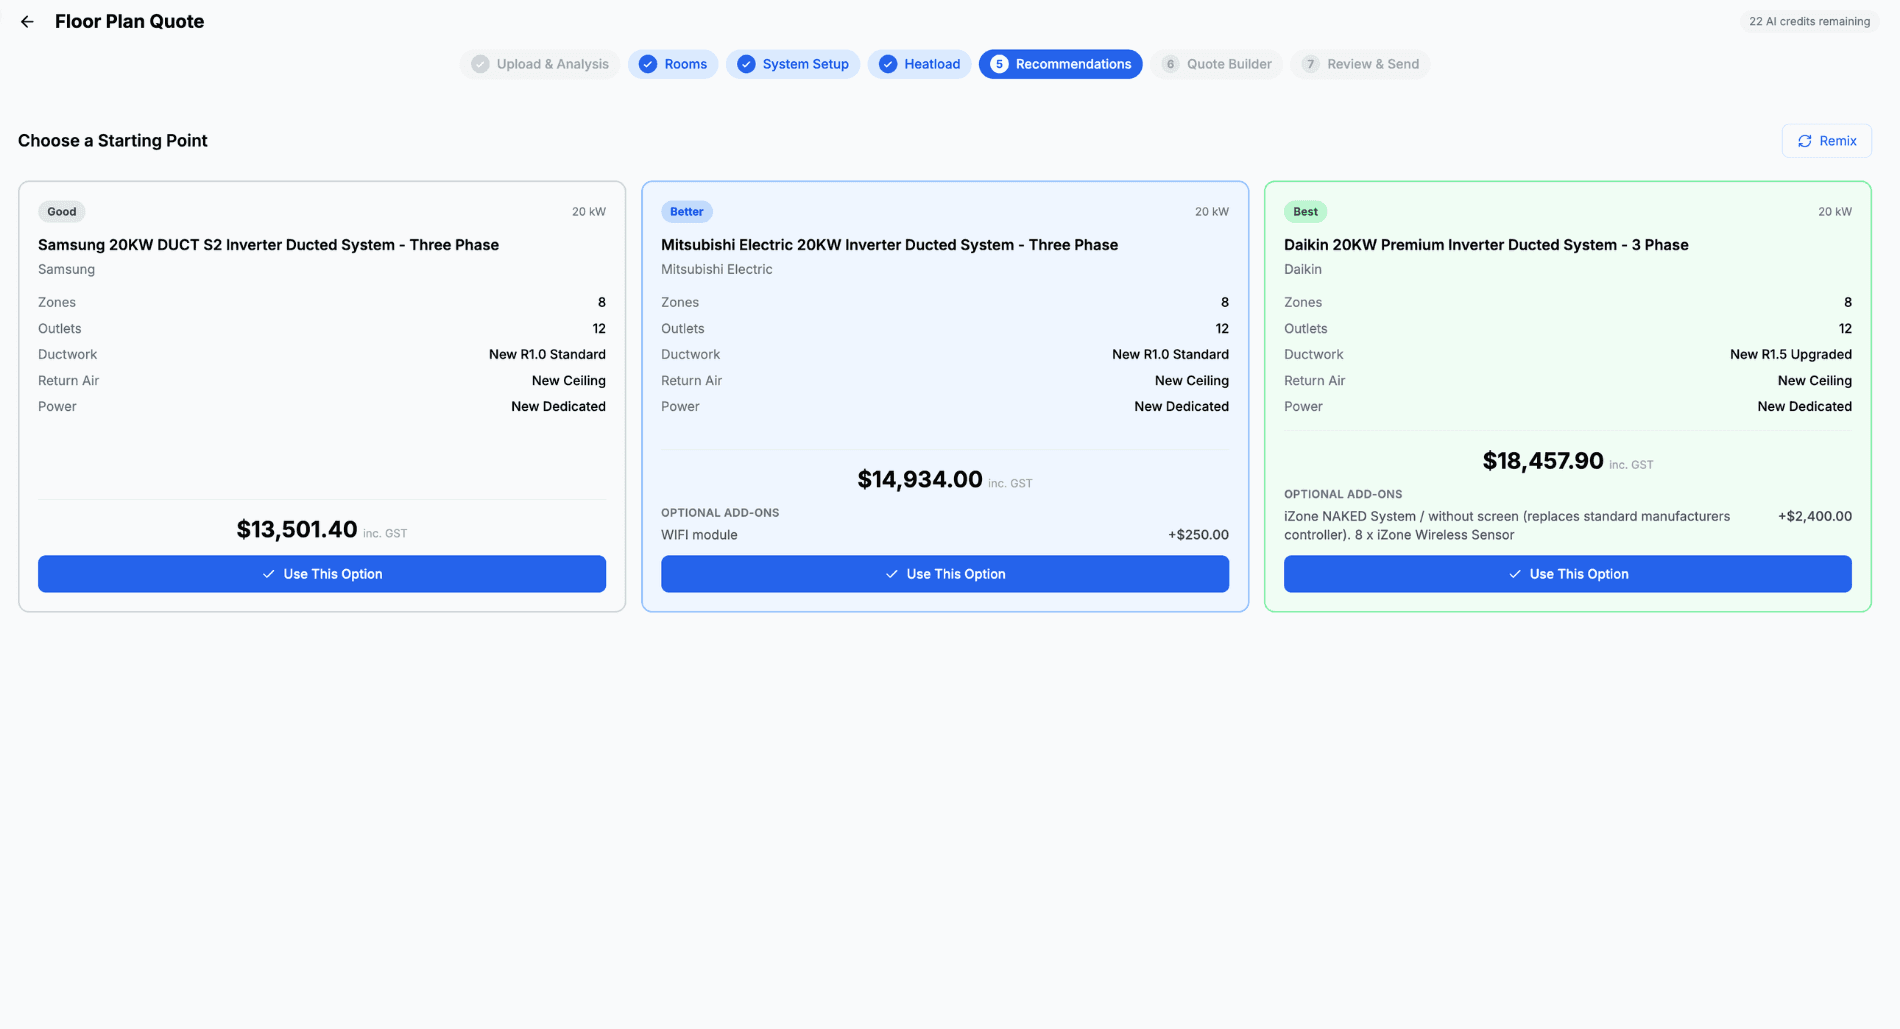
Remix
Not happy with the options? Click Remix to generate a new set of variations. Each remix produces different unit/zone combinations while staying within the heatload requirements.
What's New: Auto Duct Layout
Once you've picked an option, switch to the Parts tab on step 1 of the wizard to design the duct system visually. Auto Layout routes the whole thing in one click (plenums, BTOs, flex, dampers, outlets, outdoor unit and refrigerant pipework) or draw by hand with the full parts library. The drawn layout flows into your take-off automatically.
Learn more about Auto Duct Layout →
Step 5: Edit & Finalise
Select any of the three options and edit it further in the Quote Builder:
- Change the unit — swap to a different model or brand
- Adjust zones — add/remove zones, reassign rooms
- Modify outlets — change outlet count or type per room
- Add extras — include add-ons like WiFi controllers, smart sensors, or underfloor kits
- Override pricing — adjust any line item price
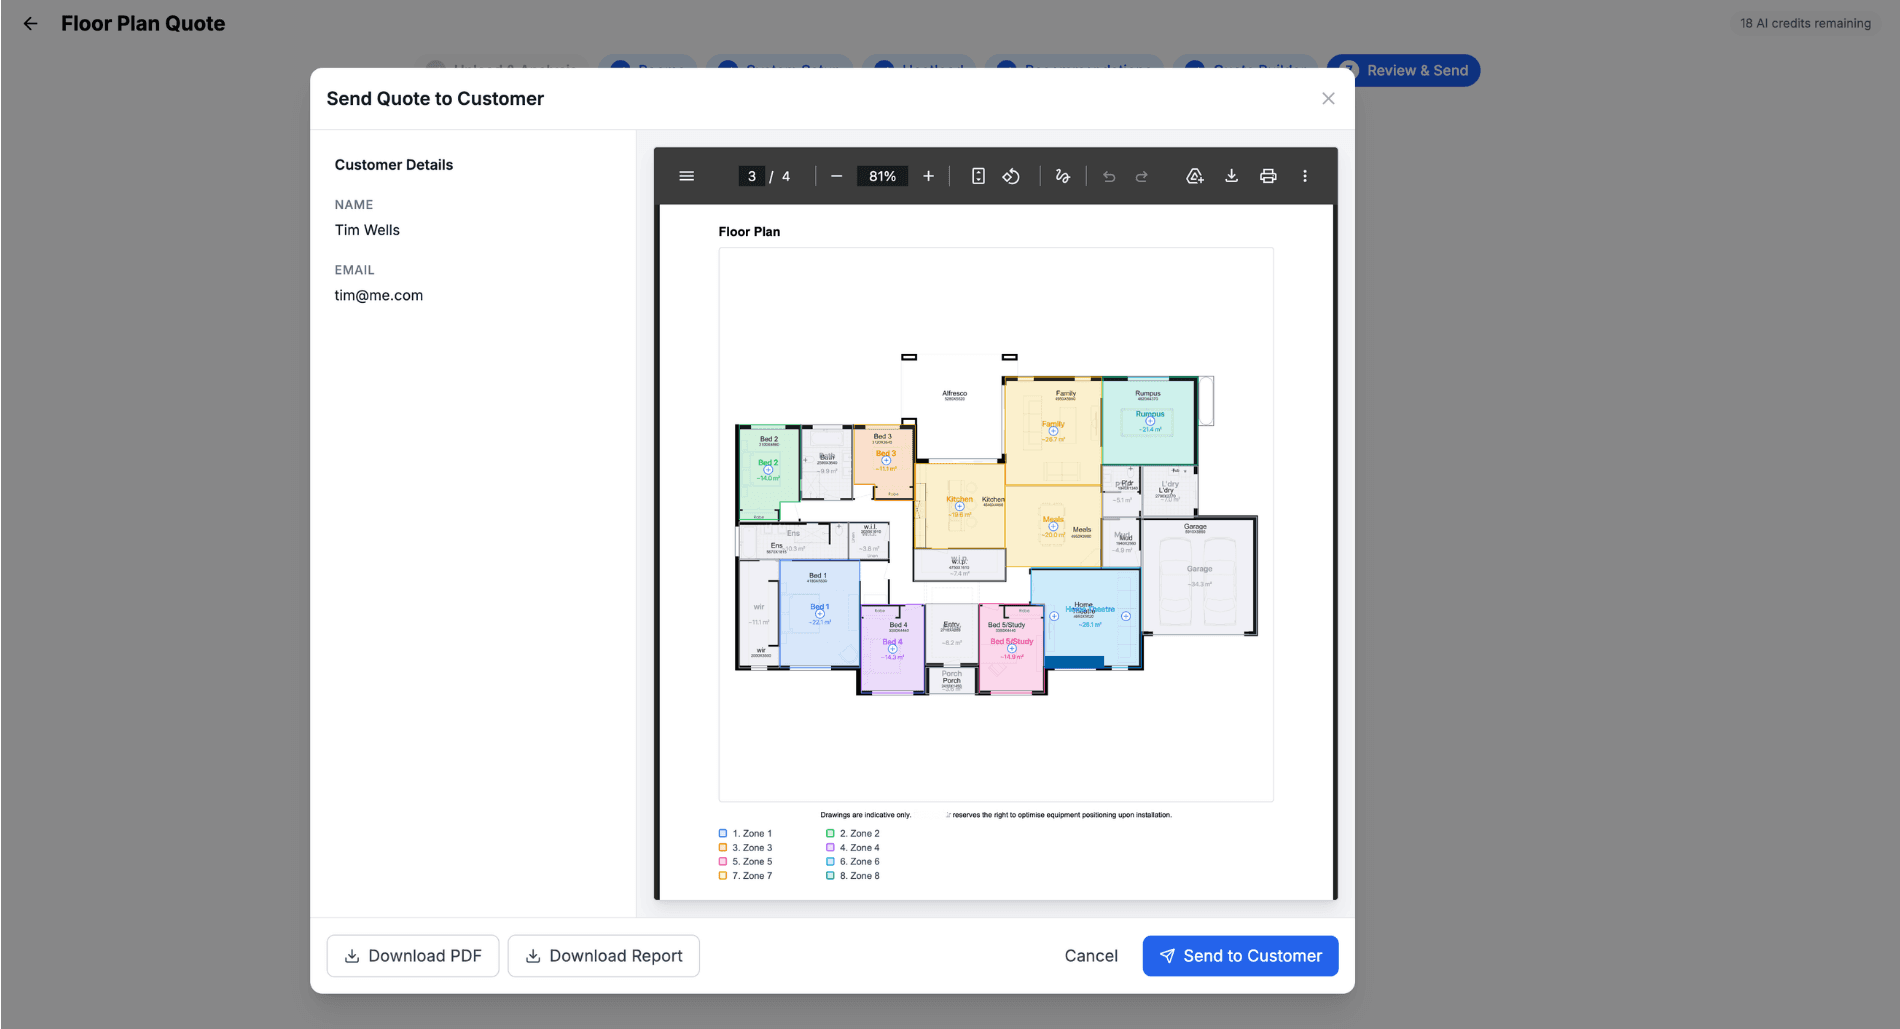
Step 6: Send to Customer
Once you're happy with your quote, hit Create Quote to open the send modal:
- Link a customer — search for an existing customer or create a new one
- Generate the PDF — a professional quote document is created automatically (with the floor plan included if you enabled it)
- Send to customer — email the quote directly or copy the online quote link to share via SMS or message
- Open in ducted editor — if you need to make further changes, transfer to the full ducted quote editor
Floor Plan Settings
You can configure default values for Floor Plan Scanning in your business settings:
- Go to Settings → Floor Plan (or access via the gear icon on the floor plan page)
- Configure defaults:
- Default brand preference
- Default installation type
- Default ceiling height
- Default watts per m²
- Default zoning factor
- Default outlet type
- Watermark on/off (adds your logo to floor plan snapshots)
These defaults pre-fill each new floor plan scan so you spend less time configuring.
Managing Floor Plans
Floor Plan List
Go to Floor Plan in the sidebar to see all your floor plans:
- Draft — work in progress, not yet linked to a quote
- Quoted — linked to an active quote
- Upload date and last modified timestamps
Duplicating a Floor Plan
If you need to create a variation (e.g. same house, different system options):
- Open the floor plan
- Click Duplicate
- A new copy is created that you can edit independently
Floor Plan in Quotes
When a floor plan is linked to a quote:
- The floor plan snapshot appears in the quote PDF (if enabled)
- The floor plan is accessible from the quote detail page
- Changes to the floor plan after quote creation don't affect the quoted version
Tips for Best Results
Getting Good AI Detection
- Use clear files — high contrast between walls and rooms helps detection. PDFs from the builder usually give the cleanest results
- Include labels — floor plans with room labels help the AI name rooms correctly
- Include a scale bar — if the plan has dimensions or a scale bar, the AI can auto-calibrate
- Multi-storey is fine in one upload — upload the full PDF or a multi-plan image and Cooledge splits levels into tabs automatically
Speed Tips
- Set up your defaults — configure default brand, installation type, and watts/m² once
- Use the Quick Review flow — if the AI detection looks good, skip straight to system setup
- Use Remix — instead of manually tweaking, remix to get new option sets quickly
- Trust the auto-zones — automatic zone assignment works well for most residential plans
AI Credits
AI credits are charged per page actually analysed, not per upload. For a single-level home that's 1 credit. For a two-storey home with Ground and Level 1 confirmed on the Page Picker, that's 2 credits — one per level.
You're always in control of the count. On the Page Picker, only pages tagged as floor plans (with a level assigned) get analysed. Any page you set to Site plan, Elevation, or otherwise mark as not a floor plan is skipped and doesn't cost a credit. The confirm button always tells you exactly what you're about to spend — for example, "Confirm and analyse 2 pages" when two levels are queued.
- Manual drawing (skip AI) does not use a credit
- Duplicating a floor plan does not use a credit
- Pages you don't mark as floor plans are skipped and don't use a credit
- Check your remaining credits in Settings → Billing
Common Questions
What floor plan formats are supported? PDF (single or multi-page), PNG, JPEG and WebP. PDFs from the builder or architect usually give the cleanest extraction because the lines are crisp vector data.
Can I upload a multi-page PDF? Yes. The Page Picker shows every page in the PDF — pick which one(s) are floor plans, mark which is Ground vs Level One for multi-storey homes, and Cooledge runs each as its own level.
Can I quote a two-storey home? Yes. Multi-level designs are first class now. Each level gets its own tab, its own zones and its own duct layout. Place droppers on the upper floor to feed Ground-floor outlets and the take-off rolls every level into one supplier order.
Can I use a photo of a printed floor plan? Yes! Take a photo of a builder or architect's plan, brochure, or printed floor plan. The AI handles perspective and varying quality.
What if the AI misses a room? Use the drawing tools to add rooms manually. You can also edit existing room boundaries.
Can I use this for split systems? Floor Plan Scanning is currently designed for ducted systems only. For split and multi-system quotes, use the standard A/C System Quoting workflow.
Does the customer see the floor plan? Only if you enable "Include Floor Plan in PDF" during system setup. Otherwise, the floor plan is internal only.
What happens if I run out of AI credits? You can still use the manual drawing mode (no AI required) or wait for your monthly credit refresh.
Does a multi-page PDF use multiple AI credits? Only for the pages you actually analyse. Each page marked as a floor plan with a level assigned uses 1 credit. Pages set to Site plan, Elevation, or not-a-floor-plan are skipped. The Page Picker's confirm button shows the exact count before you commit — for example, "Confirm and analyse 2 pages".
Can I edit the quote after sending it? Yes — use the "Open in ducted editor" option to make changes in the full ducted quote editor.
Related Articles:
- Auto Duct Layout →: Visual duct designer with auto-routing
- Measure Quote →: Quote non-AC trades from a floor plan
- A/C System Quoting → — Overview of all A/C quoting capabilities
- Ducted System Tutorial → — Detailed guide to ducted system catalogue setup
- Supplier Ordering → — Generate take-offs from accepted quotes
- Quoting Basics → — General quoting guide
Need help with Floor Plan Scanning? Email us at support@cooledge.com.au
Was this article helpful?
Let us know if you found this information useful.
Still need help? Contact support
In this article
Use your browser's search (Ctrl+F) to quickly find specific topics within this article.
Browse all help articles →Related Articles
Auto Duct Layout
Visual duct designer on the ducted floor plan wizard. Auto-route or draw by hand. Includes outdoor unit and refrigerant pipework. Drives the take-off.
Business Callouts (Why Choose Us)
Display trust-building callout points on your public quote pages to increase acceptance rates
Custom PDF Pages
Add professional cover pages, warranty info, maintenance plans and more to your quote and invoice PDFs