Measure Quote
Quote flooring, tiling, carpet and underfloor heating jobs from a floor plan. Detect rooms, calculate areas, generate an itemised quote.
Measure Quote
Quote flooring, tiling, painting, carpet and underfloor heating from a floor plan.
- Upload a floor plan image, enter rooms manually, or draw on a blank canvas
- Group rooms by trade or area (bedrooms, bathrooms, living areas, wet areas — whatever you like)
- Pre-built line items pull from your price list with quantities auto-calculated from room-group area × wastage
- Quote lands in the standard quote editor with everything pre-organised, ready to review and send
Measure Quote is a floor-plan-based quoting flow for trades that price by the square metre. Upload a floor plan, group rooms by trade or area, pick materials per group, and Cooledge turns per-room measurements into an itemised quote using your price list — built for flooring, tiling, painting, carpet, and underfloor heating businesses.
This feature is designed for measurement-driven quoting and works from the Cooledge Portal (desktop).
Who It's For
- Flooring: hardwood, laminate, vinyl, tiles
- Tiling: wall or floor tile by room
- Painting: interior or exterior, by area
- Carpet: per-room carpet with underlay
- Underfloor heating: electric or hydronic, by room
What You Need
- An active Cooledge subscription
- AI credits available if using the floor-plan scanner (1 credit per scan — manual drawing and manual entry use zero credits)
- A floor plan image (PNG, JPEG, or WebP, max 4 MB), on-site measurements to enter manually, or the willingness to draw rooms on a blank canvas
- At least some materials configured in your price list
Getting Started
Where to Find It
- Open the Cooledge Portal (desktop)
- In the sidebar, click Measurement Quote under the Quoting section (or go to
/measure/newdirectly) - Click New Measurement Quote
The wizard has four steps shown at the top: Upload & Scan → Rooms → Materials → Review & Create.
Step 1 — Upload & Scan
Two sub-tabs at the top of step 1: Upload Floor Plan and Enter Rooms Manually.
Option 1: Upload a Floor Plan
- Drag and drop your floor plan image (PNG, JPEG, or WebP, max 4 MB)
- Cooledge shows the uploaded file name and size once it's staged
- Click Draw plan manually if you'd rather draw on a blank canvas
- Or click Analyse with AI (the primary blue button) to let Cooledge detect the rooms
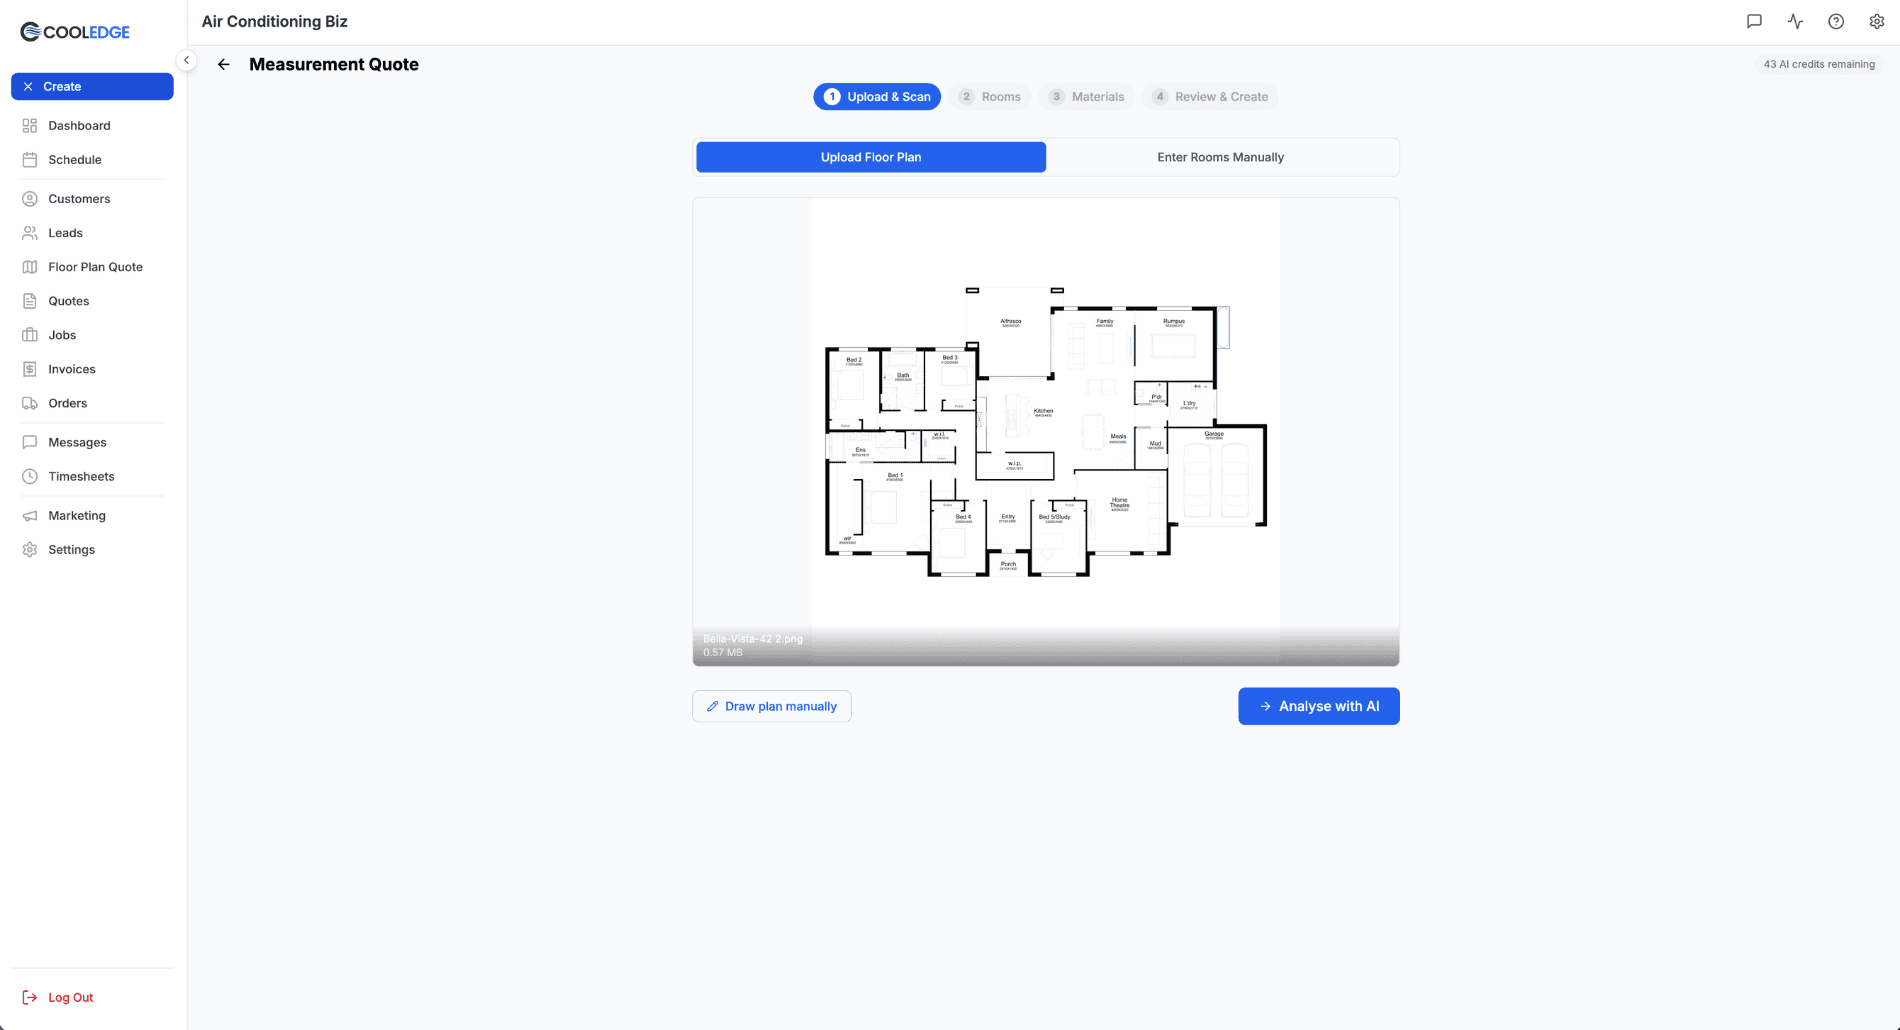
Tip: Builder plans with clear room boundaries work best. Photos of printed plans work too — the AI is pretty smart about it.
Option 2: Enter Rooms Manually
If you already measured on-site with a tape, enter the rooms by hand. Each room card has a Name, Type (Bedroom / Bathroom / Kitchen / Living / Garage / etc.), Length (m) and Width (m). Cooledge calculates the area per card automatically and keeps a running total at the bottom (e.g. Total: 48.5 m² (3 rooms)).
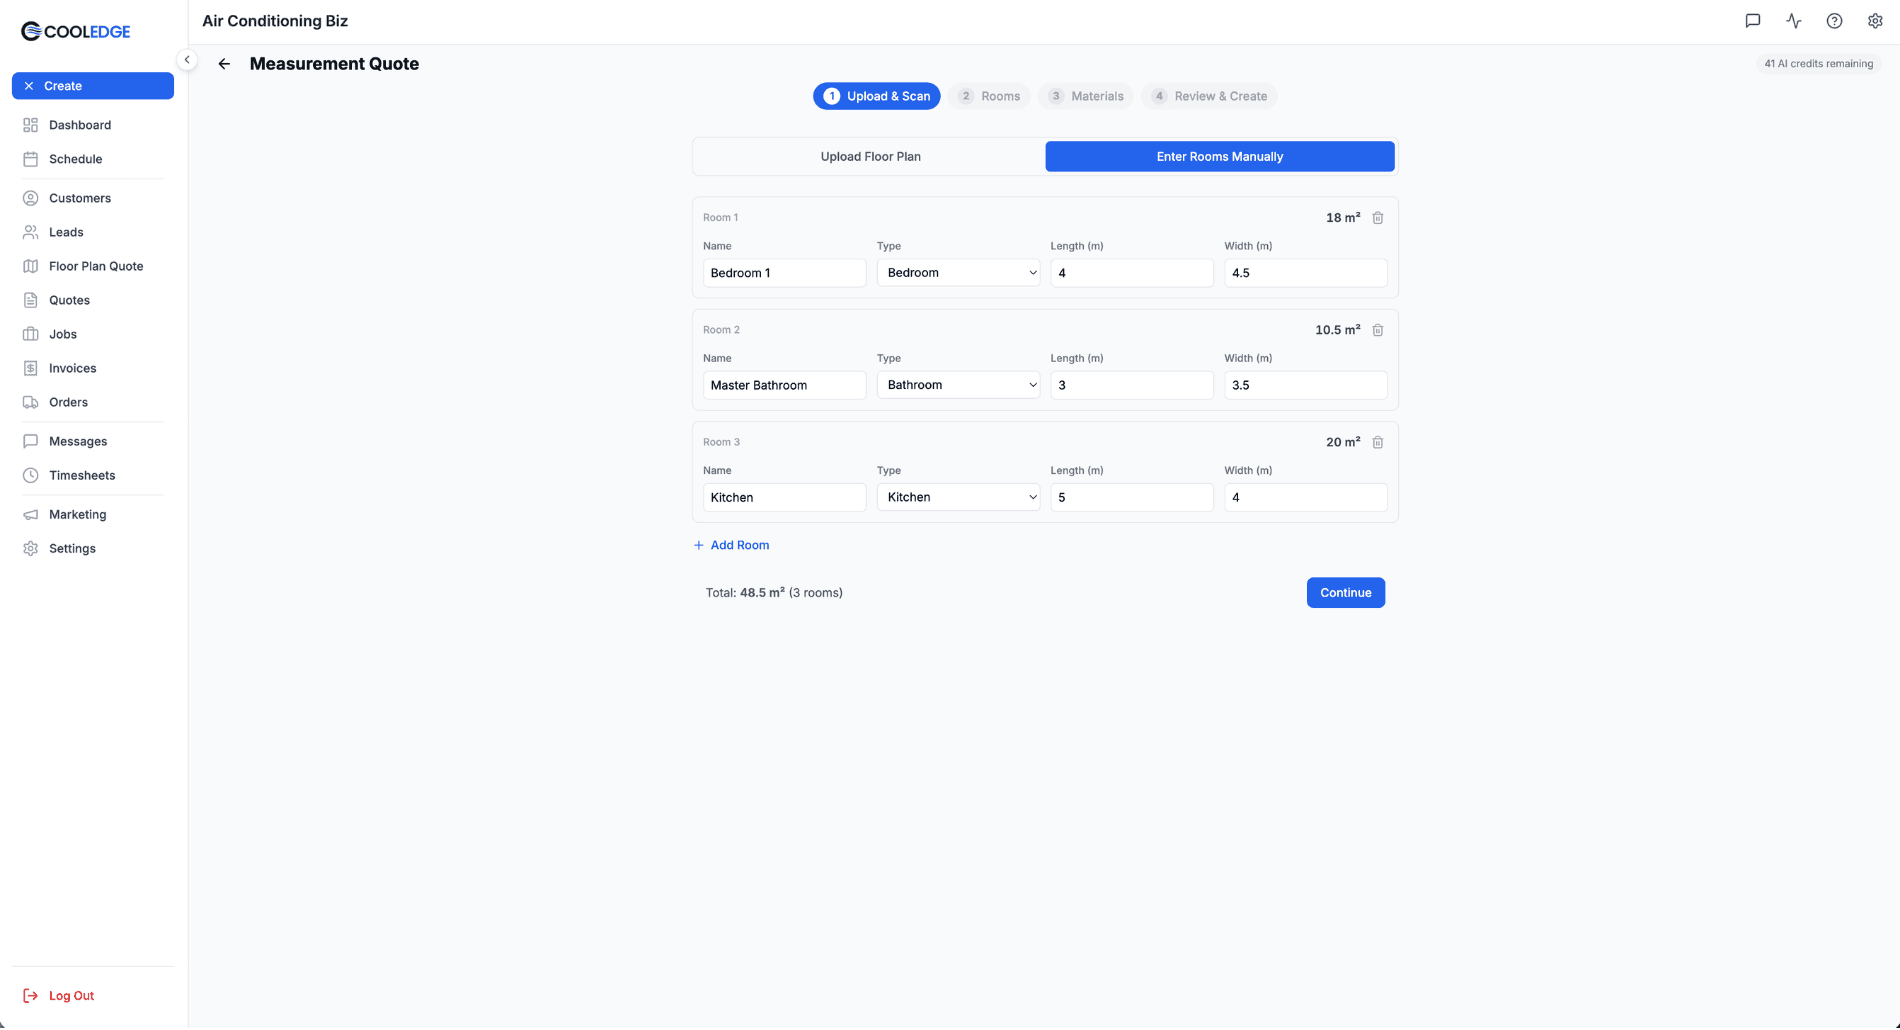
Click Add Room to add more, then Continue when you're done.
Tip: Use manual entry when you don't have a plan image, or when the floor plan has irregularities you'd rather just measure and enter directly.
Step 2 — Rooms
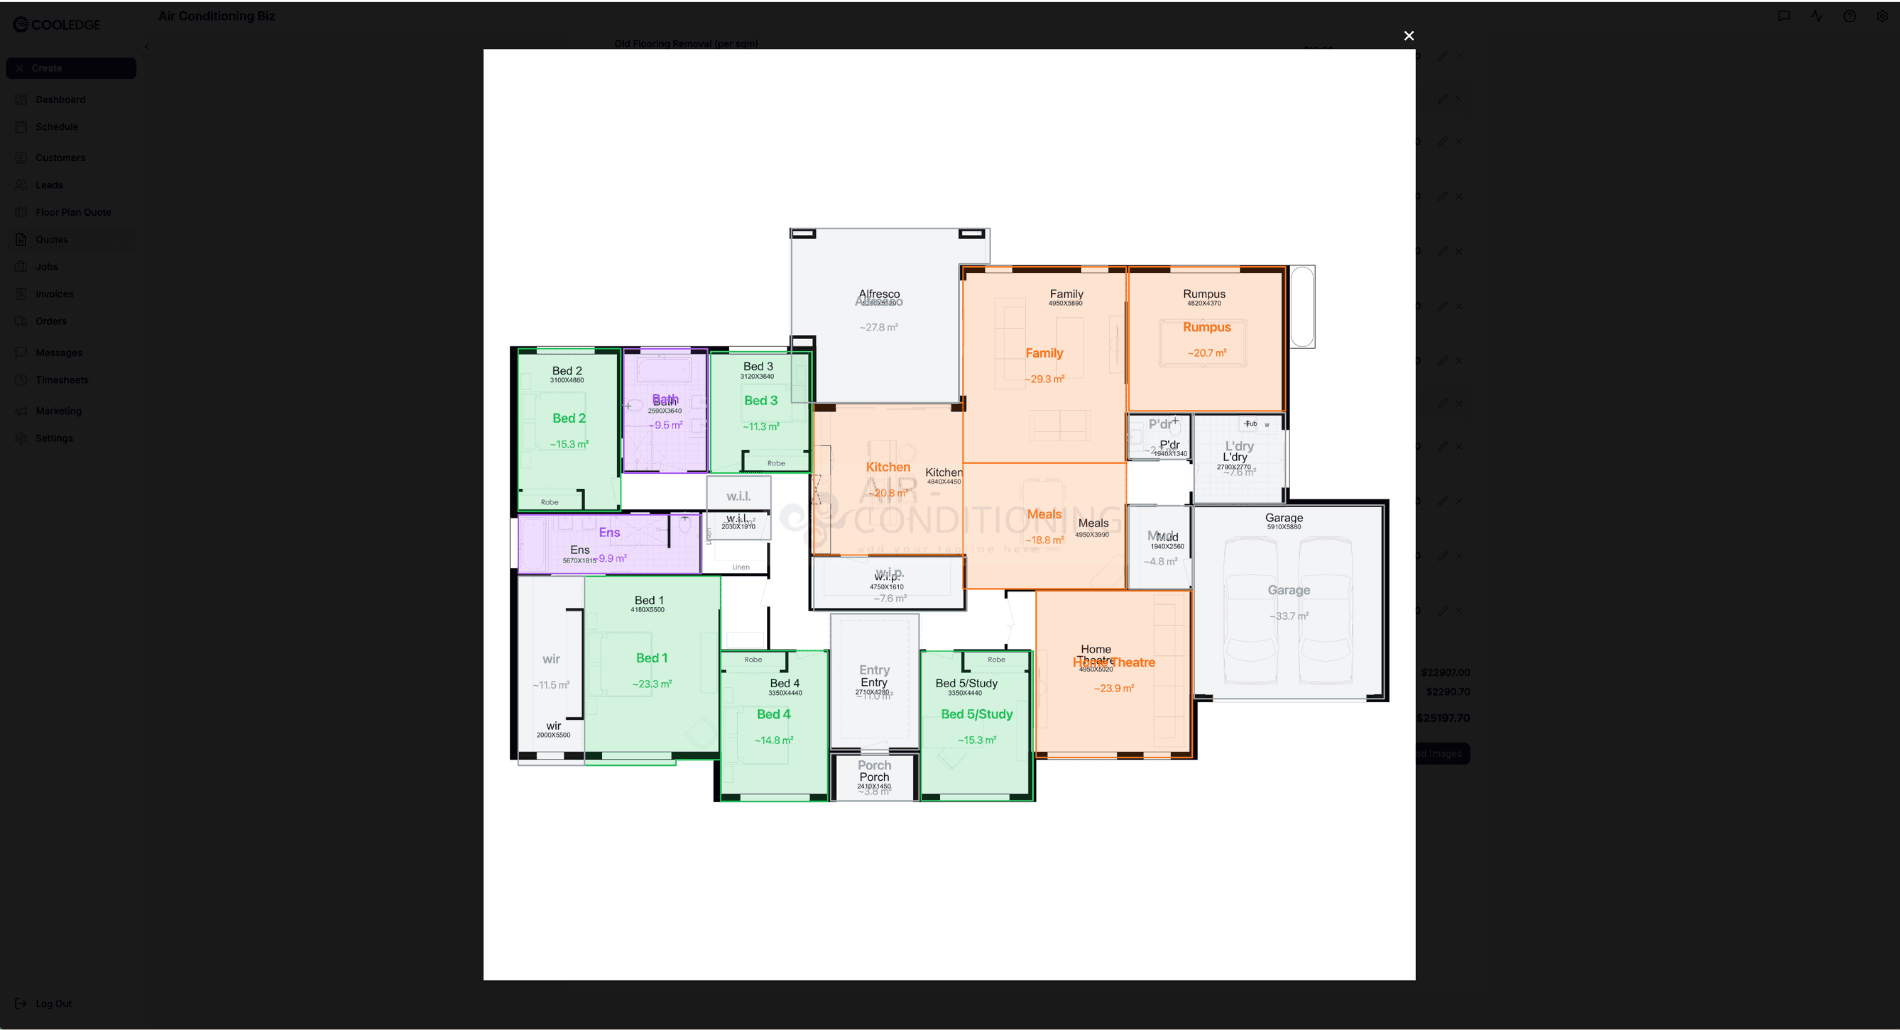
After AI detection or manual entry, the floor plan appears with rooms highlighted and a sidebar on the right. The sidebar has two tabs: Rooms and Groups.
The Rooms Tab
The Rooms tab shows every detected room with its area, plus an eye icon to include or exclude and a delete button. The header shows how many rooms are included and the total m² — for example Rooms (22) — 22 included | ~212 m².
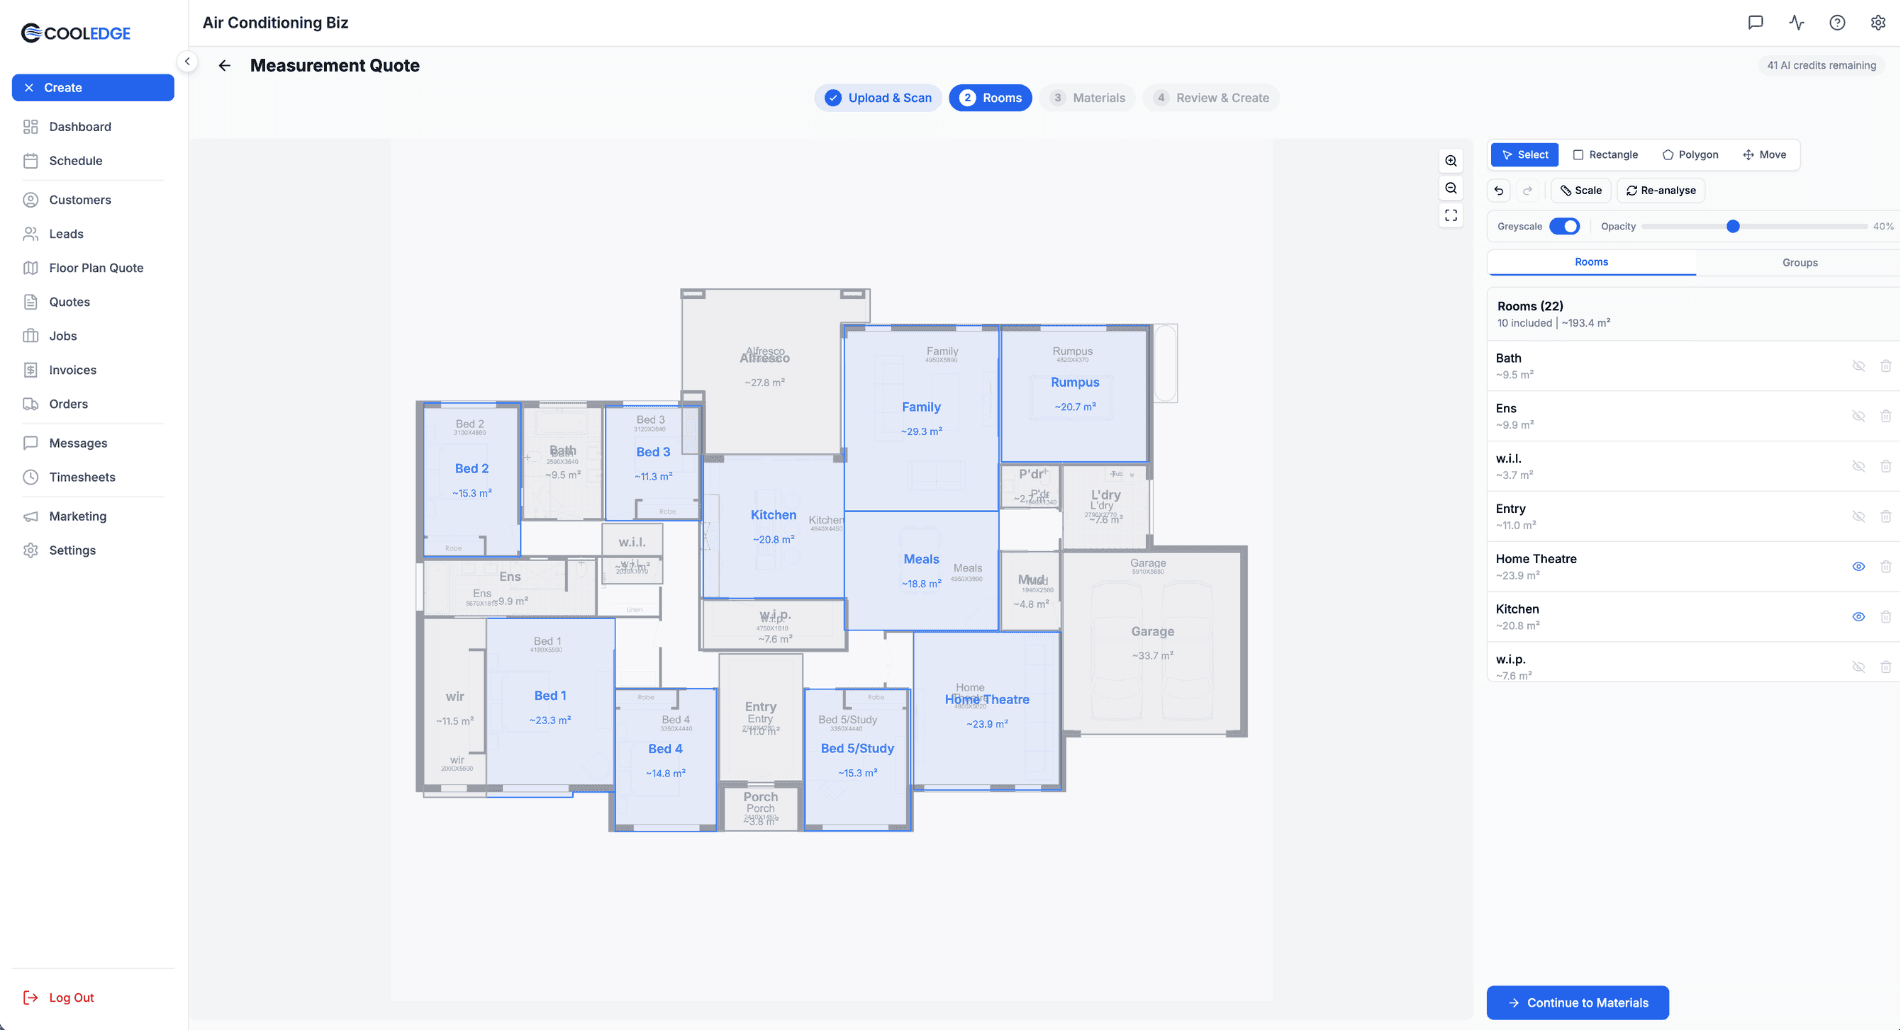
Top toolbar — drawing tools:
- Select — pick a room to edit or move
- Rectangle — draw a rectangular room
- Polygon — draw a freeform room outline
- Move — pan the floor plan
Top toolbar — actions:
- Undo / Redo — full undo history
- Scale — calibrate metres-per-pixel using a known dimension
- Re-analyse — re-run the AI on the floor plan (uses 1 AI credit)
View controls:
- Greyscale toggle — dims the floor plan background so room highlights stand out
- Opacity slider — adjust the opacity of the floor plan underlay (default 40%)
Editing Rooms
You have full control over every room:
- Rename — double-click a room label to rename it (e.g. "Master Bedroom", "Open Plan Living")
- Reshape — select a room and drag the corner handles to adjust the polygon
- Add missing rooms — use the Rectangle or Polygon tool to draw in rooms the AI missed
- Include / exclude — toggle the eye icon on any room to drop it from the quote without deleting it
- Delete — remove rooms that were detected in error
Setting the Scale
Scale conversion (pixels to metres) is critical for accurate areas.
- Click Scale in the top toolbar
- Draw a line between two points where you know the real distance
- Enter the distance in metres
- Cooledge calculates metres-per-pixel from that line
Important: Accurate scale = accurate areas = accurate quantities. If you know a room dimension (e.g. "the living room is 6m wide"), use that to calibrate.
Assign Groups
Switch to the Groups tab to group rooms by trade or area. Groups drive the materials step — each group gets its own line items and its own pricing.
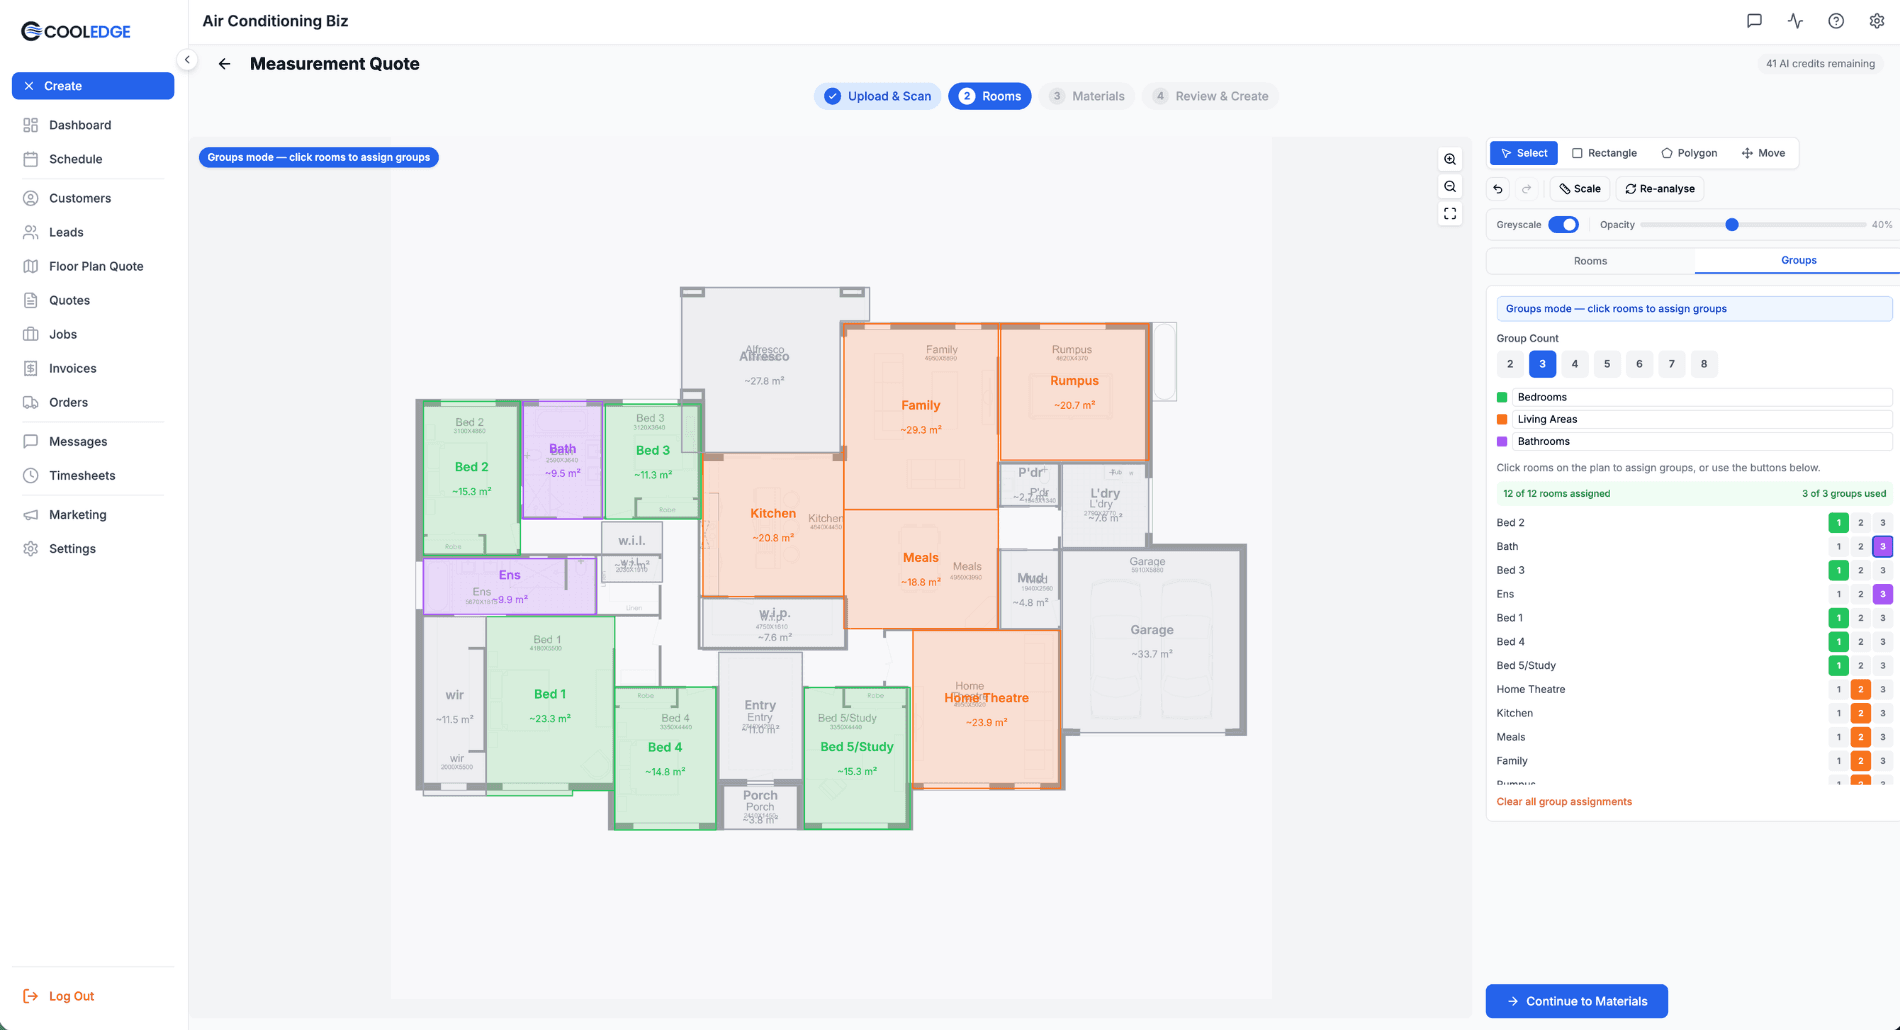
How it works:
- Pick a Group Count from 2 to 8
- Rename groups to match the job (e.g. "Bedrooms", "Living Areas", "Bathrooms", "Wet areas")
- Click a room on the floor plan, OR use the numbered buttons in the per-room assignment matrix at the bottom of the panel, to assign each room to a group
- Each group gets a colour — rooms assigned to that group take on the colour on the floor plan
The counters at the top show X of Y rooms assigned and N of N groups used. Use the red Clear all group assignments link to start over.
Tip: Groups don't have to follow trade boundaries. For a painting job you might group by "interior" vs "exterior". For a bathroom renovation you might group "wet areas" separately from "dry areas". Whatever makes sense for pricing.
Step 3 — Materials
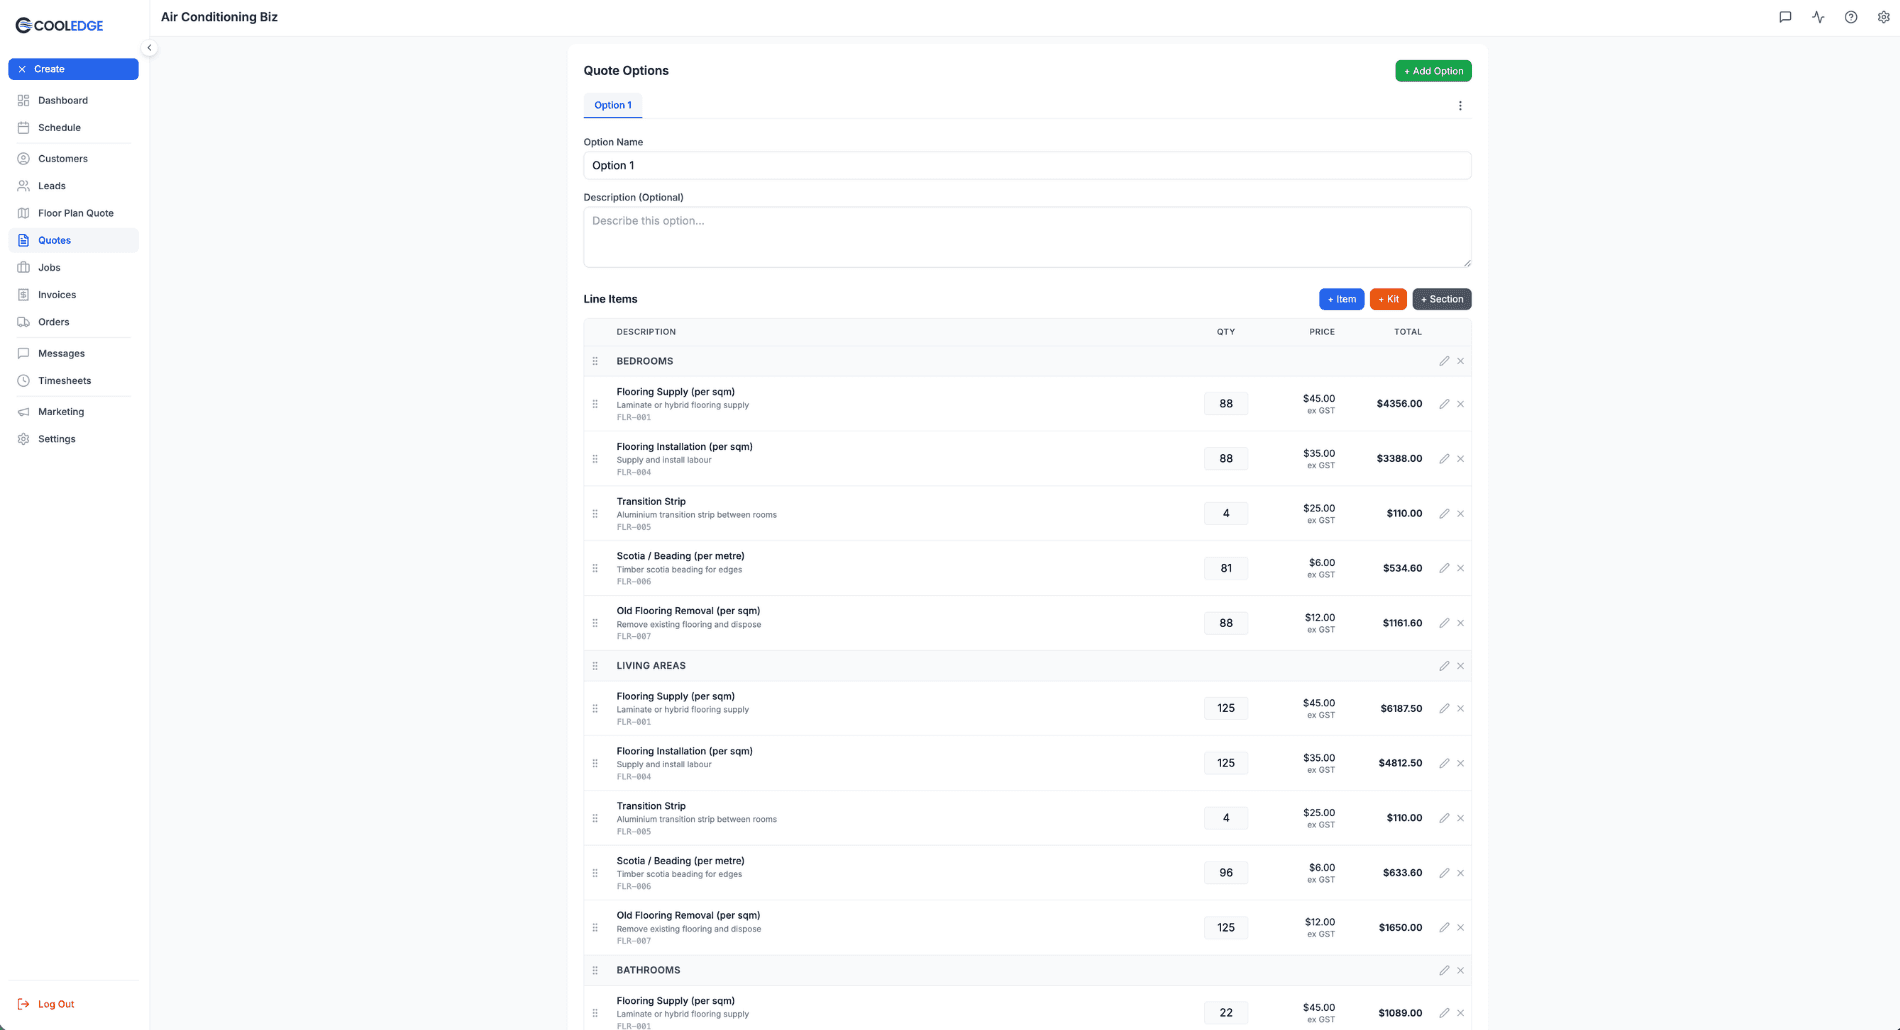
The materials step has one tab per group at the top. Each tab shows the group name, total area, and number of rooms — for example Bedrooms — 80.0m² (5 rooms), Living Areas — 113.4m² (5 rooms), Bathrooms — 19.4m² (4 rooms).
Above the items table, a header strip shows: the group name, total m², wastage-adjusted m² (e.g. + 10% wastage = 21.3 m²), number of rooms, and any applicable pill (like Wet areas for bathrooms).
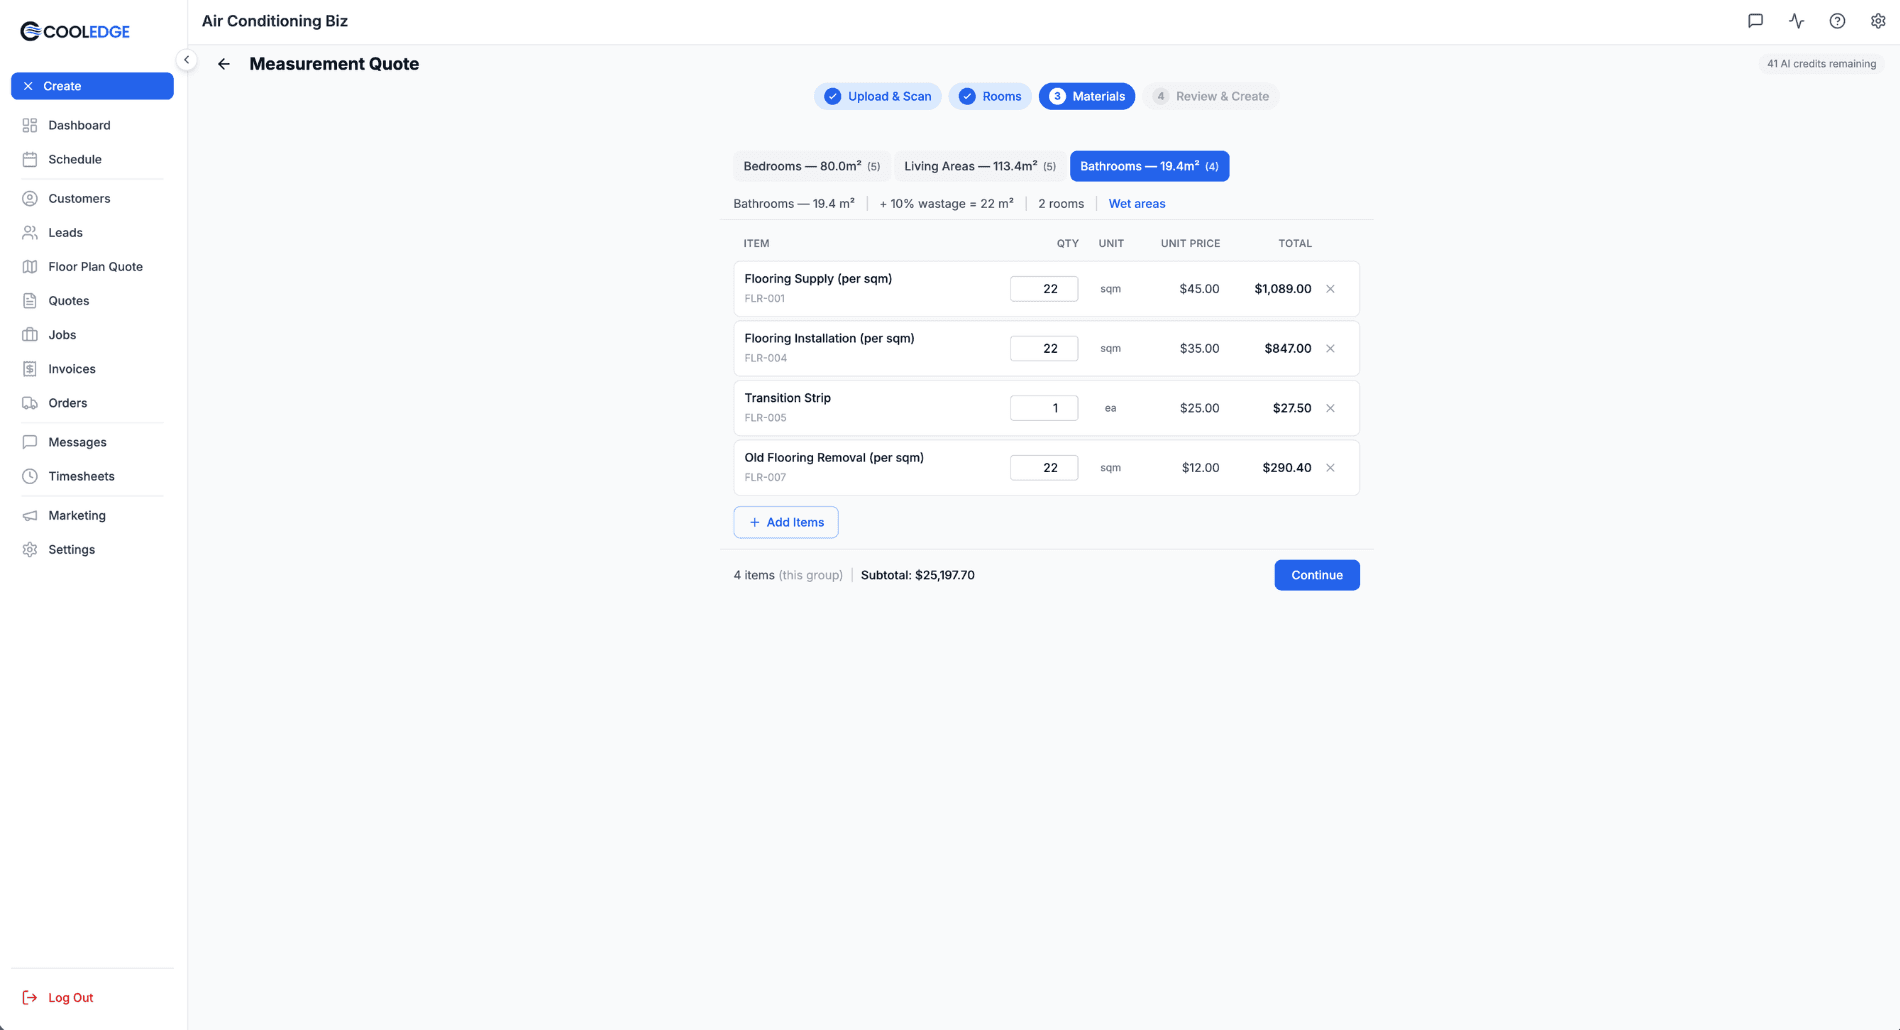
The Items Table
Each row shows:
- Item — name plus SKU in parentheses
- Qty — editable, pre-filled from group area × wastage factor for area-based items, or 1 for per-unit items
- Unit —
sqm,ea, orm - Unit Price
- Total
- A remove button (×)
At the footer: item count for the current group, subtotal, and a Continue button.
Adding Materials
Click Add Items to open the materials picker. Two tabs: Price List and Custom Item.
From Price List
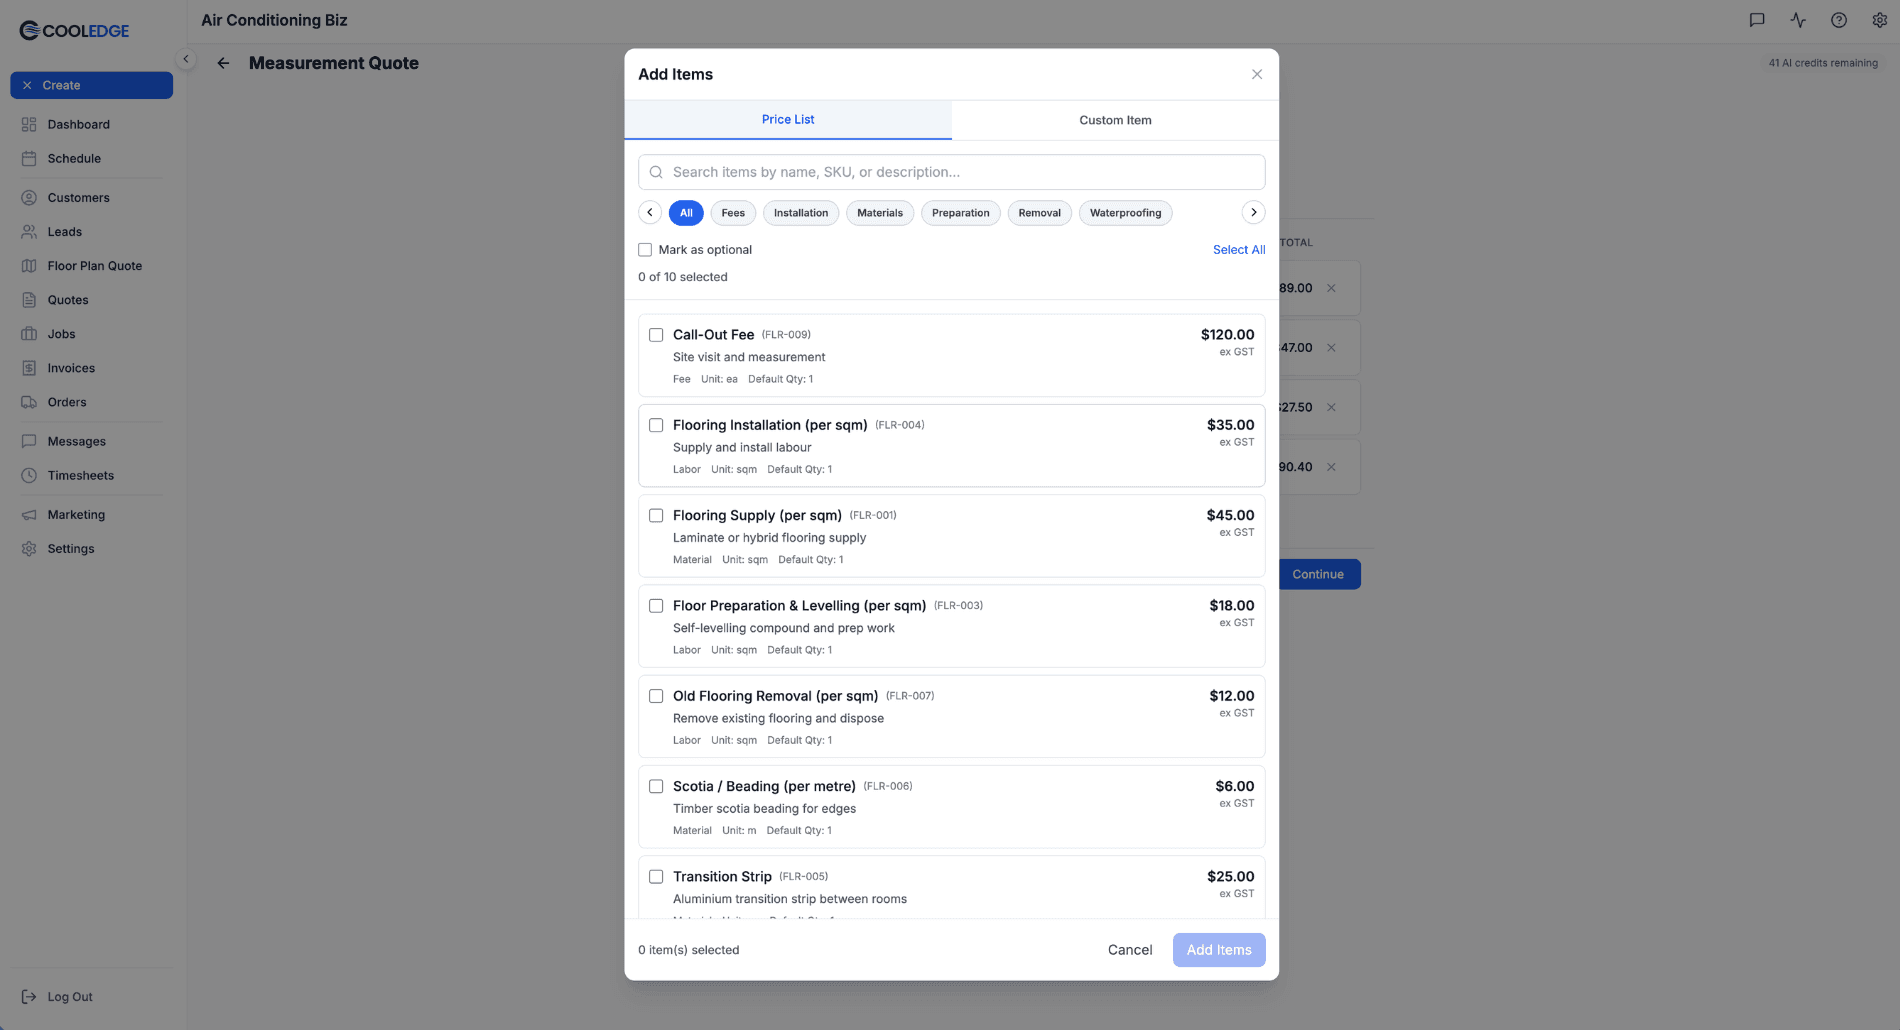
- Search field at the top by name, SKU, or description
- Category chips with left/right navigation: All / Fees / Installation / Materials / Preparation / Removal / Waterproofing
- Each item shows a checkbox, the item name (bold) with its SKU, a description, and pills for type (Fee / Material / Labor), Unit (sqm / ea / m), Default Qty (1 or area-based), and the ex-GST price
- Use Select All or tick items one at a time — the counter shows
X of Y selected - Tick Mark as optional (top right) if the selected items should be optional on the final quote
- Click Add Items to drop them into the current group
Custom Items
For one-off items not in your price list, switch to the Custom Item tab.
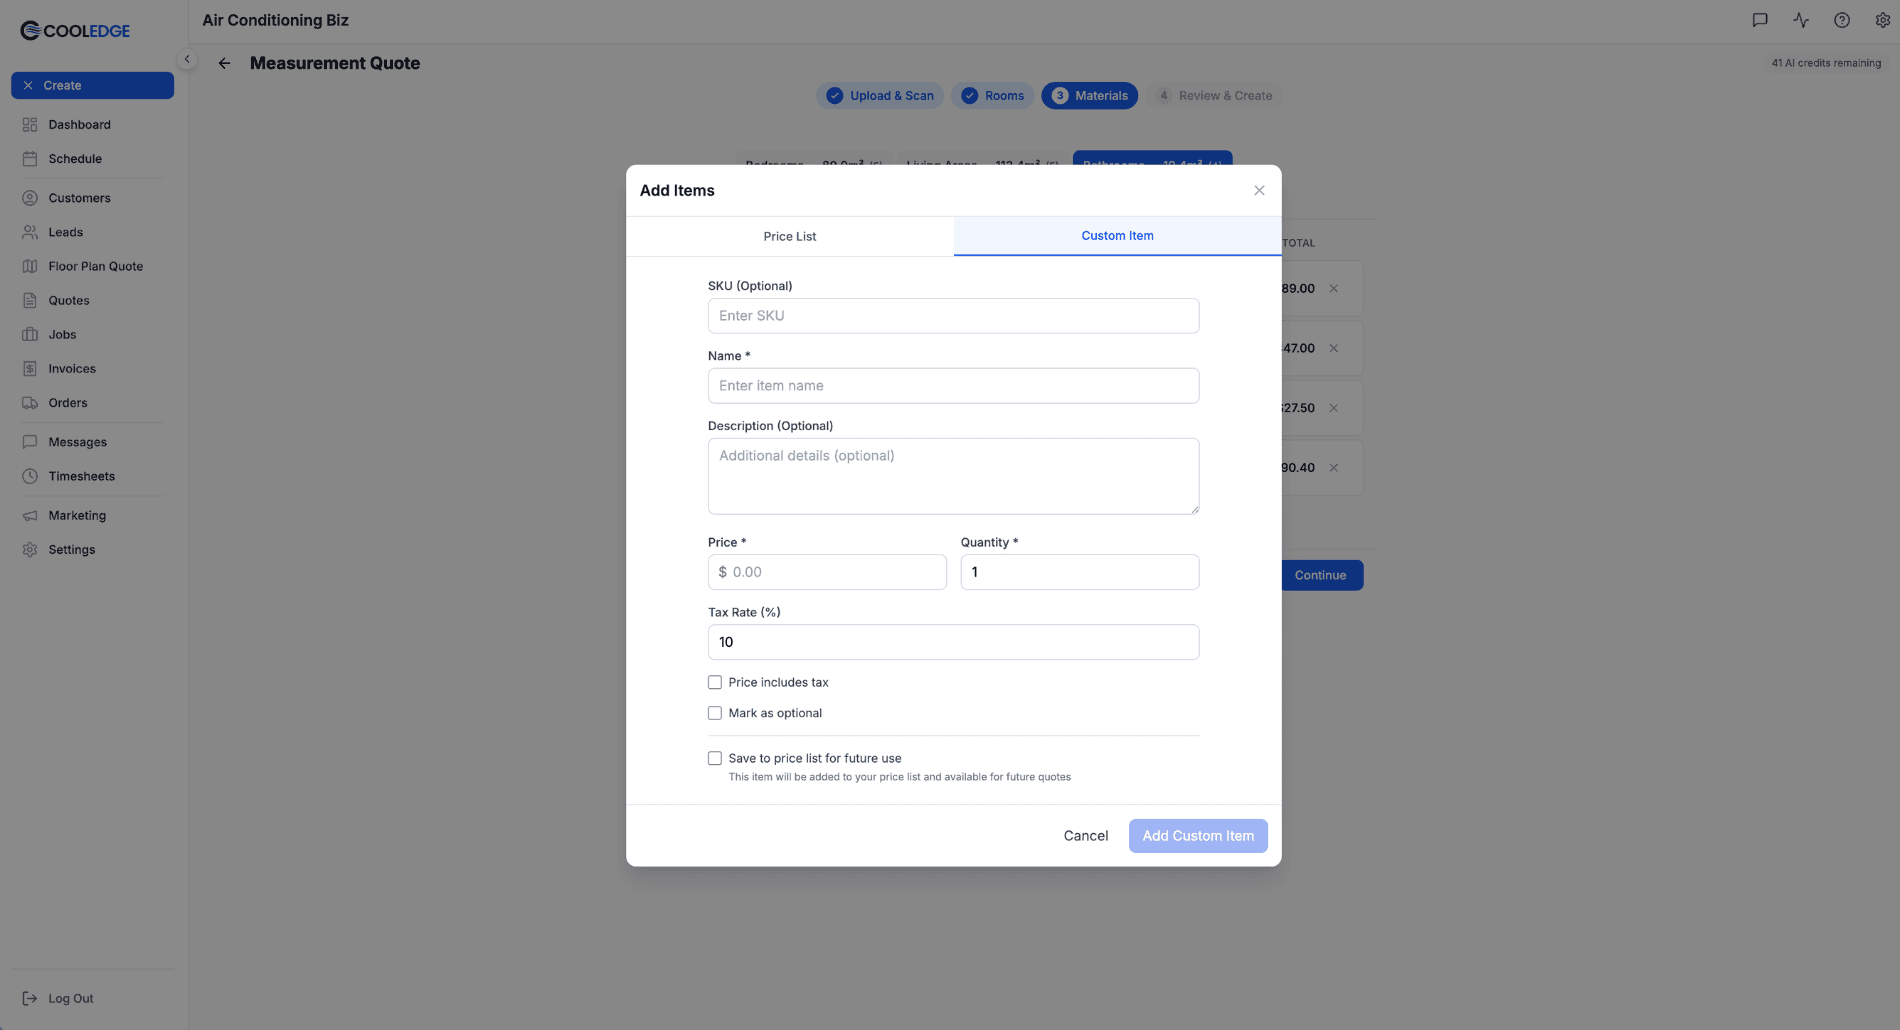
Fill in:
- SKU (optional)
- Name (required)
- Description (optional)
- Price and Quantity (required)
- Tax Rate (%) — defaults to 10
Plus three checkboxes:
- Price includes tax — for prices you've already grossed up
- Mark as optional — makes the item optional on the final quote
- Save to price list for future use — adds it to your price list so you can pick it next time without retyping
Wastage Factor
Each group applies a wastage factor (default 10%) to area-based line items. The adjusted m² shown at the top of each group tab is what drives the quantity auto-fill. Configure the default factor in Measurement Defaults so every new Measure Quote pre-fills with your preferred allowance.
Tip: Override line-item quantities per row if the wastage for a specific material is different — e.g. tile cuts on a mitred corner often need 15%.
Step 4 — Review & Create
The final step rolls up every group into a single itemised quote preview.
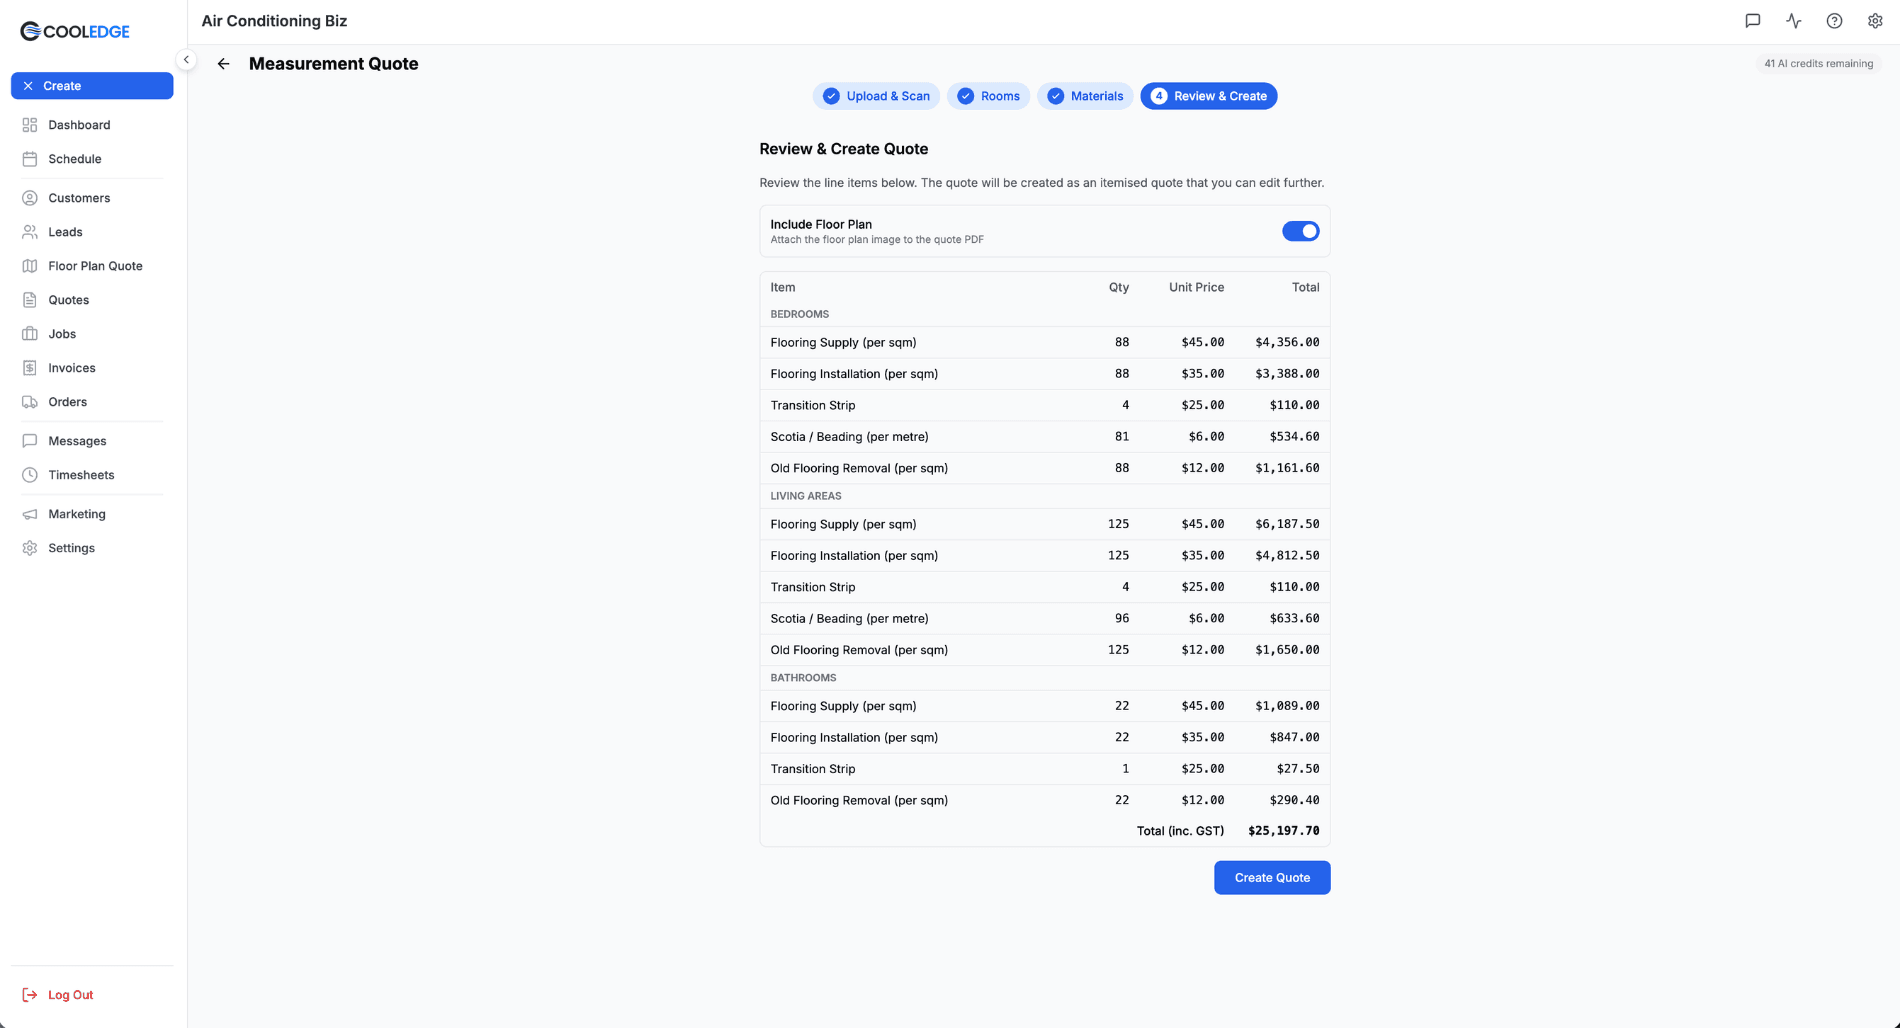
- Line items are organised by group (e.g.
BEDROOMS,LIVING AREAS,BATHROOMS) - Each item shows quantity, unit price, and line total
- Total (inc. GST) at the bottom
- Include Floor Plan toggle at the top — attaches the coloured floor plan image to the quote PDF
Click Create Quote when you're happy.
After Creating the Quote
The quote opens in the standard Quote Options editor with sections already created per group and all line items populated.
From here you can:
- Rename sections, reorder line items, or add more
- Add Kits (bundled line items) or extra Sections
- Adjust any unit price or quantity
- Set quote terms and payment schedule
- Send the quote by email, as an online link, or download as a PDF
If you enabled Include Floor Plan, the coloured floor plan (with the group colours visible) is attached to the quote PDF so the customer can see exactly which rooms are in scope and how they're grouped.
Measurement Defaults
Configure defaults once so every new Measure Quote pre-fills from them:
- Go to Settings → Floor Plan → Measurement Defaults tab
- Set your:
- Default trade (your most-used trade)
- Waste factor (typical offcut or wastage allowance as a percentage)
- Default line-item behaviour (e.g. separate materials and labour, or combine)
Defaults pre-fill on each new Measure Quote. You can still override per-job.
Note: Floor Plan Settings has separate tabs for different business types. Measurement Defaults is the tab that controls Measure Quote behaviour; Ducted AC Defaults is a separate tab on the same settings page.
Tips for Best Results
- Accurate scale = accurate areas. If you know a room dimension, use Scale to calibrate before moving on
- Use Measurement Defaults to avoid repeating setup for every job
- Crop floor plans before uploading — title blocks and site plans confuse the AI
- One floor at a time for multi-storey homes — upload each floor as a separate Measure Quote
- Group by what you price, not just by trade — if you price wet areas differently from dry areas, group them separately
- Attach the floor plan to the PDF — customers love seeing their property visualised with the scope of works overlaid
Common Questions
Does Measure Quote support ducted AC jobs? No — use Floor Plan Scanning for ducted AC. Measure Quote skips heatload entirely and goes straight to an itemised quote.
Can I use the same floor plan for different trades? Yes — use Duplicate from the Floor Plan Quotes list to branch off a plan and re-quote as a different trade or with different groups.
What if a room has both floor and wall work? Assign the room to one primary group for area calculation, then add per-room extras from the price list or as custom items in the materials step.
Do I need AI credits for manual drawing or manual entry? No — only AI floor plan analysis uses a credit (1 per scan). Manual drawing and manual entry use zero credits. Re-analyse uses another credit.
How does wastage work? Each group applies a wastage factor (default 10%) to area-based line items. The adjusted m² shown at the top of each group tab is what's used for quantity calculations. Override per-row if a specific material needs different wastage.
Can customers see optional items? Yes — items marked as optional appear on the online quote as opt-in, so customers can add them to the accepted total themselves.
What image formats can I upload? PNG, JPEG, and WebP, up to 4 MB. Higher resolution gives better AI detection results.
Related Articles:
- Floor Plan Scanning → — ducted A/C floor plans
- Managing Price List → — set up your materials
- Quoting Basics → — general quoting guide
Need help with Measure Quote? Email us at support@cooledge.com.au
Was this article helpful?
Let us know if you found this information useful.
Still need help? Contact support
In this article
Use your browser's search (Ctrl+F) to quickly find specific topics within this article.
Browse all help articles →Related Articles
Auto Duct Layout
Visual duct designer on the ducted floor plan wizard. Auto-route or draw by hand. Includes outdoor unit and refrigerant pipework. Drives the take-off.
Business Callouts (Why Choose Us)
Display trust-building callout points on your public quote pages to increase acceptance rates
Custom PDF Pages
Add professional cover pages, warranty info, maintenance plans and more to your quote and invoice PDFs