Quote Preferences & Settings
Configure payment terms, warranty terms, licences, deposit methods and other settings that appear on your quotes
Quote Preferences & Settings
Quote Preferences let you customise the content that appears on your quotes: payment terms, warranties, licences and more. These settings ensure your quotes are professional and contain all the information your customers need.
Accessing Quote Preferences
- Go to Settings in the portal sidebar
- Click Quote Preferences
- Use the tabs to navigate between different settings
Payment Terms
Payment terms define your deposit requirements and payment conditions for different work types.
Setting Up Payment Terms
- Select the Payment Terms tab
- Choose the work type: Repair or Install
- Select the client type: Standard, Real Estate or Construction
- Set the Deposit %
- Enter your payment terms text
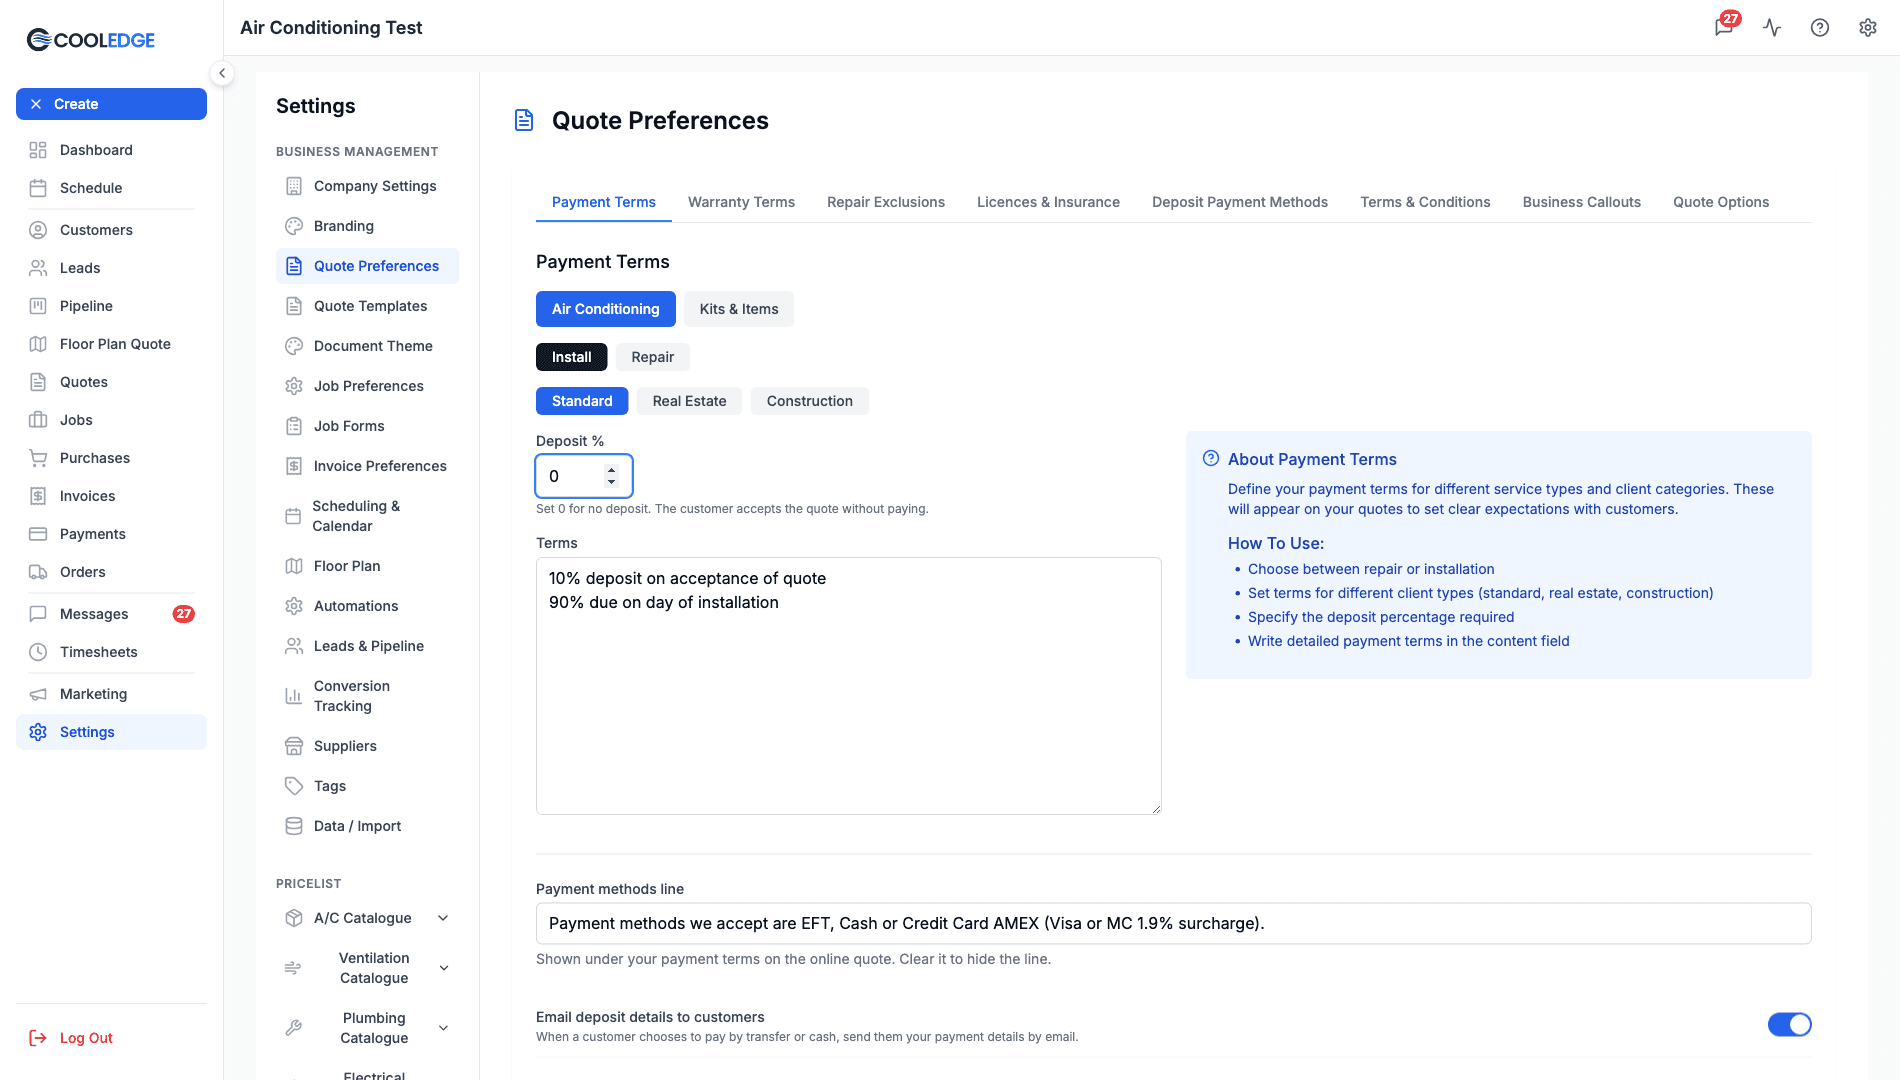
No Deposit (0%)
Deposit % accepts 0. The helper text under the field says what that means:
Set 0 for no deposit. The customer accepts the quote without paying.
On a 0% quote the accept page reads Confirm your acceptance below with a One last step panel, the customer confirms with one button and the quote goes straight to Paid. There is no payment step and no deposit invoice, so the job invoice carries the full total. If you arrange deposits outside Cooledge, note that a 0% quote offers no Receive Deposit action. Record that money as a payment on the job's invoice instead.
A blank field is not the same as zero. Leaving it empty gives you the validation error Enter a deposit percentage, and Save stays disabled until you enter a number.
Edit your terms text too. The Terms box is free text and it does not follow the percentage. Set the deposit to 0 and leave the text saying "10% deposit on acceptance of quote" and the quote will contradict itself.
Email Deposit Details to Customers
Under the terms there is a toggle, Email deposit details to customers:
When a customer chooses to pay by transfer or cash, send them your payment details by email.
Turn it on and a customer who picks bank transfer, cash or one of your custom options is emailed the instructions you saved under Deposit Payment Methods, along with the amount and a link back to their quote. It saves the moment you flip it, so the Save Changes button below does not apply to it.
- Only the business owner can change this setting
- It is off for businesses that existed before the setting was added, and on by default for new ones. Check yours rather than assuming
- The email is skipped when the quote has no customer email address, or when you have not written instructions for the method they picked
See Understanding Deposits for the whole deposit flow.
Client Types Explained
- Standard – Default terms for regular residential/commercial customers
- Real Estate – Adjusted terms for property managers and agents
- Construction – Terms for builders and construction projects
Example Payment Terms
10% deposit on acceptance of quote
90% due on day of installation
Payment Methods Line
Below your payment terms, the online quote shows a short line listing which payment methods you accept. It starts from a default sentence and you can edit it in the Payment methods line field on the Payment Terms tab. Clear the field to hide the line.
Example:
Payment methods we accept are EFT, Cash or Credit Card (Visa or MC 1% surcharge).
Warranty Terms
Define your warranty coverage. Every industry can set warranty terms, not just air conditioning.
Setting Up Warranty Terms
- Select the Warranty Terms tab
- Choose the quote type: Air Conditioning or Kits & Items
- For Air Conditioning, choose Install or Repair. Kits & Items uses a single warranty statement with no install or repair split
- Enter your warranty text
Adding Warranty to Kits & Items Quotes
Air conditioning quotes always include your warranty terms. For Kits & Items quotes it is optional, so nothing changes on the quotes you already send until you switch it on.
- Select the Warranty Terms tab
- Choose Kits & Items and enter your warranty text
- Under Add to quote PDFs, tick Kits & Items quotes
- Click Save Changes
Once it is on, your warranty appears on both the Kits & Items quote PDF and the online quote page.
Tips for Warranty Terms
- Specify the warranty duration (e.g., "24 months")
- Clarify what's covered and what's not
- Include any conditions (e.g., "regular servicing required")
- Mention manufacturer warranties separately
Example Warranty Terms
Labour Warranty: 24 months from date of installation

Parts Warranty: As per manufacturer's warranty (typically 5 years)

Warranty does not cover:
- Damage from power surges
- Damage from external factors (storms, floods)
- Issues caused by incorrect use
Repair Exclusions
Specify what's not included in your repair quotes to set clear expectations.
Setting Up Repair Exclusions
- Select the Repair Exclusions tab
- Enter Repair Notes – General information about your repair process
- Enter Exclusions – Specific items not covered
These appear on Repair Parts and Repair Leak quote types.
Example Exclusions
Repair Notes:
Our repair service includes diagnosis, parts replacement,
and testing. Labour is charged at our standard hourly rate.
Parts are quoted separately.
Exclusions:
The following are not included in this repair quote:
- Electrical work requiring a licensed electrician
- Structural modifications
- Ductwork cleaning or replacement
- Refrigerant top-ups beyond initial repair
- Access equipment (scaffolding, lifts)
Licences & Insurance
Display your business credentials on quotes to build customer trust. Every industry can add licences and insurance.
Your licences and insurance apply to your whole business, so you only enter them once. Each quote type then decides whether to show them.
Adding a Licence or Insurance
- Select the Licences & Insurance tab
- Click Add Licence/Insurance
- Enter a Label (e.g., "ARC Licence", "Public Liability Insurance")
- Optionally add an Expiry Date to track renewals
- Enter the Content with your details
- Click Save
Recommended Items
| Item | Example Content |
|---|---|
| ARC Licence | Licence No: AU12345, Expiry: [date] |
| Contractor Licence | Licence No: 123456C |
| Public Liability | Policy: ABC123, Coverage: $20M |
| Workers Comp | Policy: WC-456789 |
Example Licence Content
Legal Name: Your Business Pty Ltd
ARC Licence Number: AU12345
Licence Type: Full
Expiry Date: 30 June 2027
Adding Licences to Kits & Items Quotes
Air conditioning quotes always include your licence details. For Kits & Items quotes it is optional, so nothing changes on the quotes you already send until you switch it on.
- Select the Licences & Insurance tab
- Under Add to quote PDFs, tick Kits & Items quotes
- Click Save Changes
Your licence and insurance details then appear near the end of the Kits & Items quote PDF, under the heading "Licensing and Insurance Details".
Deposit Payment Methods
The Deposit Payment Methods tab controls how customers can pay their deposit when they accept a quote online. These options appear on the deposit payment page.
Card Payments (Stripe)
If your business is connected to Stripe, customers can pay their deposit by card the moment they accept. The payment is then recorded for you automatically. If you are not connected yet, this tab shows an Accept card payments online prompt with a Connect Stripe in Payment Settings link. See Stripe Payments → to set it up.
Bank Transfer and Cash
- Select the Deposit Payment Methods tab
- Enter Bank Transfer Details – Your bank account information
- Enter Cash Payment Details – Instructions for cash payments
Note: Leave a field empty to hide that payment option from customers.
Example Bank Transfer Details
Bank: Commonwealth Bank
Account Name: Your Business Pty Ltd
BSB: 062-000
Account Number: 1234 5678

Please include your Quote Number in the payment reference.
Email remittance to accounts@yourbusiness.com.au
Example Cash Payment Details
Cash payments accepted at our office:
123 Main Street, Sydney NSW 2000

Office Hours: Monday-Friday 8am-4pm

Please bring your quote number for reference.
Custom Payment Options
Beyond bank transfer and cash, you can add your own payment methods, such as a finance provider (for example Brighte) or manual credit card instructions. Add and manage them in the Custom payment options section of the Deposit Payment Methods tab. They appear on the deposit payment page after Credit Card, EFT and Cash.
Adding a Custom Option
- In the Deposit Payment Methods tab, scroll to Custom payment options
- Click Add custom option
- Fill in the fields below
- Reorder options with the up and down arrows or remove one with the trash icon
For each option you can set:
- Label – The name the customer sees, for example "Brighte finance" or "Credit Card"
- Instructions – What the customer should do to pay this way. This shows when they select the option
- Button text (optional) – Label for an optional button, for example "Apply with Brighte"
- Button URL (optional) – Where the button links. It must start with
http://orhttps://and opens in a new tab
Every option needs a label. If you add button text and a button URL, the option shows a button that opens your link, which is handy for a finance application form.
What Happens When a Customer Chooses One
Custom options do not take payment. Choosing one records how the customer intends to pay, nothing more. When a customer selects one and accepts:
- The quote stays Accepted with the deposit still owing, and no payment is recorded
- The customer sees your instructions for that option, and gets them by email as well if Email deposit details to customers is on
- Your office is notified by email and by push, both saying no payment has been recorded yet
- When the money arrives you record it with Receive Deposit on the quote. The quote moves to Paid once the deposit is fully covered
The same is true of bank transfer and cash. Only a card payment through Stripe is money at the moment the customer accepts.
Terms & Conditions
Require customers to accept your T&Cs before approving a quote online.
Setting Up Terms & Conditions
- Select the Terms & Conditions tab
- Toggle Require customers to accept Terms & Conditions
- Enter the URL to your full T&Cs page
- Customise the acceptance text
Using the Placeholder
Your acceptance text must include {{terms and conditions}} – this becomes a clickable link to your T&Cs URL.
Example:
I have read and agree to the {{terms and conditions}} provided by Your Business Pty Ltd.
This displays as: "☐ I have read and agree to the terms and conditions provided by Your Business Pty Ltd."
Business Callouts
Display "Why Choose Us" trust points on your public quote pages. For detailed setup instructions, see Business Callouts (Why Choose Us) →.
Quick Setup
- Select the Business Callouts tab
- Toggle Show on quote pages
- Customise the heading (default: "Why Choose Us")
- Add 2-6 callout points
Example Callouts
- Licensed & Fully Insured
- 4.9★ Google Rating
- Same-Day Service Available
- 10+ Years Experience
Quote Options
The Quote Options tab holds business-wide options that change how quotes behave.
Allow Negative Adjustments on Quotes
By default the adjustment field on a quote can only add to the total. Turn on Allow negative adjustments on quotes to let your team enter negative adjustment values that reduce the total.
- Only the business owner can change this setting
- It is off by default
- When off, adjustment fields reject negative values everywhere, including pasted values (a pasted "-1000" becomes 1000)
- The quote total can never go below $0
- The adjustment is never shown on the customer's quote either way
Allow Markup Adjustment on Quotes
Your catalogue's unit and materials markups normally apply to every quote. Turn on Allow markup adjustment on quotes to show markup sliders in the quote editor so your team can adjust pricing on individual quotes.
- Only the business owner can change this setting
- It is off by default
- When on, Unit markup and Materials markup sliders appear on Split, Ducted, Multi, VRV and Install Only quotes, in both the portal and the mobile app (Install Only shows only the materials slider)
- Slider changes apply to that quote alone. Your catalogue defaults are untouched, and Reset on a slider returns the quote to them
- A slider can go all the way to 0% for a cost-price quote
- Any quote priced with markups different to your defaults shows a Markup adjustments summary on its quote page, so the office can always see when pricing was adjusted
- Markup is never shown on the customer's quote; they only see the final prices
To change the default markups themselves, edit them on the catalogue materials pages. See Product & Catalog Management →.
Itemised Electrical Costs
Air conditioning quotes list the electrical works for each option and, by default, show what that work costs:
Includes electrical works - new dedicated circuit, inc. RCBO switch ($400.00)
Turn Itemised electrical costs off to show just the description:
Includes electrical works - new dedicated circuit, inc. RCBO switch
- Only the business owner can change this setting
- It is on by default, so nothing changes on your quotes until you switch it off
- The electrical cost is still part of the option price either way. This only changes what the customer sees, never what they pay
- Applies to Split, Ducted, Multi, VRV and Install Only quotes, on the quote PDF, the install report, the portal preview and the mobile app quote summary
- Options priced at $0 for electrical work never show a cost, whichever way the setting is set
Ducted Controller Image
Ducted quote and report PDFs include a photo of the zone controller that matches the brand you have quoted.
Turn Ducted controller image off to leave the photo out. This is worth doing if the controller you fit varies, or you would rather not picture a specific model.
- Only the business owner can change this setting
- It is on by default
- The controller name and the zone list stay on the quote either way, so the customer still sees what they are getting, for example "Daikin Zone Controller. 2 zones"
- Only affects the PDFs. The online quote page has never shown the photo
Note: Changes can take up to 2 hours to show in the mobile app. Fully closing and reopening the app applies them straight away.
Saving Your Changes
Changes are not saved automatically. After making edits:
- Click Save Changes at the bottom of the page
- Wait for the "Changes saved successfully" confirmation
- The button is disabled if no changes have been made
Note: The Save button will be disabled if there are validation errors (e.g., the deposit percentage field is blank, T&C URL is invalid).
The Quote Options toggles and Email deposit details to customers are the exception. They save the moment you change them, so the Save Changes button does not apply to them.
How Settings Appear on Quotes
Your quote preferences appear in different places depending on the setting:
| Setting | Detailed Quote PDF | Online Quote Page |
|---|---|---|
| Payment Terms | Yes | Yes |
| Email deposit details to customers | No | No (it emails the customer instead) |
| Warranty Terms | Yes (AC quotes; Kits & Items when turned on) | Yes (AC quotes; Kits & Items when turned on) |
| Repair Exclusions | Yes (repair only) | Yes (repair only) |
| Licences & Insurance | Yes (AC quotes; Kits & Items when turned on) | No |
| Deposit Payment Methods | No | Yes (deposit page) |
| Terms & Conditions | No | Yes (acceptance) |
| Business Callouts | No | Yes |
Note: "AC quotes" refers to Split, Ducted, Multi, VRV and Repair system types, which always show these sections. Kits & Items quotes show warranty and licences only once you turn them on under Add to quote PDFs.
Related Articles:
- Business Callouts (Why Choose Us) → – Detailed callouts guide
- Quoting Basics → – Creating and sending quotes
- Understanding Deposits → – How deposits work
Need help with quote preferences? Email us at support@cooledge.com.au
Was this article helpful?
Let us know if you found this information useful.
Still need help? Contact support
In this article
Use your browser's search (Ctrl+F) to quickly find specific topics within this article.
Browse all help articles →Related Articles
Auto Duct Layout
Visual duct designer on the ducted floor plan wizard. Auto-route or draw by hand. Includes outdoor unit and refrigerant pipework. Drives the take-off.
Business Callouts (Why Choose Us)
Display trust-building callout points on your public quote pages to increase acceptance rates
Custom PDF Pages
Add professional cover pages, warranty info, maintenance plans and more to your quote and invoice PDFs