Lead Capture — Forms, Landing Pages & Chat Widget
Build forms, create landing pages, and add chat widgets to capture leads directly from your website and campaigns
Lead Capture
CoolEdge Lead Capture lets you generate your own leads with embeddable forms, branded landing pages, and a floating chat widget. Every submission lands in your unified lead pipeline with real-time notifications and full reporting.
Looking for the Leads Marketplace? The marketplace delivers pre-qualified leads from partner channels. Lead Capture is about generating your own leads from your website, ads, and social. Learn about the Leads Marketplace →
Want customers to book a time, not just enquire? Switch booking on for any form and visitors pick a live time slot that creates a confirmed job on your calendar with staff assigned. Learn about Online Bookings →
Prefer a board over a list? Every lead also appears on the Sales Pipeline →, a drag and drop board with custom stages and deal values.
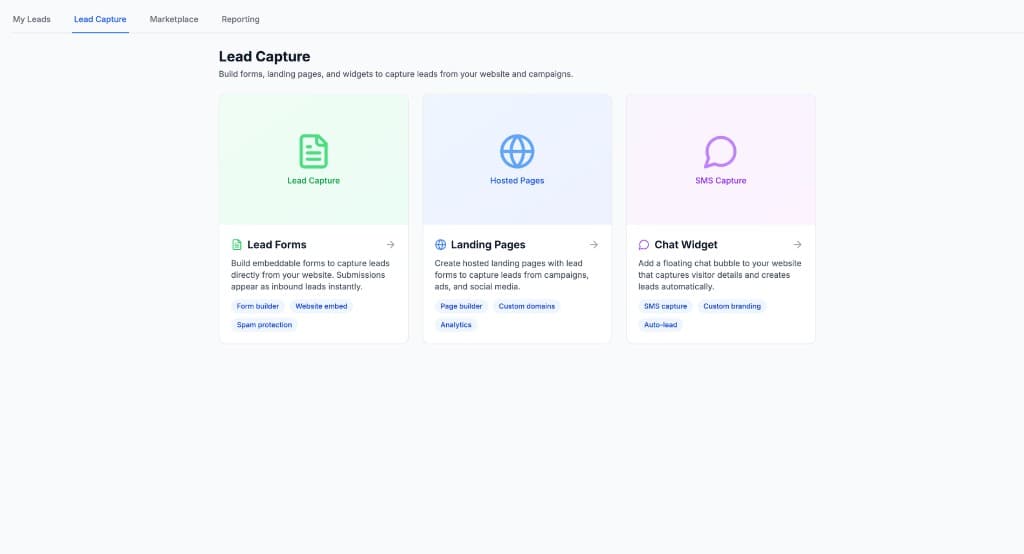
1. Lead Forms
Lead forms are custom forms you build inside CoolEdge and embed on any website. When a visitor submits the form, a lead is created in your pipeline instantly.
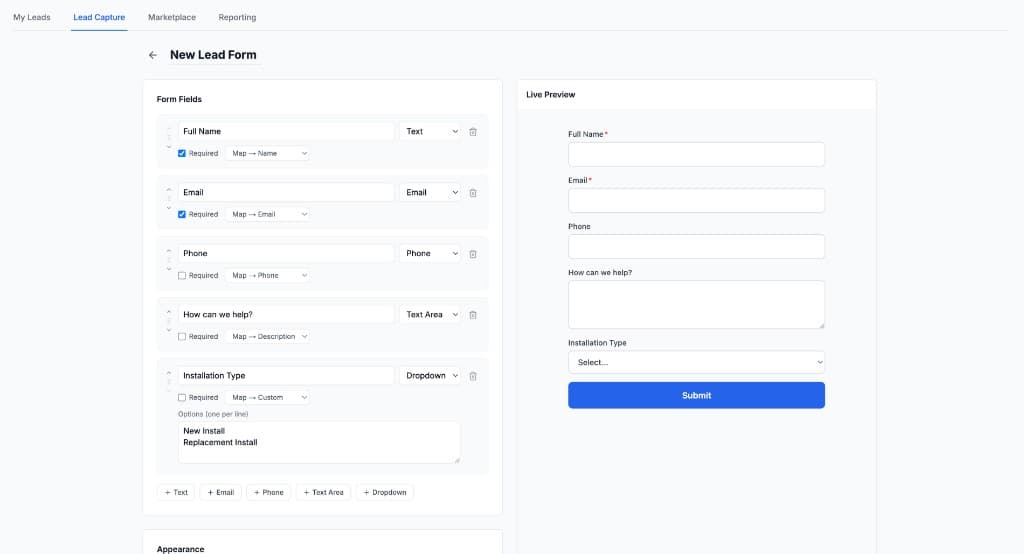
Building a Form
- Go to Leads → Lead Capture → Lead Forms
- Click + New Form
- Add fields by clicking the field type buttons: Text, Email, Phone, Text Area, or Dropdown
- Configure each field:
- Label — the field name visitors see
- Type — text, email, phone, textarea, or dropdown
- Required — toggle whether the field must be filled in
- Map To — choose which lead field it maps to (Name, Email, Phone, Address, Description, or Custom)
- For dropdown fields, enter options one per line
- Click Save when done
Multi-Step Forms and File Uploads
Forms can be single-step or split across multiple steps. Use question steps to group your questions across a few tidy screens instead of one long page, for example "About your property" then "About the job". A single question step renders as a normal form. Two or more turn the form into a stepped wizard with a progress bar.
Add a File Upload field when you need a photo or document from the customer, such as a photo of the switchboard or the unit's model plate. Uploads accept images and PDFs, up to 4 files per question, and attach to the lead automatically.
Multi-step forms and file uploads work on any lead form. To let visitors pick a time and book a job, see Online Bookings →.
Embedding on Your Website
Once your form is saved, you can embed it on any website:
- Open the form and click the Embed tab
- Copy the embed script
- Paste the script into your website HTML where you want the form to appear
The form renders inside an iframe and automatically matches the width of its container.
Form Appearance
You can customise the form's look under Settings:
- Button text and colour — change the submit button label and colour
- Success message — what visitors see after submitting
- Redirect URL — optionally redirect to a thank-you page after submission
2. Landing Pages
Landing pages are hosted pages with your branding, a hero section, body content, trust signals, and an integrated form. They live at a URL like yourbusiness.cooledge.com.au/lp/page-name and don't require your own website.
Creating a Landing Page
- Go to Leads → Lead Capture → Landing Pages
- Click + New Page
- Enter a page name and choose which lead form to attach
- Build the page using sections:
- Hero — headline, subheading, and call-to-action
- Body — describe your services or offer
- Trust — testimonials or trust badges
- Form — the lead form appears here
- Footer — business details and links
Theme & Branding
Customise the look of your landing page under the Theme panel:
- Light or Dark mode
- Accent colour — buttons and highlights
- Font — System, Serif, or Mono
- Show business logo — toggles your logo in the header
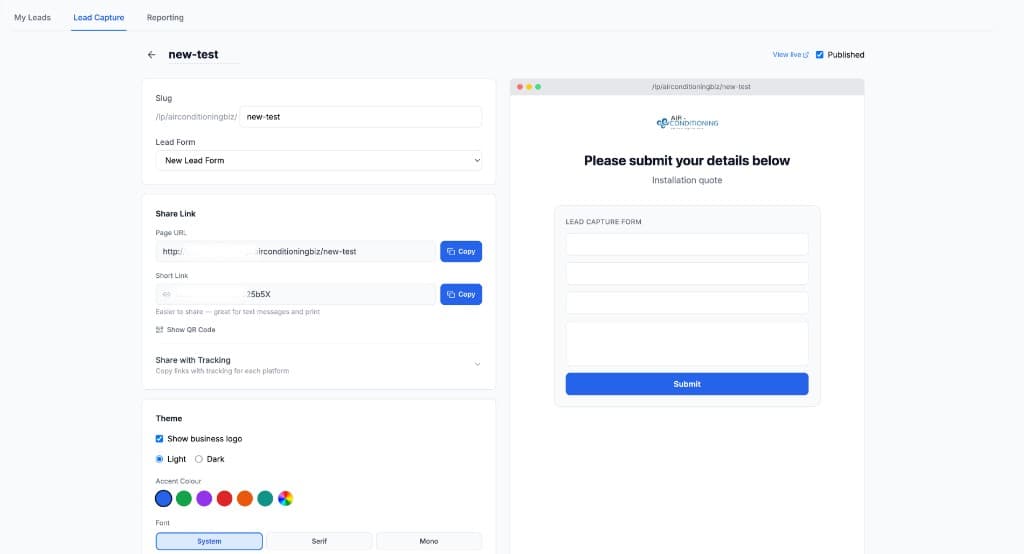
Publishing & Sharing
- Toggle Published to make the page live
- Copy the Page URL or Short Link to share
- Use the Share with Tracking panel to get links pre-tagged with UTM parameters for Facebook, Instagram, Google Ads, Email, SMS, and Flyers
- Click Show QR Code to generate a downloadable QR code for print materials
3. Chat Widget
The chat widget is a floating bubble you add to your website. It captures visitor details through a conversational prompt — ideal for visitors who prefer messaging over filling in a form.
Setting Up the Chat Widget
- Go to Leads → Lead Capture → Chat Widget
- Configure:
- Greeting — the initial tooltip message (e.g. "Need a quote?")
- Header title — the title when the chat opens
- Accent colour — matches the bubble and header
- Position — left or right side of the screen
- Avatar — a default avatar is included, or upload your own profile picture
- Consent text — privacy/consent message shown before submission
- Under Behaviour, configure:
- Show prompt on page load — auto-show the greeting tooltip after a delay
- Show avatar on prompt — display the avatar beside the greeting tooltip
- Hide on mobile — disable the auto-prompt on mobile devices
- Prompt delay — how long to wait before showing the greeting (0–15 seconds)
- Copy the embed script and add it to your website
How It Works for Visitors
- A floating chat bubble appears on your website
- After a configurable delay, a tooltip prompt appears with your avatar and greeting
- Clicking the bubble opens the chat form above it — the bubble stays visible as a toggle
- Visitors enter their name, phone, and message then hit send
- Closing the form returns to the prompt; the prompt only disappears when a visitor explicitly dismisses it
- On submit, a lead is created in your pipeline with source "Chat"
4. Online Bookings
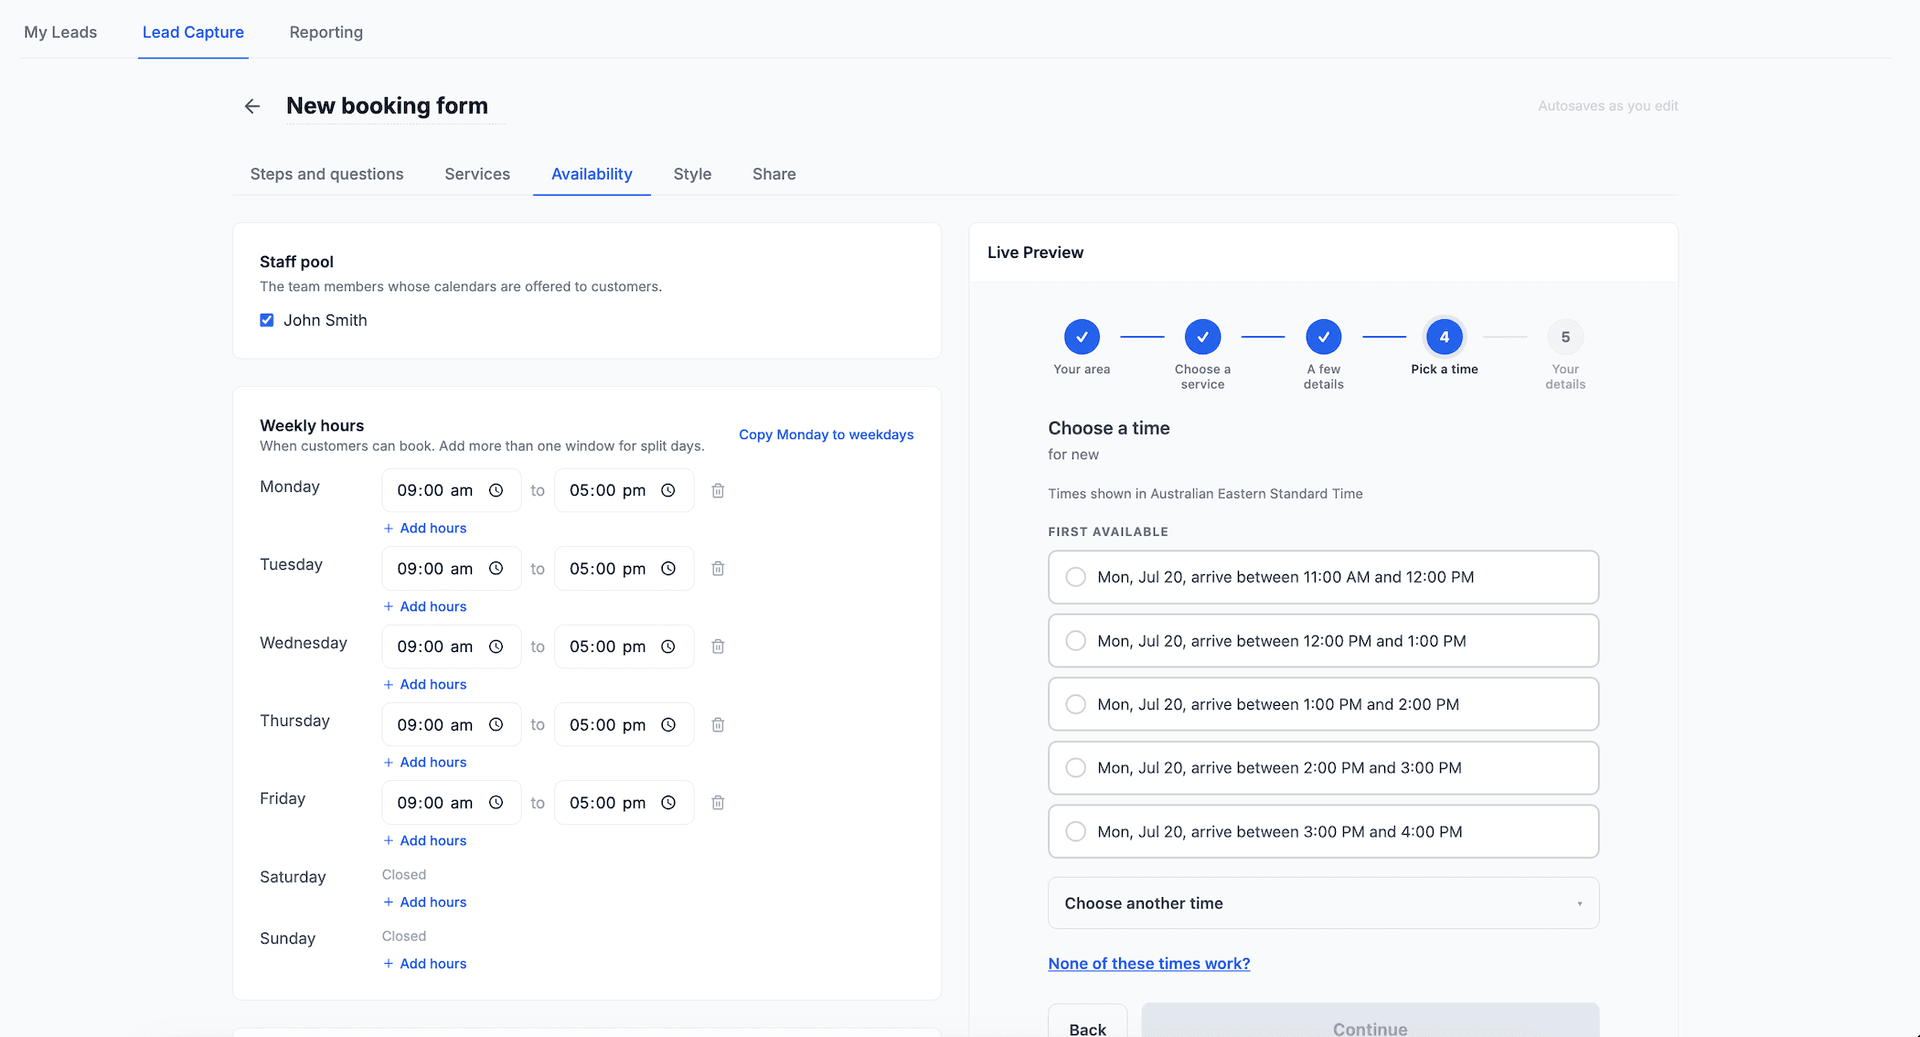
Any lead form can go one step further and take the booking itself. Switch Booking on for a form and it gains a schedule step where visitors pick a real available time. Submitting auto-confirms: Cooledge creates the lead, customer and job, assigns a staff member and drops the booking on your schedule calendar.
- Services with real durations: each service sets how long it takes and whether it books a Work Order, a Quote Visit or an Enquiry
- Live availability: time slots are worked out against your real calendar, so a time is only offered when a staff member is genuinely free
- Everything after the booking is automatic: confirmation email, calendar invite and reminders go out without you touching anything
Online Bookings is available on Growth and Scale plans. Read the full Online Bookings guide →
5. Managing Your Leads
All leads from forms, landing pages, and the chat widget appear in your Leads pipeline alongside any marketplace leads you've claimed.
Use the search and filter bar to narrow the list: status, source and lead type sit in the bar, and the Filters button adds enquiry type, hot leads, tag, form and channel. Click a column heading to sort the list. Prefer working your deals on a board? Open the Sales Pipeline →.
Lead Details
Click any lead to see full details:
- Contact Information — name, email, phone, address
- Lead Info — status, source, lead type, created date, postcode
- Description — what the customer submitted
- Custom Fields — any additional data from dropdown or custom fields
- Notes — add internal notes for your team
- Tags: the customer's tags, viewable and editable right on the lead
- Quotes, jobs and invoices: everything the lead produced, with its deal value
- Attribution: the channel, campaign, form and landing page that captured the lead
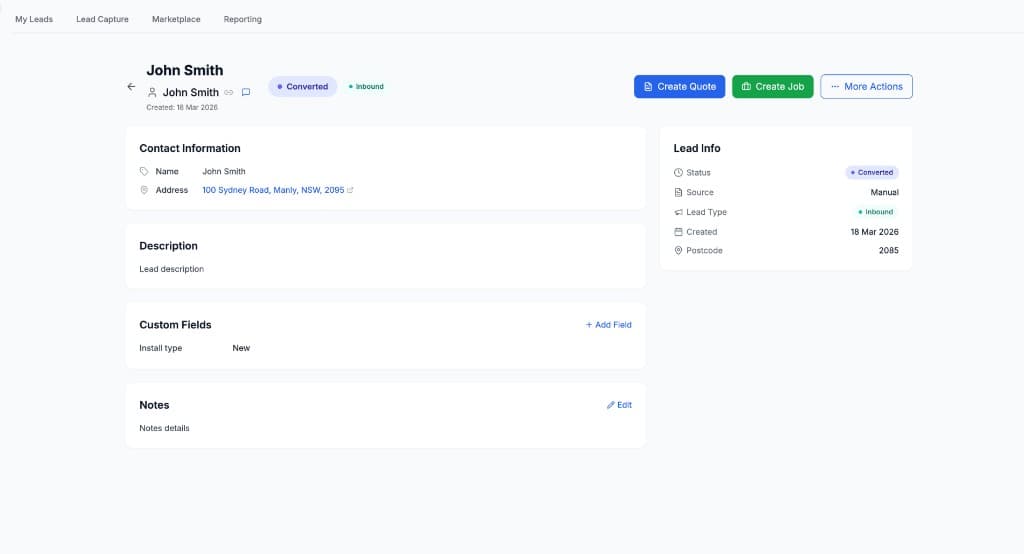
Lead Actions
From the lead detail page you can:
- Mark as Contacted — update the status when you've reached out
- Create Quote — generate a quote directly from the lead
- Create Job — convert the lead into a job
- Flag as Hot: mark the lead as a priority so it stands out on the list and the board
- Archive — remove from active pipeline
Lead Statuses
Inbound leads follow this status flow:
- New → Contacted → Quoted → Converted → Won or Archived
On the Sales Pipeline → these statuses group your custom stages, so the board and the list always agree about where a lead sits.
6. Lead Reporting
Track how your lead capture is performing across all channels.
- Go to Leads → Reporting
- Select a time period: 7 days, 30 days, 90 days, or All time
Report Sections
- Summary Cards — total leads, conversion rate, top source, new this period
- By Source — see how many leads came from each source (Manual, Web Form, Landing Page, Chat, Marketplace)
- By Status — breakdown of leads by their current status
- Timeline — leads over time so you can spot trends
- Top forms: leads, quoted and won counts with a won rate per form, so you can see which forms produce work rather than just enquiries
- Landing pages: views, leads and view to lead conversion for every page you host

7. Short Links & Attribution
Every landing page and form can be shared with tracked short links. These help you understand exactly where your leads come from.
Each lead's detail page shows what captured it on the Attribution card: the channel, the campaign and the exact form and landing page, linked straight to their builders.
To close the loop, Conversion Tracking sends every booking and lead to Google Analytics, Google Ads and Meta the moment it is captured, so your ad platforms can optimise for the campaigns that actually produce work.
Channel Presets
When sharing a landing page, CoolEdge offers pre-configured links for:
- Facebook — UTM tagged for Facebook campaigns
- Instagram — UTM tagged for Instagram
- Google Ads — UTM tagged for paid search
- Email — UTM tagged for email campaigns
- SMS — UTM tagged for text messages
- Flyer — UTM tagged for print materials
QR Codes
Generate a QR code for any landing page to use on:
- Business cards
- Flyers and letterbox drops
- Vehicle signage
- Job site signs
8. Notification Settings
Control how you're notified when new leads come in.
- Go to Settings → Leads
- Under Inbound Notifications, configure:
- Email notifications — receive an email for every new inbound lead
9. Tips for Getting More Leads
- Add the form to every page of your website, not just the contact page
- Use landing pages for ads — a dedicated page converts better than your homepage
- Enable the chat widget — some visitors won't fill in a form but will chat
- Include QR codes on flyers — make it easy for offline contacts to reach you
- Track your sources — check reporting weekly and invest more in what works
Next Steps: Take bookings with Online Bookings → | Set up Conversion Tracking → | Send Email & SMS Campaigns → | Create quotes from leads →
Need help with Lead Capture? Email us at support@cooledge.com.au
Was this article helpful?
Let us know if you found this information useful.
Still need help? Contact support
In this article
Use your browser's search (Ctrl+F) to quickly find specific topics within this article.
Browse all help articles →Related Articles
Online Bookings
Let customers book jobs straight from your website. Turn any lead form into a self-service booking page that creates a confirmed job on your calendar with staff assigned.
Sales Pipeline
Work your leads on a drag and drop board with custom stages, deal values and a 30 day view of what you won and lost