Creating Customers
Add new customers to your database with contact details and site addresses
Creating Customers
When to Create a Customer
You'll create a new customer when:
- First-time customer requests work
- New lead from the marketplace
- Referral or phone inquiry
- Walk-in customer at your office/shop
Always search first! Before creating, search to make sure the customer doesn't already exist. See Finding and Searching Customers to avoid duplicates.
Where to Create Customers
There are several places you can create customers:
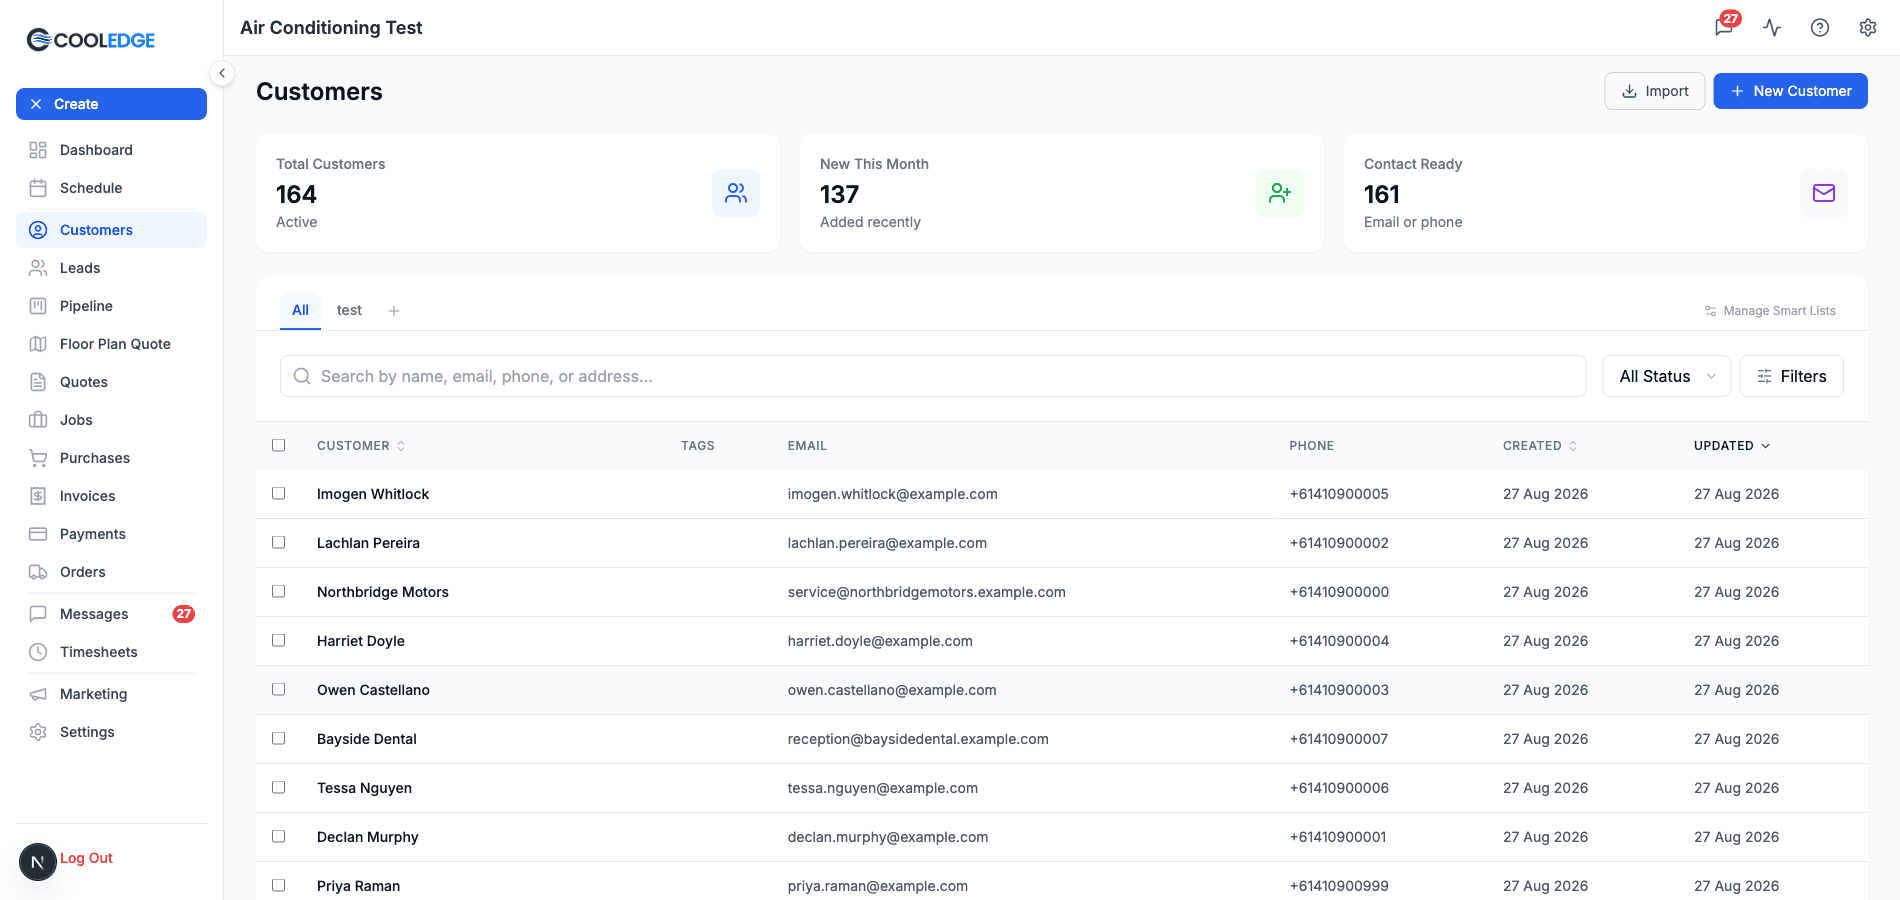
From the Customers Page (Main Method)
- Go to the Customers page in the portal
- Click New Customer (top right)
- Fill in the customer form
- Click Create Customer
This gives you the full form with all options.
During Quote/Job Creation
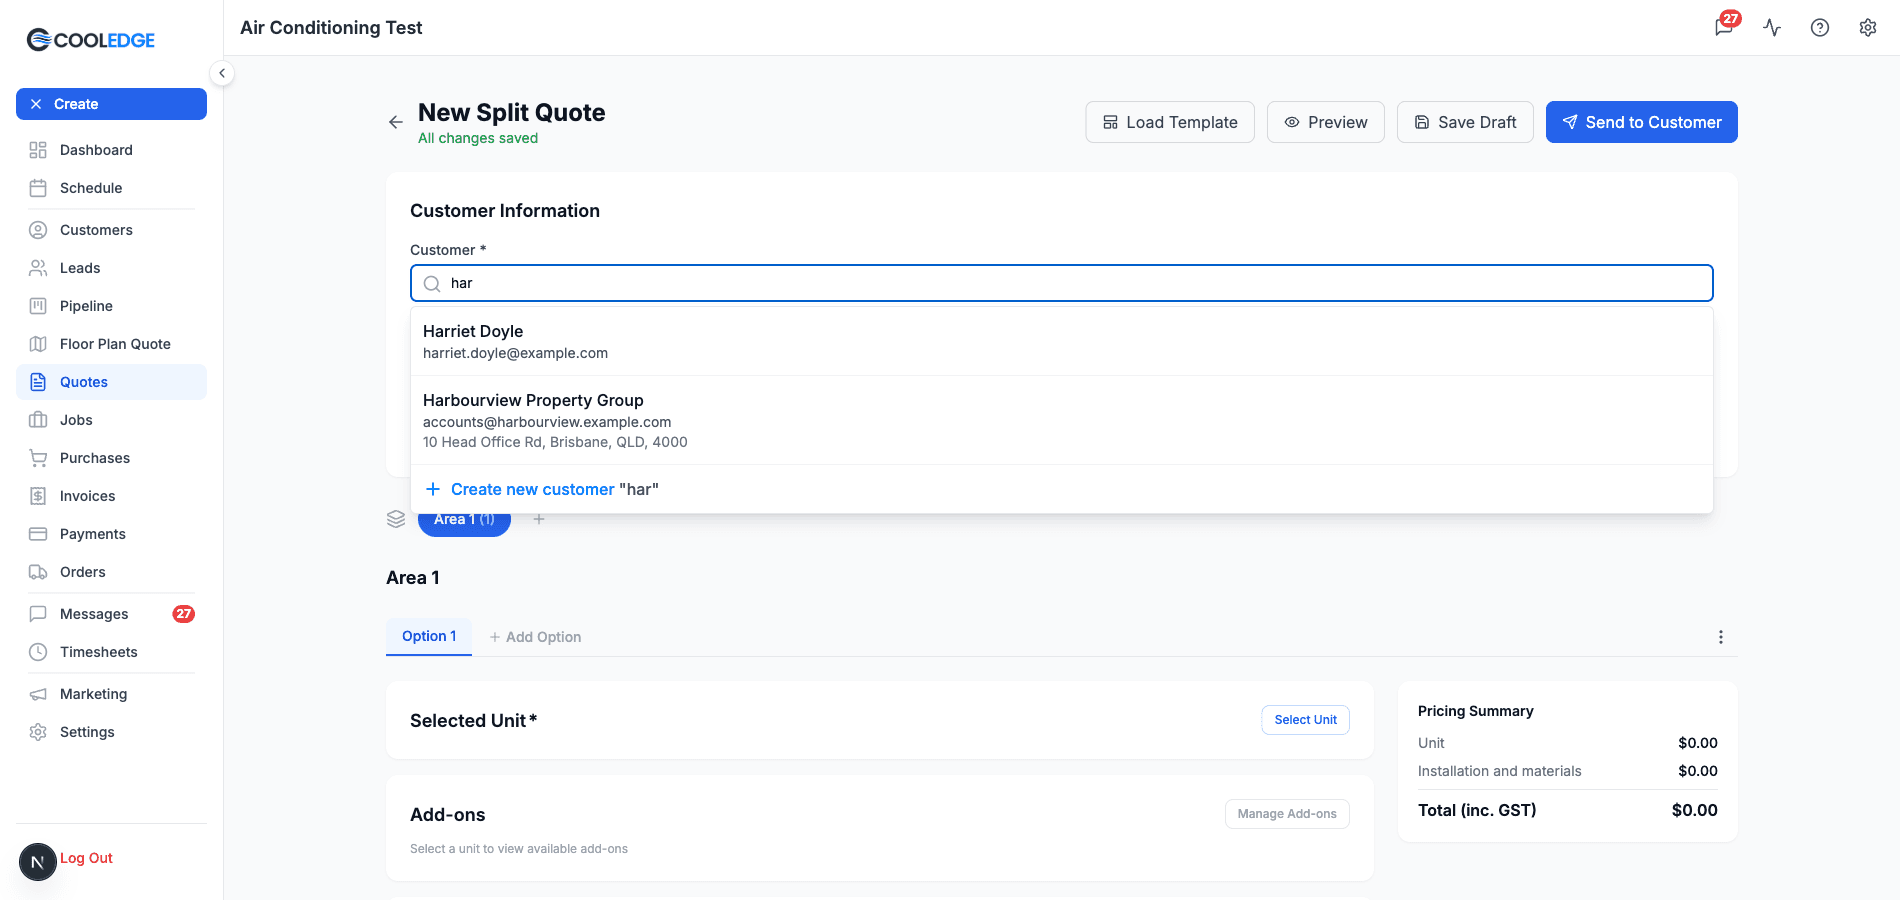
When creating a quote or job:
- Click into the customer field: your recent customers appear straight away, so pick one or start typing to search
- If they aren't there, click Create new customer at the bottom of the results
- A short form opens over the page, with whatever you typed already in the name field
- Fill in the essential details
- Save
- Carry on with the quote or job
This is faster and it skips the Notes field.
From Mobile App
In the Cooledge mobile app, on the Customer step of a quote:
- Tap Select Customer
- Search by name, email or phone
- If they aren't there, tap Create New Customer
- Fill in the details on the phone
- The customer is created and attached to the quote
The mobile form is simplified for field use. You can also create a customer straight from the + button on the Home screen, under New Customer.
The duplicate check runs on the phone too. Type an email or phone that already belongs to a customer and the same warning appears under the contact fields, so a second record doesn't get created from the field where it's hardest to notice.
Customer Information Explained
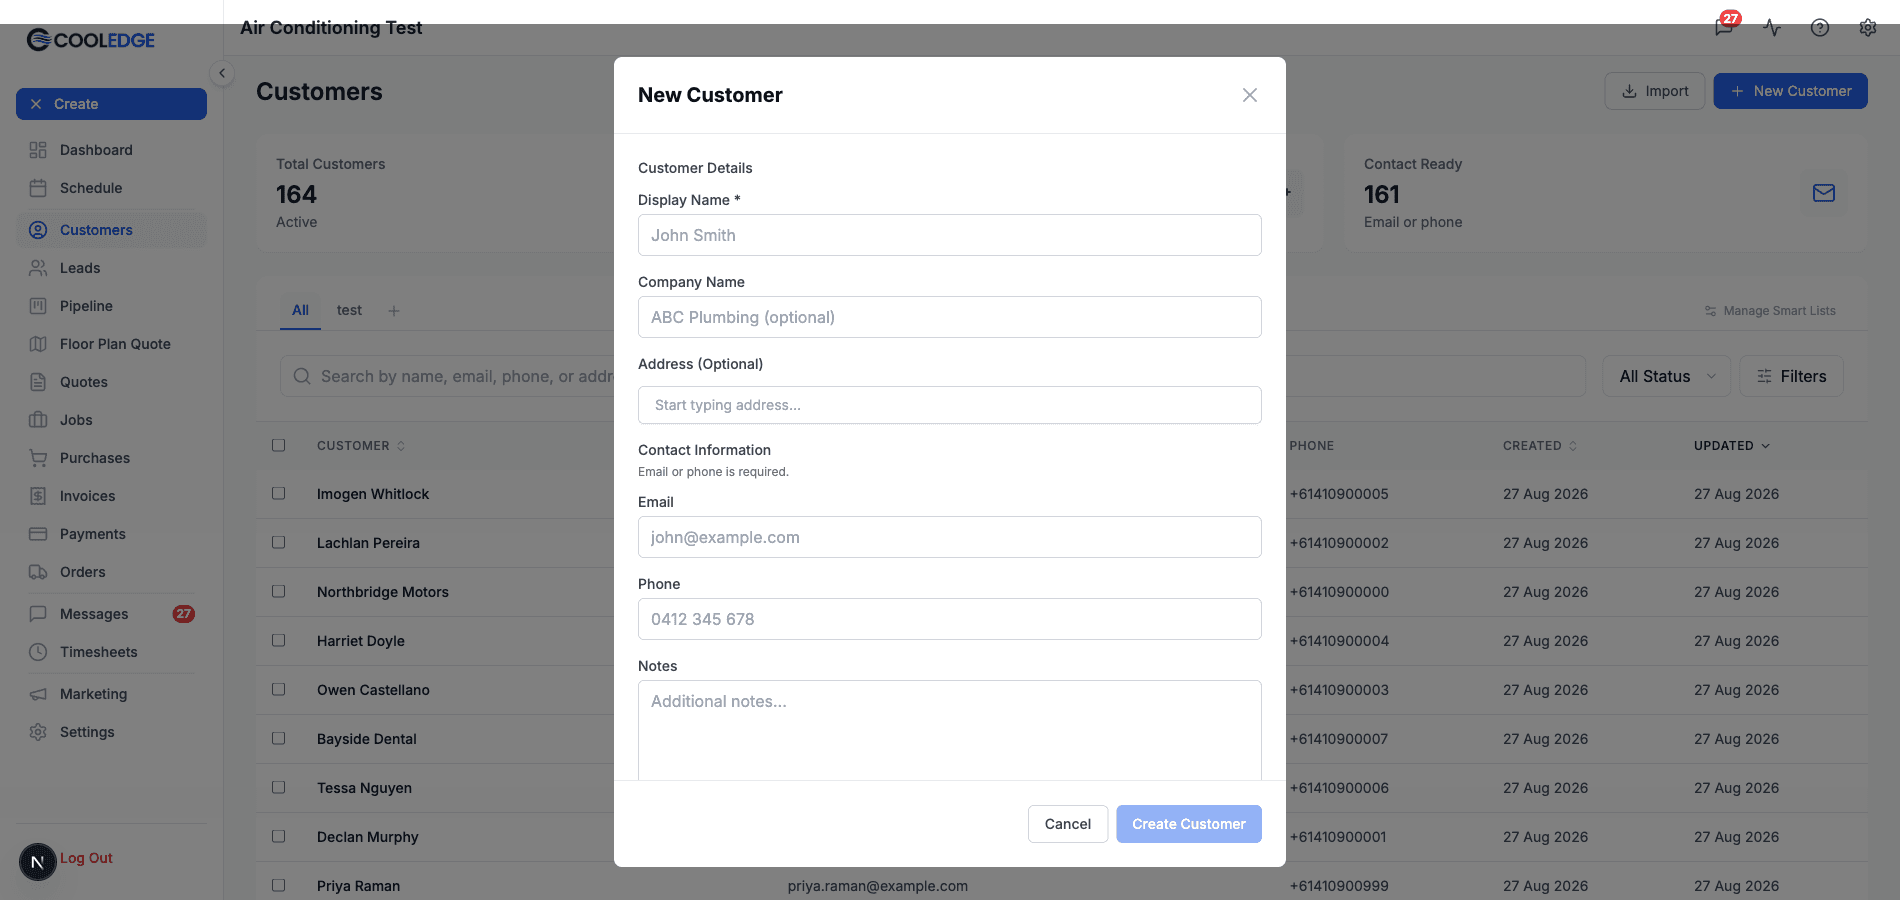
Display Name (Required)
This is what you'll see everywhere in Cooledge - on the calendar, in job lists and on invoices. You can format it however works for you: "John Smith", "Smith, John", "ABC Plumbing Services" or even "John at 45 George St".
Just be consistent with your approach. For individuals, "First Last" format works well. For businesses, use the business name. The key is making it recognizable at a glance so you know exactly who you're looking at.
Company Name (Optional)
The customer's registered business name. This is what shows as Company on their detail page and what formal paperwork needs. Use it when:
- The customer is a business
- Invoicing needs the registered name
- Contracts need the legal entity
Examples:
- Display Name: "Joe's Cafe"
- Company Name: "Joseph Smith PTY LTD"
Once you type a company name, a Use company name as display name tickbox appears. Tick it and the company name becomes the display name too, which saves typing it twice for a straight business customer.
Most individual customers can leave this blank.
Contact Information
You need at least one of these. The form won't save with both the email and the phone empty, because a customer Cooledge can't reach is a customer you can't quote.
- The address invoices and quotes go to
- Where they'll receive all communications
- Check it carefully, typos here cause delivery failures
Phone
- The number to call
- A mobile is best, so SMS works too
- Include the area code (e.g. 0412 345 678)
These become the customer's default email and default phone. A customer can also have several contact people, each with their own email and phone, but the defaults stay the fallback for everything Cooledge sends.
Contact people
If the customer has more than one person you deal with (a site manager, an accounts person, a tenant) you can add each as a contact and mark one as the primary. New quotes and jobs then reach the right person by default. You add contacts after the customer exists, so create the customer first. See Managing Customer Sites and Contacts.
Notes (Optional)
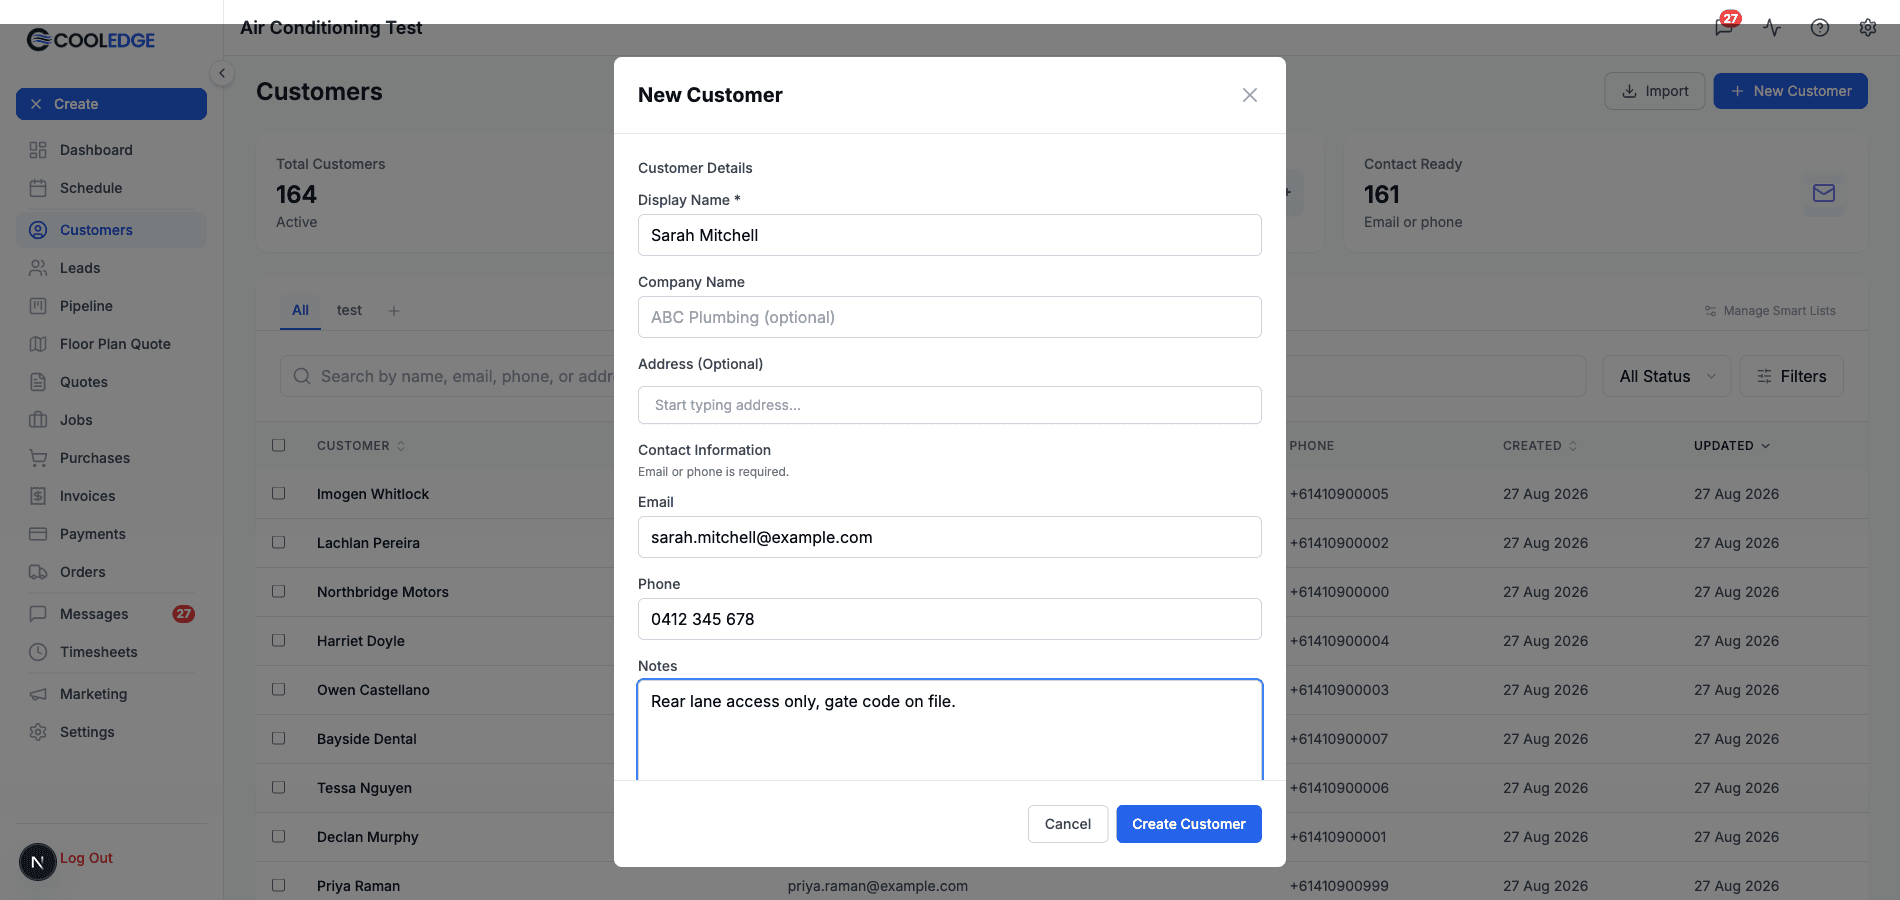
Internal notes only you and your team see. Useful for:
- "Difficult access - narrow driveway"
- "Prefers email communication"
- "Previous customer from 2019 - good experience"
- "Referred by ABC Company"
Don't put sensitive info here. Keep it professional.
Adding a Site Address
Sites are the physical locations where work happens. Most customers have one site (their home/business), but some have multiple.
During Customer Creation
When creating a customer, you can add their first address immediately:
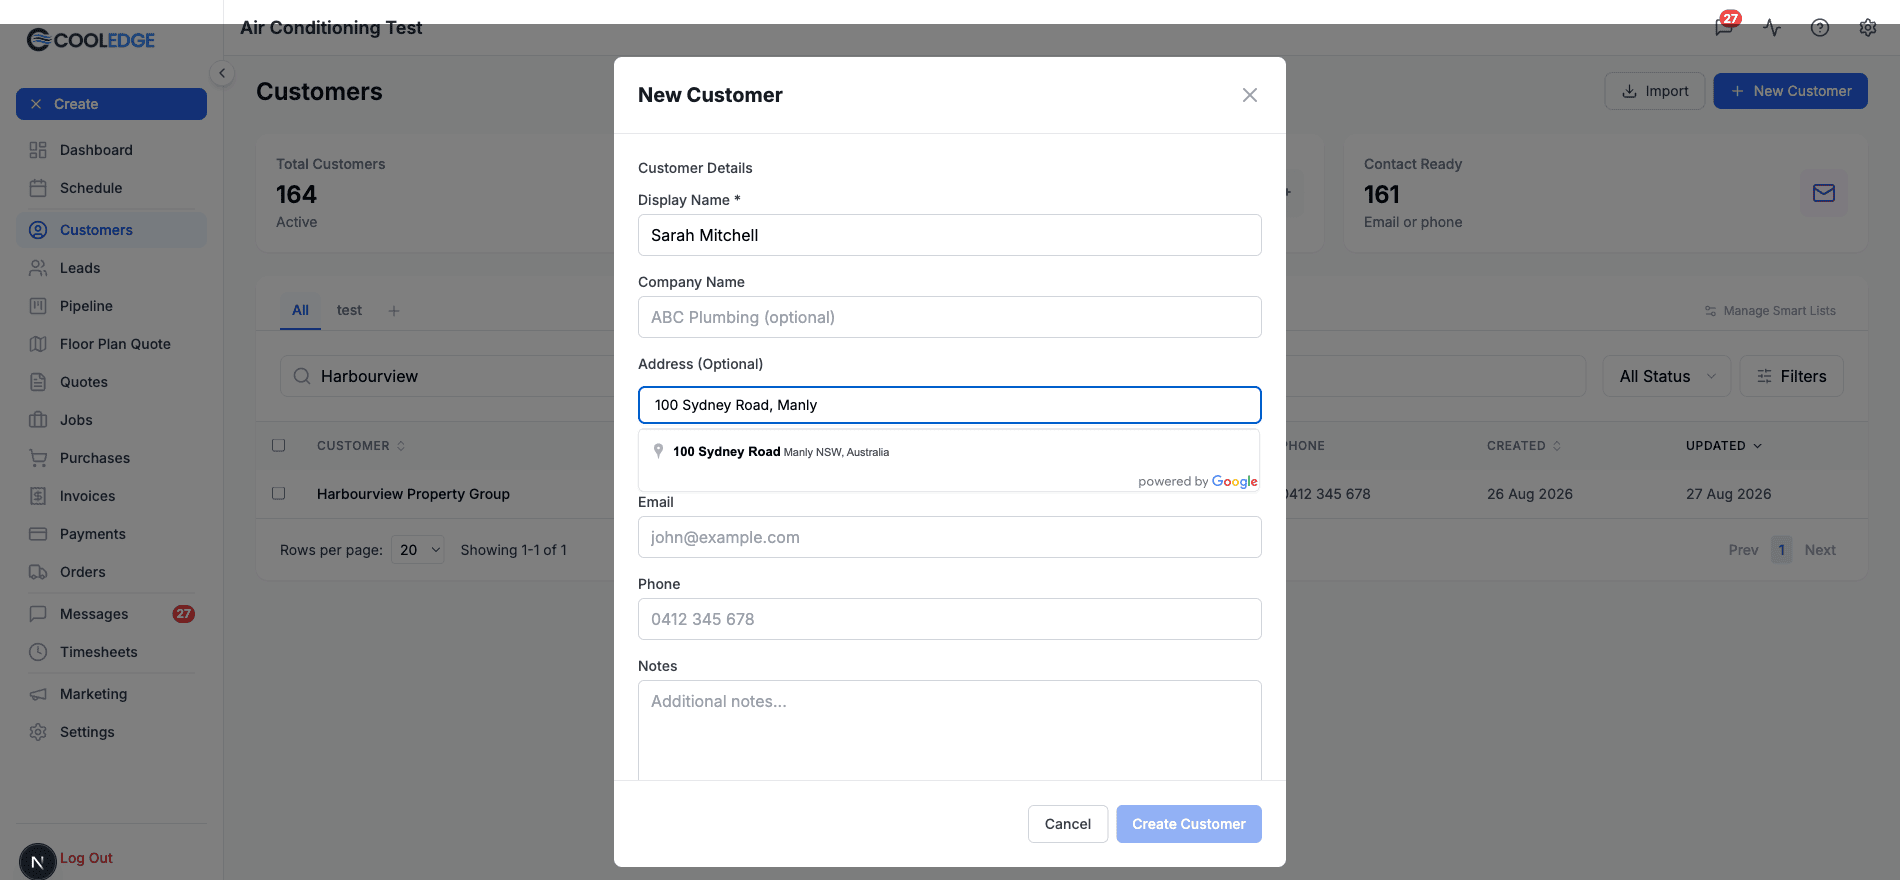
- In the customer form, find the Address (Optional) field
- Start typing and pick the match from the dropdown
- Save customer
Wait for the suggestion to appear and select it rather than typing the whole address free-hand. Cooledge splits the street, suburb, state and postcode out of the match and geocodes it, which is what keeps the map link and routing accurate.
The site is created automatically with the customer, and because it is their first one it becomes the customer's main address: the one that shows at the top of their detail page and comes preselected on new quotes, jobs and invoices.
Skip the Address for Now
The address is optional, so if you don't have it yet:
- Leave the field blank
- Create the customer anyway
- Add the address later from their detail page
You can add as many more addresses as the customer needs after they exist and switch which one is the main address at any time. See Managing Customer Sites and Contacts.
Customer Sites Explained
Why separate sites?
- Commercial customers have multiple locations
- Customers own multiple properties
- Rental properties (landlord customers)
- Franchises with multiple branches
Each site has:
- Full address
- Optional label (e.g., "Main Office", "Warehouse", "Home")
- Geocoded location (for maps and routing)
When creating jobs, you select which site the work is for.
See Managing Customer Sites and Contacts for adding more sites later.
After Creating a Customer
Once saved, the customer:
- Appears in customer list and search
- Gets a unique customer ID
- Can be selected for quotes, jobs and invoices
- Has a detail page showing all their history
Next steps:
- Create a quote or job for them
- Add additional sites if needed
- Add contact people if needed
Creating Customers from Leads
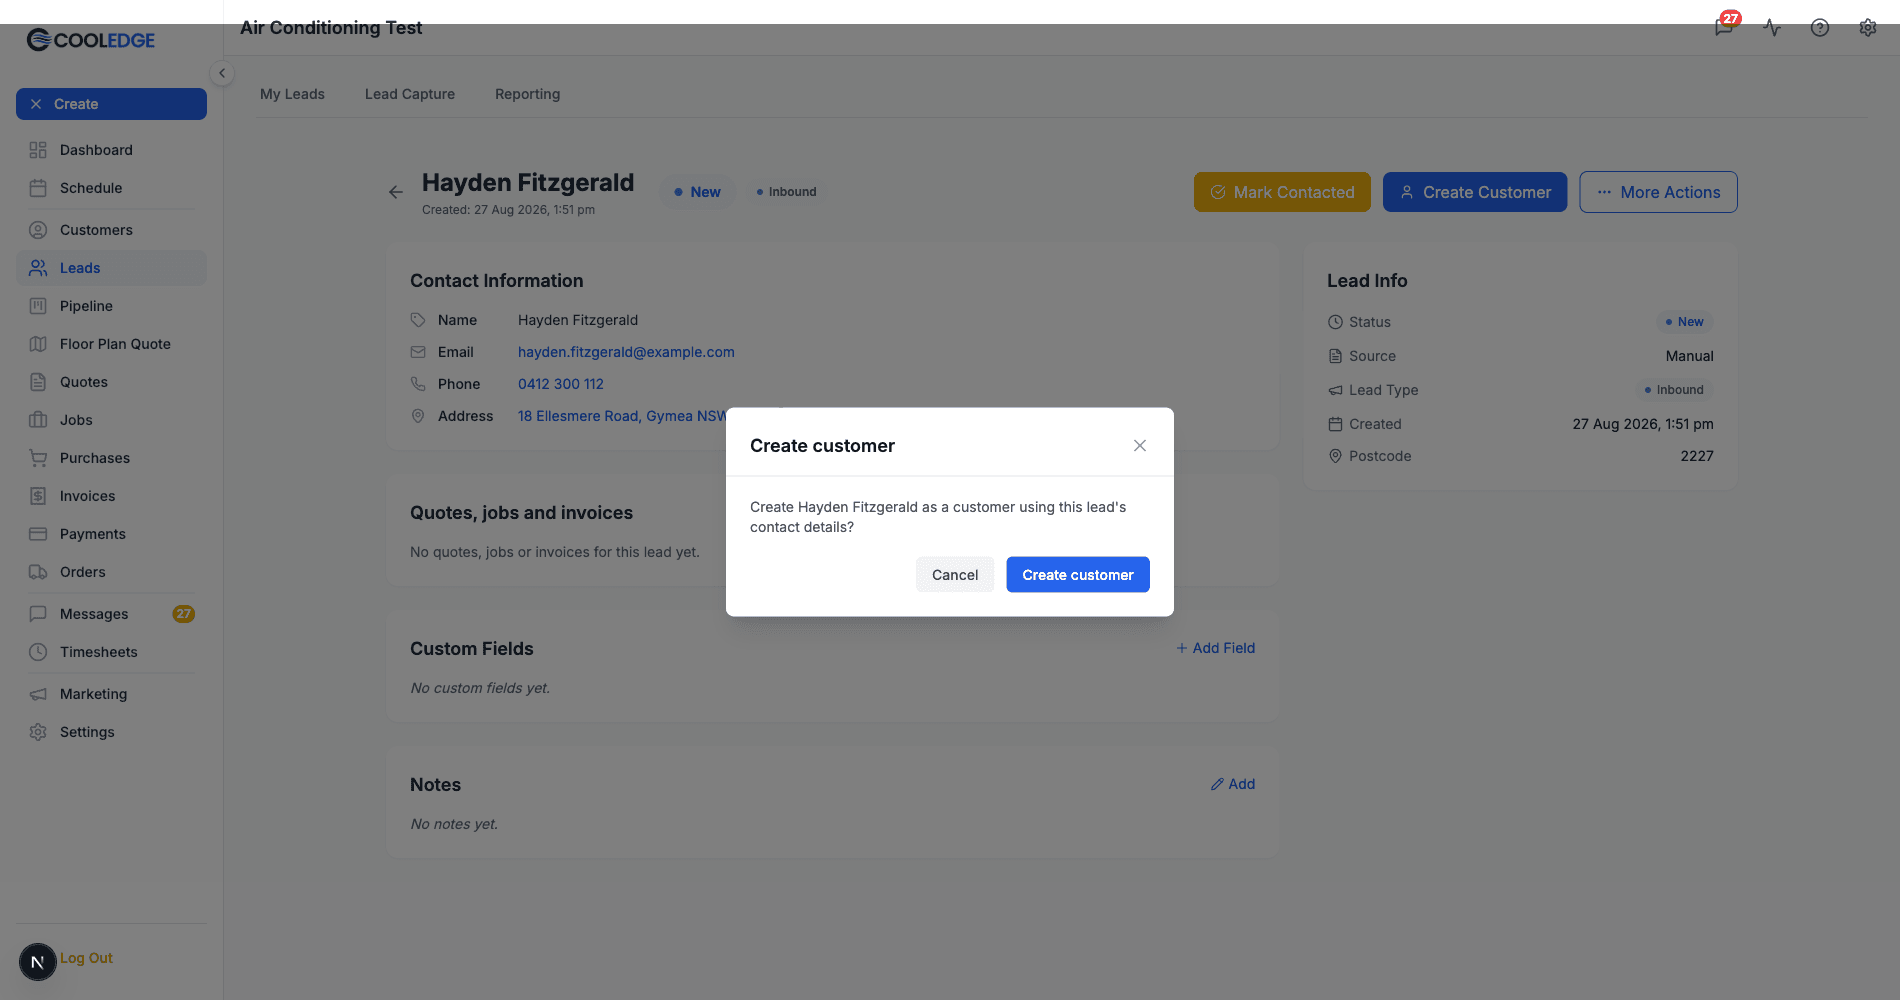
A lead isn't a customer yet. Turning one into a customer takes a single click, and there's no form to fill in:
- Go to the Leads page and open the lead
- Click Create Customer
- Confirm the prompt
Cooledge builds the customer from the lead's own details: name, email, phone and, if the lead came with an address, a first site. Nothing is retyped and nothing is lost.
Once the lead is linked to a customer, Create Quote and Create Job replace the Create Customer button, so the next step is right there. If the lead's details match a customer you already have, Cooledge links to that one instead of making a duplicate.
Avoiding Duplicates
Cooledge checks as you type, everywhere you can create a customer: the New Customer form, the quick form inside a quote or job and the same forms in the mobile app. Once the email or phone you enter belongs to a customer you already have, a warning appears under the contact fields naming that customer, with their email, phone and main address so you can tell whether it's the same person.
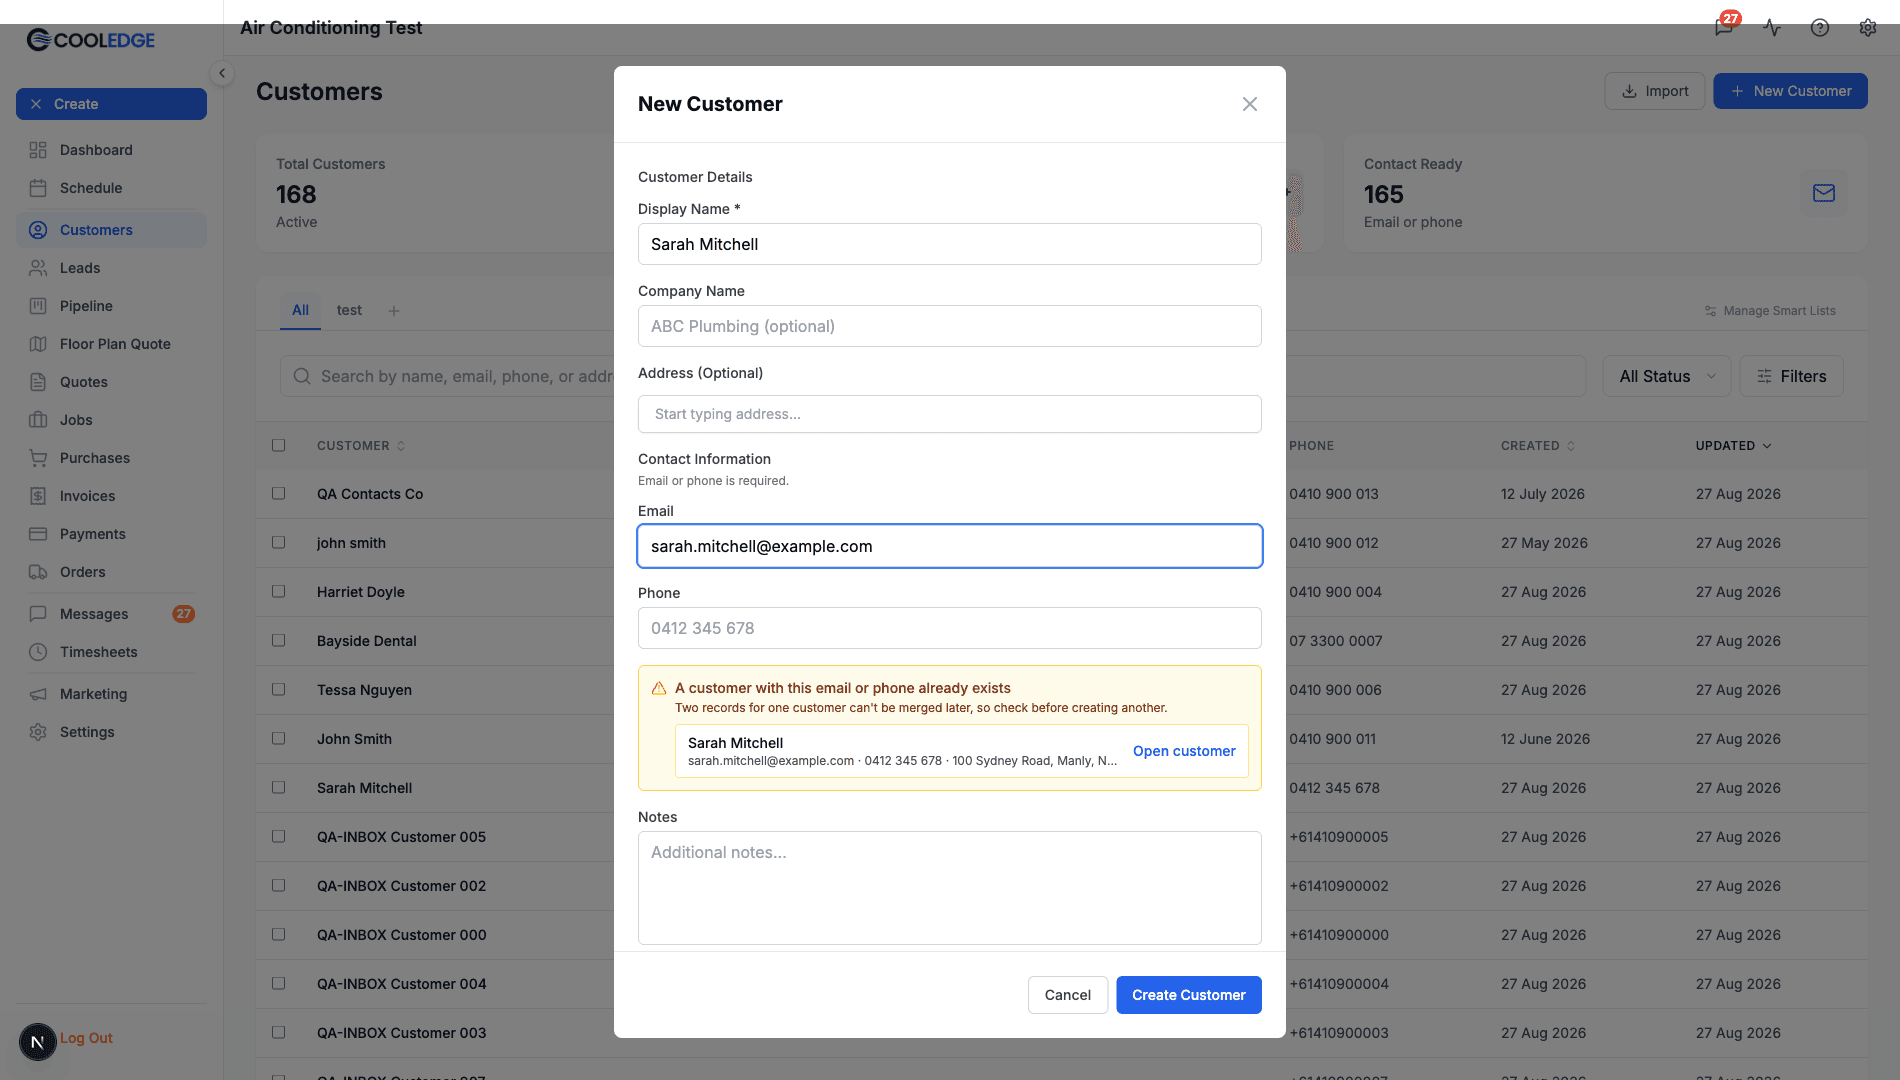
- The link on each match picks the existing record instead of creating another. It reads Open customer on the New Customer form, Use this customer on a quote or job and Assign to this customer when you're assigning a message
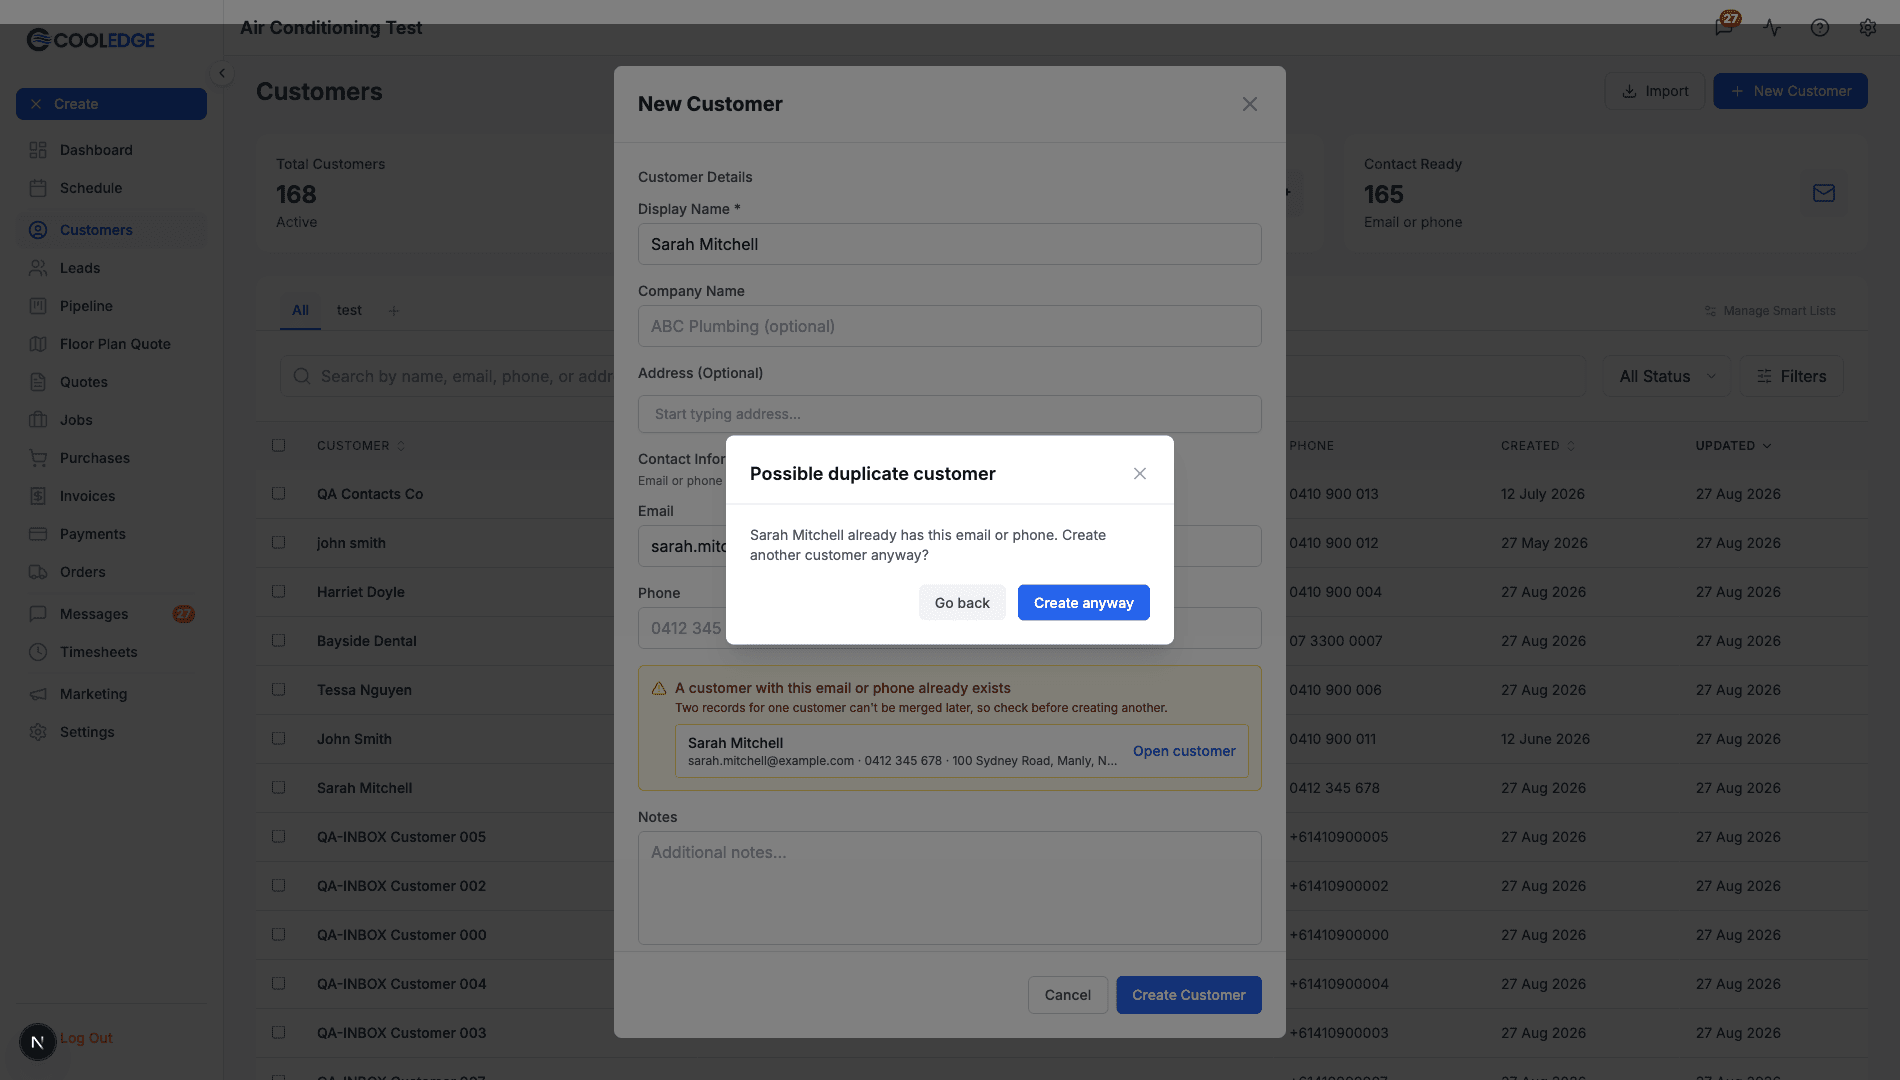
- If it really is a different person on a shared number, such as two tenants of one landlord, click Create Customer anyway. Cooledge asks once to confirm, then creates the record
The check matches on email and phone, not on name, so two "John Smith" records with different numbers won't trigger it. That's deliberate, because plenty of customers share a name. It does mean the one habit worth keeping is searching by phone or email before you type a new name. See Finding and Searching Customers for how to search well.
Two records can't be merged afterwards, which is why the warning is worth reading. If you do end up with a duplicate, the cleanup is manual: keep the record with the most history, move new work onto it and archive the other from More Actions → Archive Customer.
The one place Cooledge dedupes silently is leads: converting a lead whose email or phone already belongs to a customer links to that customer rather than creating a second one.
Quick vs Full Customer Forms
Quick Form (During Quote/Job Creation)
Fields shown:
- Display Name
- Company Name
- Phone
- Address
Use when:
- You're creating a quote or job and the customer isn't in Cooledge yet
- You're in the field on mobile
- It's time-sensitive
You can add the rest later.
Full Form (Customers Page)
The same fields plus Notes, so you can record access issues or preferences while you're thinking of them.
Use when:
- You're onboarding a customer properly
- You have their complete information
- You're setting up a commercial account
Everything else a customer can have (extra addresses, contact people, tags, custom fields) is added from their detail page after they exist, whichever form created them.
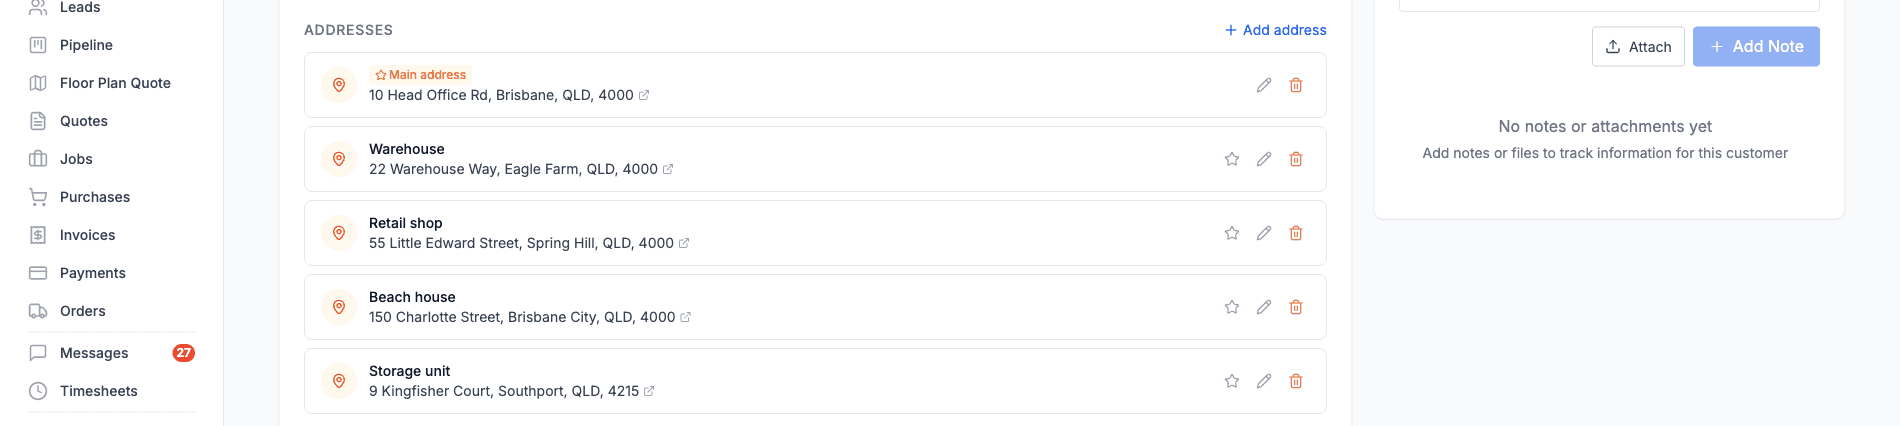
Multiple Sites for One Customer
Some customers need multiple site addresses:
Examples:
- Landlord with 5 rental properties
- Business with head office + 3 branches
- Developer managing multiple construction sites
How it works:
- Create the customer once
- Add the first address during creation
- Open their detail page
- Click + Add address to add more
- Label each one: "Head Office", "Warehouse", "Beach house" and so on
The first address becomes their main address. On new quotes, jobs and invoices a Site address picker appears, preset to the main one, so you choose which address the work is for.
Best Practices
Search before creating Always search by phone, email or name before creating. Duplicates cause confusion and data fragmentation.
Use full names "John" isn't enough. Use "John Smith" or "John - 45 George St" to avoid confusion with other Johns.
Verify contact details Double-check email addresses especially. One typo means they won't get invoices or quotes.
Add addresses carefully Wrong addresses delay work. Verify suburb and postcode match. Geocoding won't work if address is incorrect.
Use consistent formatting Pick a name format (First Last vs Last, First) and stick with it. Consistency makes searching easier.
Add notes for special cases If a customer has specific needs, access issues or preferences, note them immediately. Future-you will thank present-you.
Common Scenarios
Scenario 1: Homeowner Customer
Info you have:
- Name: Sarah Johnson
- Phone: 0412 345 678
- Email: sarah.j@email.com
- Address: 123 Main St, Suburb, NSW 2000
Create:
- Display Name: Sarah Johnson
- Default Phone: 0412 345 678
- Default Email: sarah.j@email.com
- Add site: 123 Main St...
Simple, one site, one contact person.
Scenario 2: Business Customer
Info you have:
- Business: ABC Manufacturing
- Company Name: ABC Manufacturing PTY LTD
- Contact: Mike Brown (Manager)
- Phone: (02) 9876 5432
- Email: mike@abcmfg.com.au
- Address: Unit 5, 789 Industrial Ave...
Create:
- Display Name: ABC Manufacturing
- Company Name: ABC Manufacturing PTY LTD
- Default Phone: (02) 9876 5432
- Default Email: mike@abcmfg.com.au
- Add site: Unit 5, 789 Industrial Ave...
- After creation: Add Mike as a contact person
Scenario 3: Property Manager/Landlord
Info you have:
- Name: Property Management Co
- They manage 20+ properties
- Each property is a different job site
Create:
- Display Name: Property Management Co
- Default contact: office@propmgmt.com.au
- Add one site initially (head office or first property)
- Add more sites as you win jobs at different properties
- Each job selects the specific site address
Common Questions
What if I don't have their email? Leave it blank and enter a phone number instead. You need one or the other, not both. Add the email later when you get it.
Can I change customer details after creating? Yes. Go to customer detail page and click "Edit". You can update anything except the customer ID.
What if they move? Don't edit the existing site address (historical jobs need it). Add a new site with the new address. Mark old site as inactive if you want.
Do I need a company name for individual customers? No. Company name is for businesses. Individuals can leave it blank.
How do I delete a customer? You don't. Customers are linked to quotes, jobs and invoices, so deleting one would tear holes in your records. Open the customer and use More Actions → Archive Customer to take them out of the way instead. Archiving is reversible from the same menu.
What Happens When You Edit Customer Details
When you update a customer's name, address or contact details, it's important to understand what changes and what doesn't.
Editing from Customer Details Page
If you edit a customer from the main Customers page:
- ✅ Customer record updates
- ✅ Future quotes, jobs and invoices use the new details
- ❌ Past invoices and quotes stay as they were
Why? Historical records need to match what was actually sent to the customer at that time. If you sent an invoice to "123 Main St" last year, and they've since moved to "456 Oak Ave", that old invoice should still show the old address for accuracy.
Editing from a Job
If you edit a customer while viewing a job:
- ✅ Customer record updates
- ✅ The job's customer details update
- ✅ Any unsent invoices for that job update
- ❌ Already-sent invoices stay as they were
Use this when: The customer's details changed and the job is still active. For example, they moved during the project, or you had the wrong phone number.
Editing from an Invoice or Quote
For standalone invoices (not linked to a job):
- If you edit the customer while creating the invoice, it updates the customer record
- When you send the invoice, it uses the latest customer details
- You're in control of what information gets sent
For job invoices:
- Job invoices always use the customer details from the job (not the customer record)
- If you see a warning about customer details changing, you need to edit the customer from the job page instead
- This keeps all invoices for that job consistent with the job's customer details
Use this when: You need to correct wrong information on a specific standalone invoice or ensure a job's customer details are accurate.
What's Preserved
These are "locked in" and won't change even if you update the customer:
- Sent invoices (customer name, address on invoice stays the same)
- Accepted/Paid quotes (what was quoted stays intact)
- Completed jobs (historical record preserved)
These DO update when you edit:
- Draft/unsent invoices and quotes
- Active jobs and their unsent invoices
- New records created in the future
In simple terms: Once money changes hands or documents are sent, customer details are frozen for that record. This protects historical accuracy.
Related Articles
- Finding and Searching Customers - Avoid duplicates, search effectively
- Managing Customer Sites and Contacts - Add more sites and contact people
- Creating and Managing Jobs - Set up work for customers
Was this article helpful?
Let us know if you found this information useful.
Still need help? Contact support
In this article
Use your browser's search (Ctrl+F) to quickly find specific topics within this article.
Browse all help articles →