Job Forms
Build custom forms, fill and sign them on the job and send branded PDFs to your customers
Job Forms
Sign-off sheets, safety checklists and service reports without the paper.
- Build any form with the drag-and-drop builder, or start from a ready-made template
- Fill forms on the job from the mobile app or the portal
- Capture photos and signatures right on the screen
- Completing a form saves a branded PDF to the job automatically
- Email the PDF to your customer or attach it to the invoice
Job Forms replaces the paperwork that lives around a job — the completion sign-off the customer signs, the safety checklist your tech runs through, the service report you promised to send. Build the form once, fill and sign it on the job and a clean PDF with your logo lands on the job record automatically.
Job Forms is available on Growth and Scale plans.
What You Need
- A Growth or Scale plan — check your plan in Settings → Billing
- Owner or admin access to build and edit form templates (anyone on the team can fill forms in)
- The Cooledge mobile app if your techs will fill forms in the field
Setting Up Your Templates
Start from a ready-made template
Cooledge comes with five starter templates covering the paperwork most trades run every day:
- Job Completion Sign-off — customer confirms the work is done and signs
- Service Report — what was found, what was done and what's recommended
- Site Inspection Report — condition and observations before or after work
- JSA / SWMS — a simple job safety analysis checklist
- Maintenance Checklist — recurring service items to tick off
Starters live under their own Starter templates heading in Settings, below your business's forms. You can fill them in on a job as they are, or press Clone to make your own copy and change whatever you like — rename it, add fields, remove fields, reword the declaration. Once you've made your own version (or a starter just isn't relevant to your trade), press Hide and it drops out of the job form picker — Unhide brings it back any time.
Build your own from scratch
Go to Settings → Job Forms and click New form. The builder has three parts:
- Field library (left) — the building blocks. Click a field type to add it, or drag it straight onto the canvas exactly where you want it.
- Form canvas (middle) — a live preview of your form, organised into sections. Drag fields and sections to reorder them (a blue line shows where the drop will land), and use Add section to group related fields under a heading.
- Field settings (right) — click any field on the canvas to change its label, make it required, add help text and more.
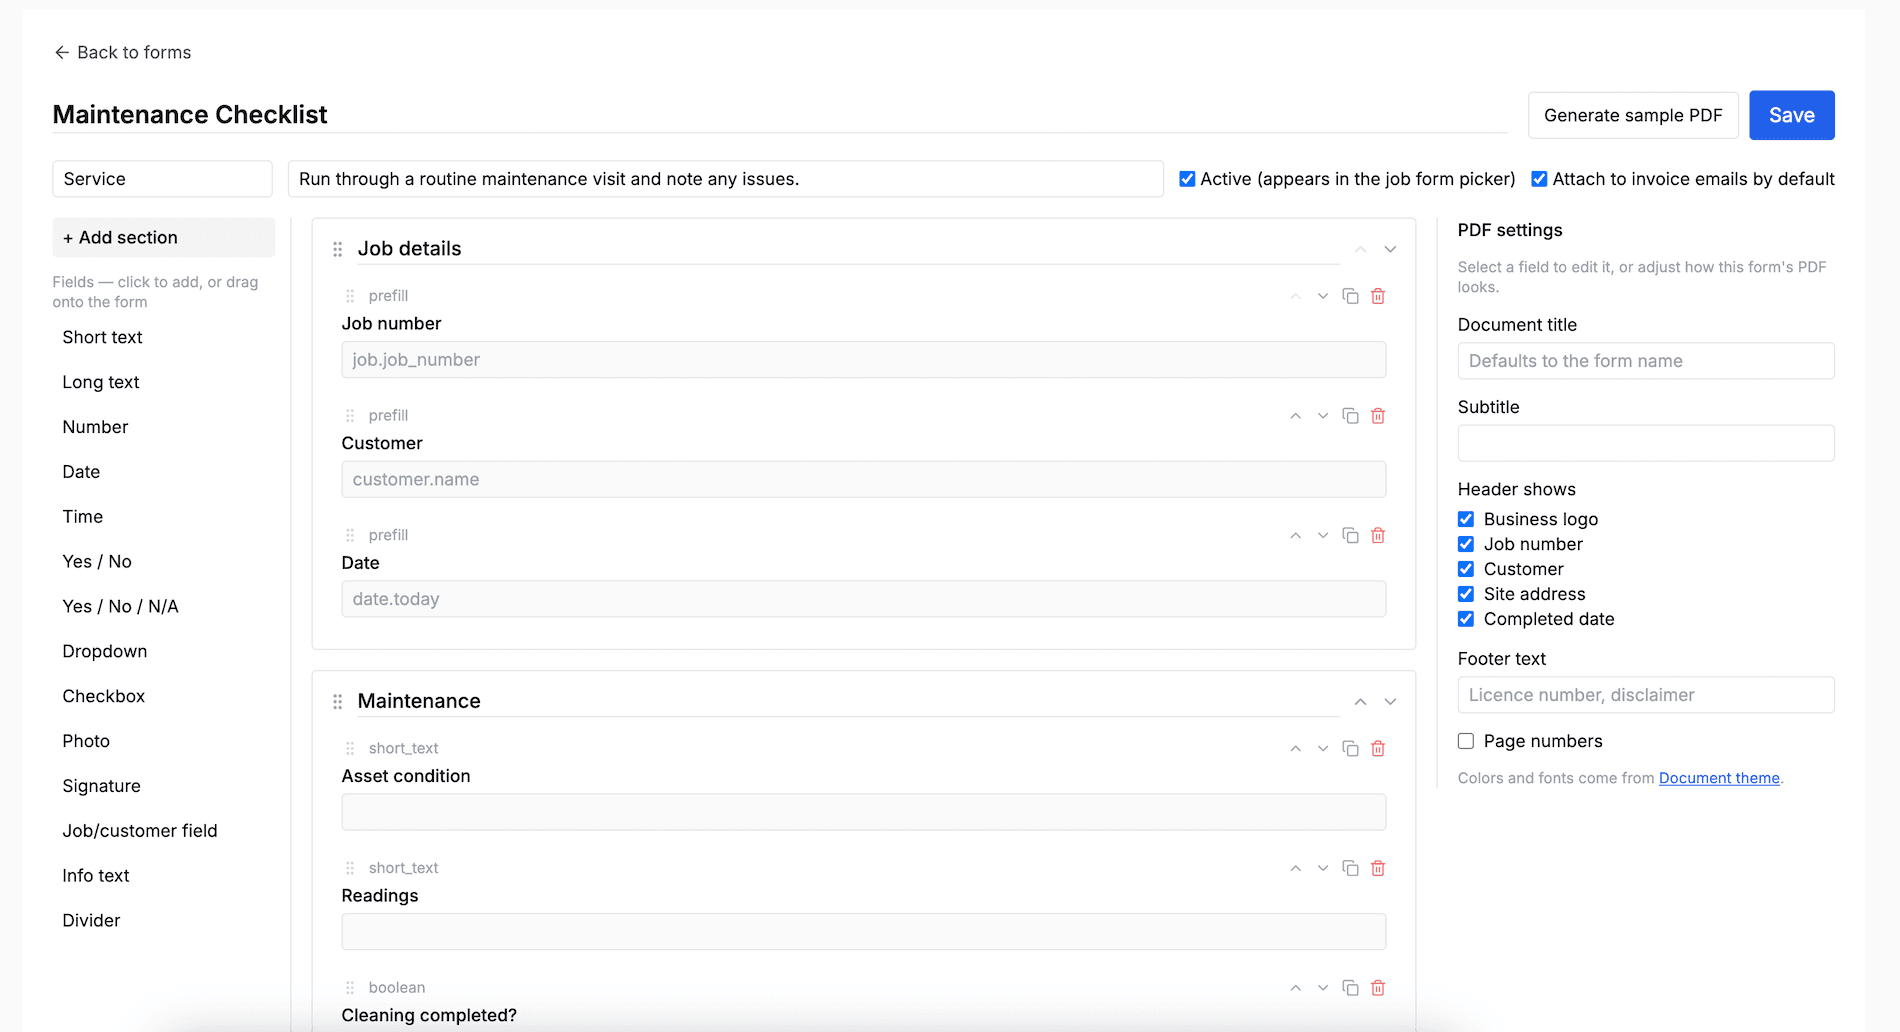
The field types cover everything a paper form does: short and long text, numbers, dates, times, Yes/No, Yes/No/N/A, dropdowns, checkboxes, photos, signatures, instruction text, dividers and pre-filled job details (job number, customer name, site address and more — these fill themselves in from the job, so nobody retypes them). Most fields can also be set to half width, so short answers sit two to a row on the form and the PDF.
A few field settings worth knowing:
- Required — the form can't be completed until this field is filled in. Drafts save freely either way.
- Internal only — the answer is kept on the job record but left off the customer's PDF and email. Handy for tech notes.
- Photo fields — set a minimum or maximum number of photos and choose whether they appear on the PDF.
- Signature fields — choose the role (customer or technician), whether it's required and an optional declaration line, for example "I confirm the work was completed to my satisfaction." Each signature records the signer's typed name and the date and time.
Template settings
At the top of the builder you can set the template's name, description and category, and switch it between active and inactive. There's also one setting that matters later: attach to invoice emails by default. When it's on, completed forms from this template come pre-ticked whenever you email an invoice for that job.
With no field selected, the right panel shows the PDF settings for this form: a custom document title and subtitle, which details appear in the header (logo, job number, customer, site address, completed date), footer text like a licence number and page numbers. Colours and fonts come from your Document theme, so form PDFs match your quotes and invoices.
Preview the PDF
The canvas already shows the form exactly as your techs will see it. To check the finished customer document, click Generate sample PDF — it renders the real branded PDF with placeholder answers filled in.
Filling In a Form on a Job
- In the portal: open the job and go to the Forms tab, then click Add form and pick a template.
- On the mobile app: open the job, scroll to the Forms section and tap +.
Job details like the job number, customer and site address are already filled in when the form opens. Work through the fields in any order — the form saves as a draft as you go, so it's fine to start on-site and finish later.
Photos and signatures
Photo fields let you take a photo on the spot or choose one from the library. Signature fields show the declaration (if the template has one) — on mobile, tap Tap to sign and a full-screen signing pad opens: hand the phone to the customer, they sign with their finger, type their name and save. The saved signature then shows right in the form, and Re-sign or Clear are there if it needs redoing.
Fields marked internal-only are labelled in the form so everyone knows those answers stay off the customer's copy.
Completing a Form
When the form is done, tap Complete. Cooledge checks that every required field and signature is filled in — if anything's missing, it highlights exactly what's needed.
Once it completes:
- A branded PDF is generated with your logo and business details
- The PDF is saved to the job's attachments and a note is added to the job timeline
- The form locks — a signed document can't be quietly edited afterwards
Sending the PDF
Email it to the customer. From the completed form, tap Email to customer and the PDF goes out straight away. It goes to the job's linked contact person when there is one, otherwise to the customer's saved email. The send is logged against the job like every other email.
Attach it to the invoice. When you email an invoice, the send window lists the job's completed forms with tick boxes. Templates set to attach by default come pre-ticked, and a Signed forms only toggle filters the list to forms with signatures. The signed sign-off arriving with the bill answers "was the work done properly" before it gets asked.
Fixing a Mistake
Completed forms are locked, so corrections work like this: open the form and choose Void and recreate. The original stays on the job as a voided record and a fresh editable copy is created with all the answers carried across — fix what's wrong, get it signed again and complete it.
FAQs
Can I edit a form after it's completed? No — completed forms are locked so signed documents stay trustworthy. Use Void and recreate to issue a corrected version.
Who can build templates? Owners and admins manage templates. Everyone on the team can fill in and complete forms on their jobs.
Do my techs need the portal? No. The whole fill-and-sign flow works in the Cooledge mobile app. Building templates happens in the portal.
Can I keep some answers off the customer's PDF? Yes — mark the field as internal only. The answer stays on the job record for your team.
What happens if I edit a template later? Only new forms use the updated version. Forms already filled in or completed keep the exact layout they were created with.
Was this article helpful?
Let us know if you found this information useful.
Still need help? Contact support
In this article
Use your browser's search (Ctrl+F) to quickly find specific topics within this article.
Browse all help articles →Related Articles
Creating and Managing Jobs
Set up customer jobs, edit details and manage the entire job lifecycle
Job Categories
Organise your jobs with custom categories for filtering, reporting, and automation
Putting Jobs on Hold
Pause jobs with a reason, set an automatic release date, and manage hold reasons from settings